
Tạo Login và Register trong ASP.Core 2.1 , ASP.NET Core đã hổ trợ cho mình, mình chỉ việc chỉnh sửa và cài đặt và sử dụng nó thôi, trong bài này mình sẽ chỉ mọi người cách tạo nó như thế nào? đồng thời mình sẽ Design Customization nó như thế nào?
Đầu tiền cũng là bước chuẩn bị tốt nhất cho một dự án đó là như sau:
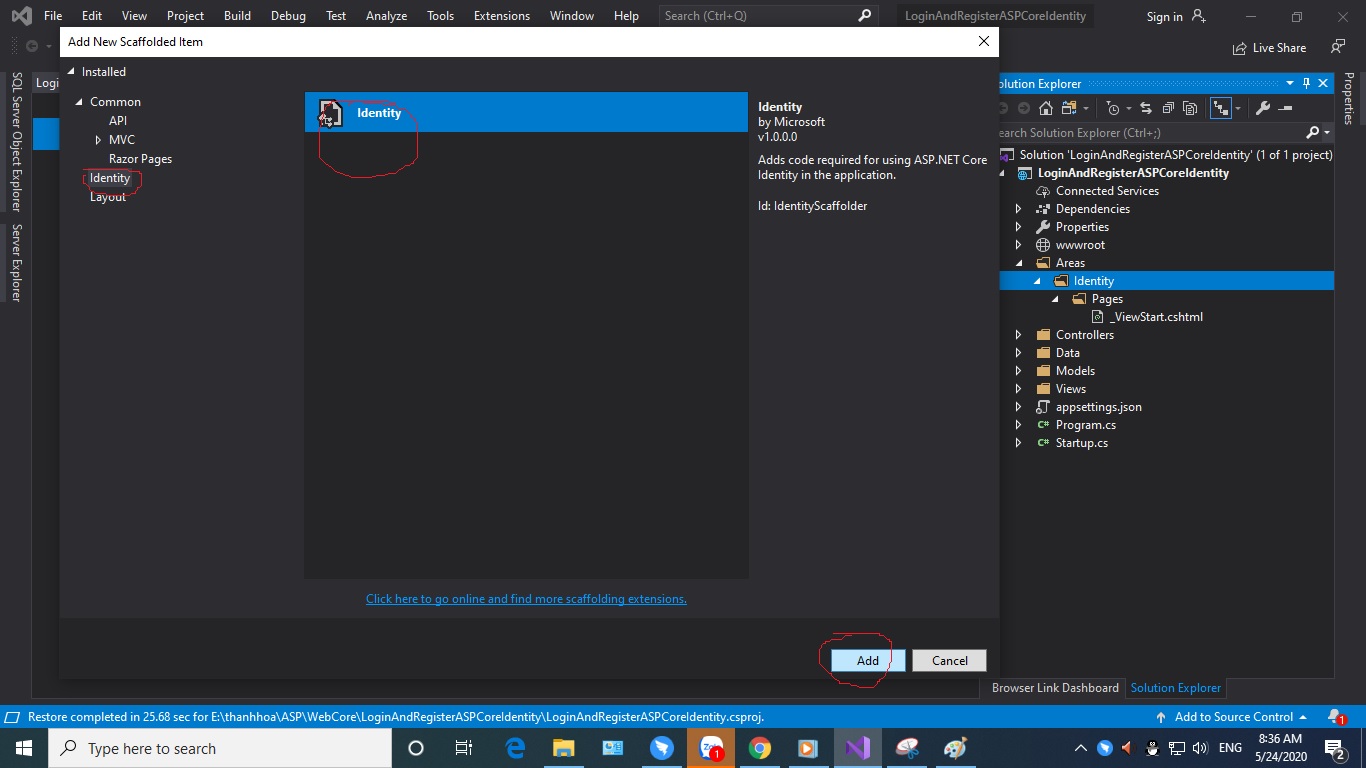
# Create Project ASP.NET Core 2.1
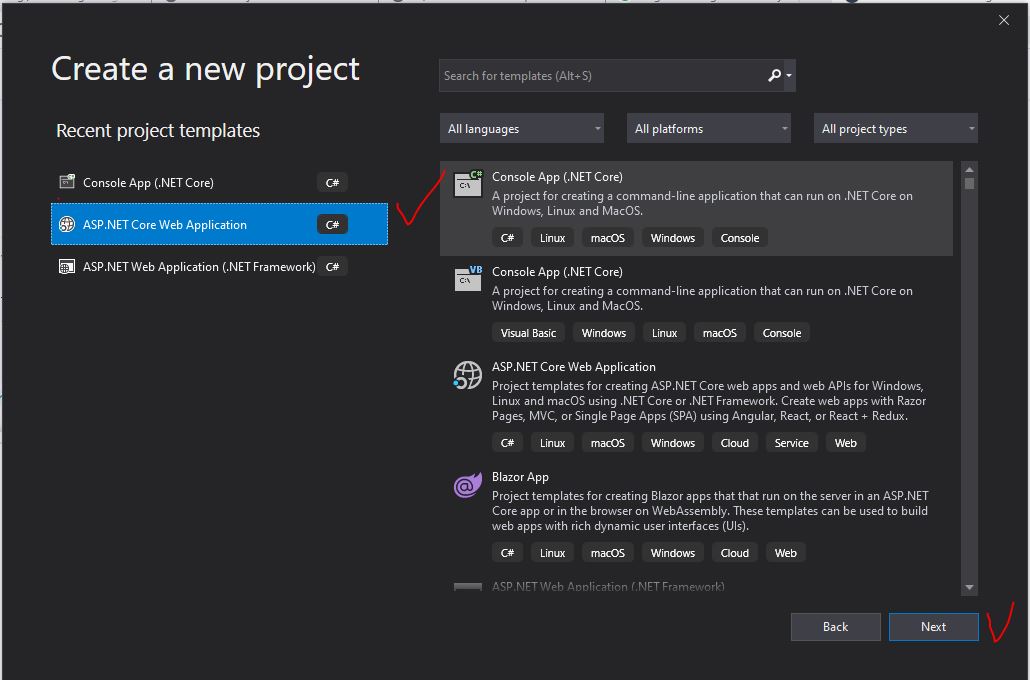
Bước 1: Trong Visual Studio 2019, Bạn chọn File->New, chọn Project
Bước 2: Chọn Create a new project
Bước 3: Chọn ASP.NET Core Web Application template
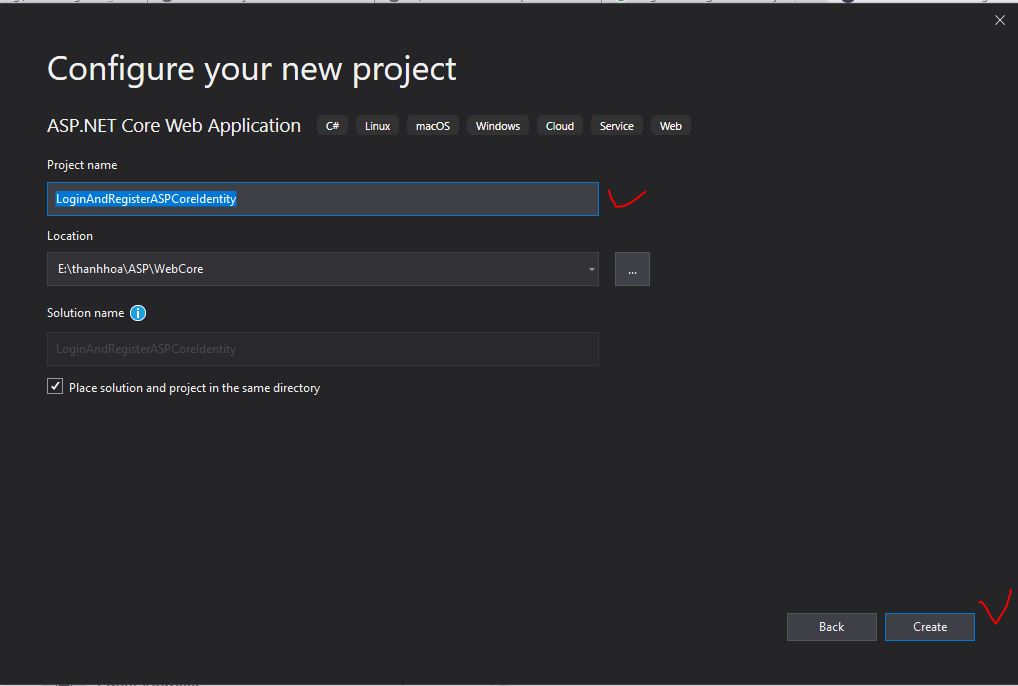
Bước 4: Đặt tên Project, chọn Create.
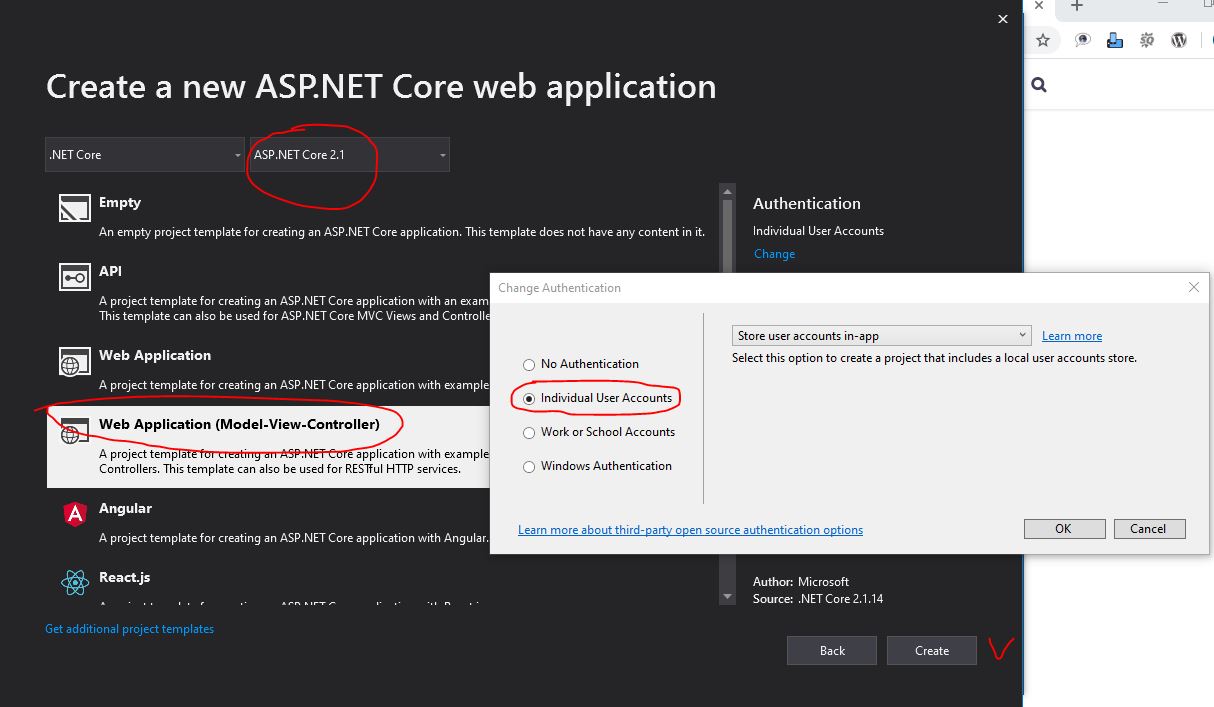
Bước 5: Select .NET Core, ASP.NET Core 2.1, Chọn Web Application (Model-View-Controller), check đến Authentication và chọn Individual User Account sao đó Create
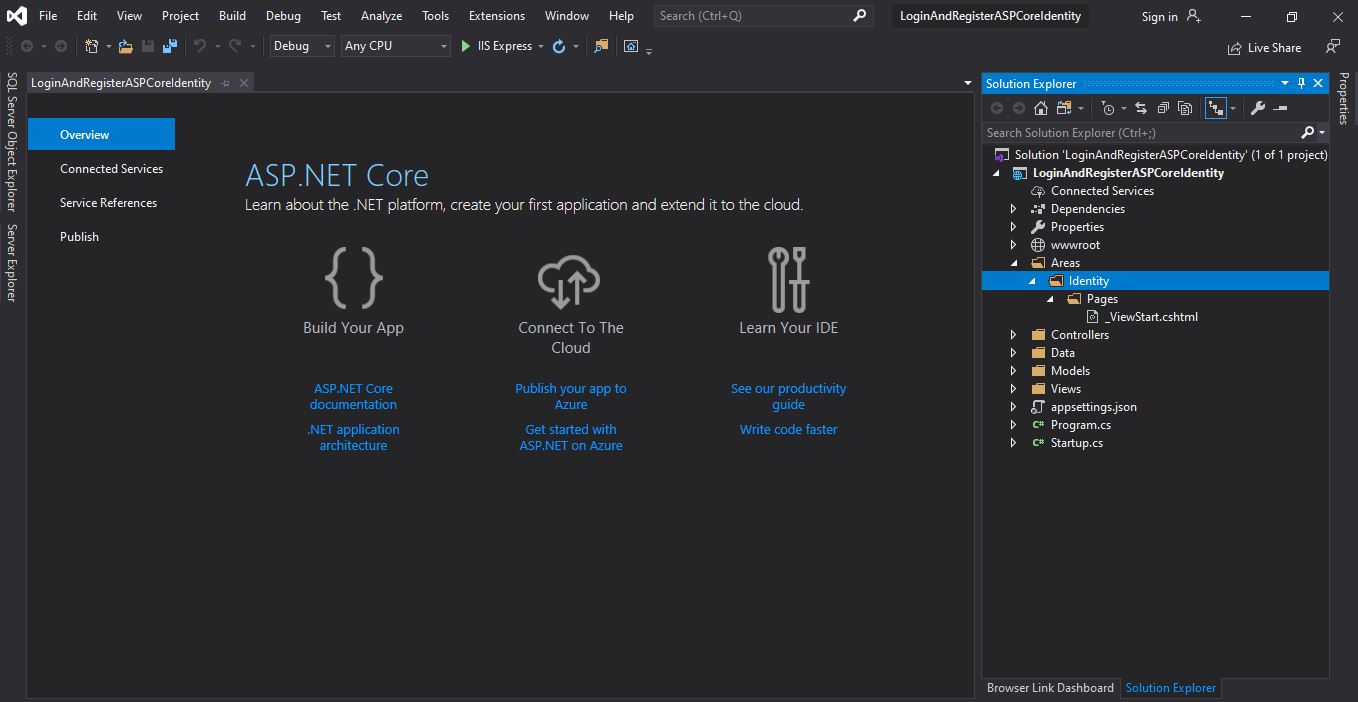

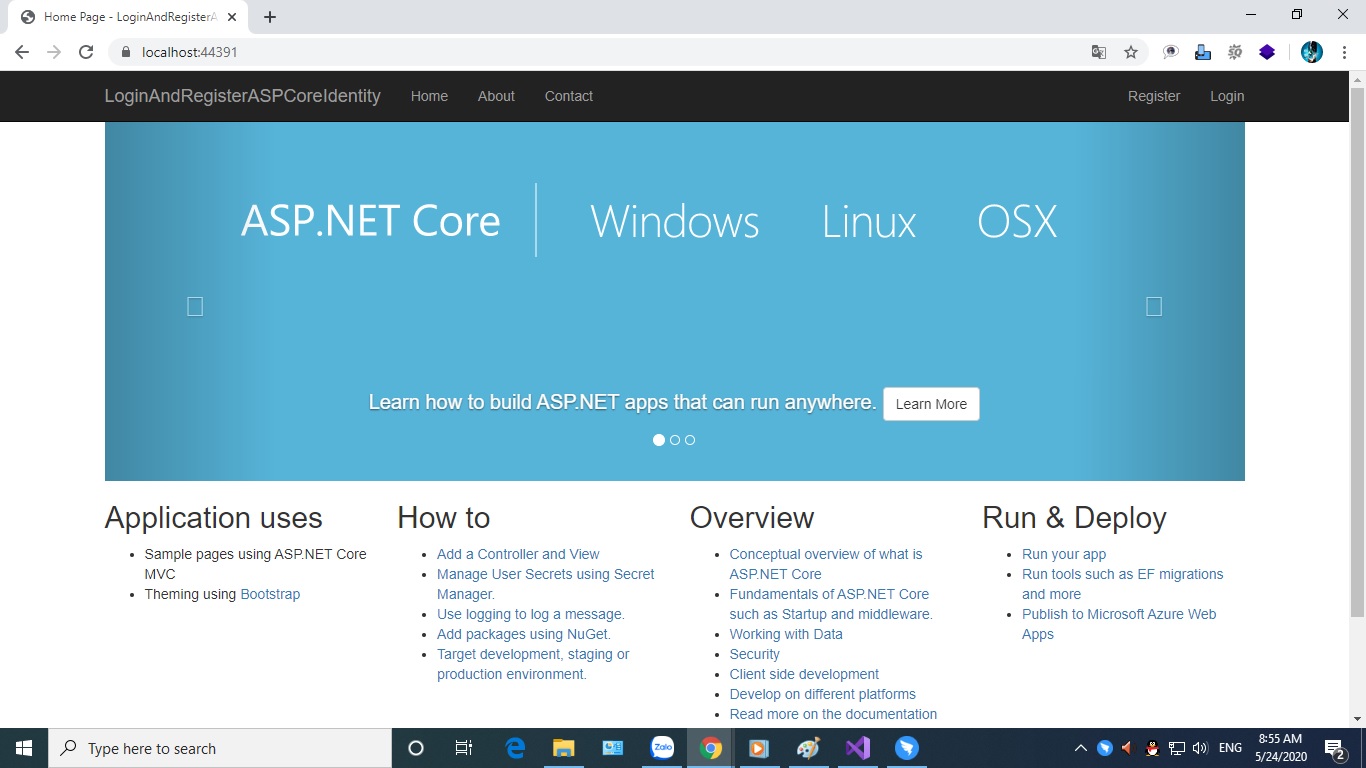
Sau khi tạo xong bạn sẽ được một thư mục Project có sẵn các file thiết kế mà ASP.NET CORE 2.1 đã cung cấp cho ta sẵn, giờ ta thử Run project xem nó hoạt động chưa đã
Sau khi hoạt động thành công! thì ta tiến hành như sau
Mở file appsettings.json lên chỉnh sửa name Database cho dễ nhớ nhé
{
  "ConnectionStrings": {
    "DefaultConnection": "Server=(localdb)\\mssqllocaldb;Database=aspnet-LoginAndRegisterASPCoreIdentity;Trusted_Connection=True;MultipleActiveResultSets=true"
  },
  "Logging": {
    "LogLevel": {
      "Default": "Warning"
    }
  },
  "AllowedHosts": "*"
}
Bạn thấy rằng, giao diện Register.cshtml chỉ cho ta cung cấp (Email,Password) và hệ thống nó lấy Email làm tên đại diện cho ta khi ta Login hệ thống, giờ đây ta muốn thêm (FullName, BirthDay) vào Register.cshtml để cho người dùng đăng ký
Đầu tiên vào thực mục Data trong Project: LoginAndRegisterASPCoreIdentity/Data , Create WebAppUser.cs , ta cần using Microsoft.AspNetCore.Identity để sử dụng được Identity
using System;
using System.Collections.Generic;
using System.Linq;
using System.Threading.Tasks;
using Microsoft.AspNetCore.Identity;
namespace LoginAndRegisterASPCoreIdentity.Data
{
    public class WebAppUser : IdentityUser
    {
        [PersonalData]
        public string FullName { get; set; }
        [PersonalData]
        public DateTime BirthDay { get; set; }
    }
}
Đoạn code trên ta thừa kế từ lớp IdentityUser và cài đặt thêm các thuộc tính như (FullName,BirthDay) vào lớp IdentityUser
Tiếp theo để class WebAppUser.cs được hoạt động ta cần cài đặt nó trong class ApplicationDbContext.cs, giờ ta hãy vào Data/ApplicationDbContext.cs và mở file lên cài đặt nó như sau:
using System;
using System.Collections.Generic;
using System.Text;
using Microsoft.AspNetCore.Identity.EntityFrameworkCore;
using Microsoft.EntityFrameworkCore;
using Microsoft.AspNetCore.Identity;
namespace LoginAndRegisterASPCoreIdentity.Data
{
    public class ApplicationDbContext : IdentityDbContext<WebAppUser>
    {
        public ApplicationDbContext(DbContextOptions<ApplicationDbContext> options)
            : base(options)
        {
        }

    }
}
Bạn chỉnh sửa lại như bên trên nhớ dùng using Microsoft.AspNetCore.Identity; để sử dụng Identity, sau khi chỉnh sửa xong, ta tiến hình cài đặt file Register.cshtml.cs
Ta hãy nhớ rằng giờ ta đang sử dụng WebAppUser.cs kế thừa từ IdentityUser.cs
Mở file Register.cshtml.cs trong thư mục Areas/Identity/Pages/Account/Register.cshtml.cs, bạn sẽ thấy file đang dùng IdentityUser nên ta hãy thay đổi IdentityUser thành WebAppUser
using LoginAndRegisterASPCoreIdentity.Data; vào file, sau đó đổi thấy cái nào IdentityUser đổi thành WebAppUser nhé
Tại InputModel bạn thêm vào như sau: cầu hình 2 thuộc tính mình vừa tạo ở WebAppUser.cs
[Required]
[DataType(DataType.Text)]
[Display(Name = "Họ và tên")]
public string FullName { get; set; }

[Required]
[Display(Name = "Ngày sinh")]
[DataType(DataType.Date)]
public DateTime BirthDay { get; set; }
Tại OnPostAsync() bạn cần chỉnh sửa lại như bên dưới đây, bạn cần thêm 2 thuộc tính vào phần thêm dữ liệu
var user = new IdentityUser { UserName = Input.Email, Email = Input.Email };

//Đổi thành:

var user = new WebAppUser
{
    FullName = Input.FullName,
    BirthDay = Input.BirthDay,
    UserName = Input.Email,
    Email = Input.Email
};
Fullcode file Register.cshtml.cs:
using LoginAndRegisterASPCoreIdentity.Data;
namespace LoginAndRegisterASPCoreIdentity.Areas.Identity.Pages.Account
{
    [AllowAnonymous]
    public class RegisterModel : PageModel
    {
        private readonly SignInManager<WebAppUser> _signInManager;
        private readonly UserManager<WebAppUser> _userManager;
        private readonly ILogger<RegisterModel> _logger;
        private readonly IEmailSender _emailSender;

        public RegisterModel(
            UserManager<WebAppUser> userManager,
            SignInManager<WebAppUser> signInManager,
            ILogger<RegisterModel> logger,
            IEmailSender emailSender)
        {
            _userManager = userManager;
            _signInManager = signInManager;
            _logger = logger;
            _emailSender = emailSender;
        }

        [BindProperty]
        public InputModel Input { get; set; }

        public string ReturnUrl { get; set; }

        public class InputModel
        {
            [Required]
            [DataType(DataType.Text)]
            [Display(Name = "Họ và tên")]
            public string FullName { get; set; }

            [Required]
            [Display(Name = "Ngày sinh")]
            [DataType(DataType.Date)]
            public DateTime BirthDay { get; set; }

            [Required]
            [EmailAddress]
            [Display(Name = "Email")]
            public string Email { get; set; }

            [Required]
            [StringLength(100, ErrorMessage = "The {0} must be at least {2} and at max {1} characters long.", MinimumLength = 6)]
            [DataType(DataType.Password)]
            [Display(Name = "Password")]
            public string Password { get; set; }

            [DataType(DataType.Password)]
            [Display(Name = "Confirm password")]
            [Compare("Password", ErrorMessage = "The password and confirmation password do not match.")]
            public string ConfirmPassword { get; set; }
        }

        public void OnGet(string returnUrl = null)
        {
            ReturnUrl = returnUrl;
        }

        public async Task<IActionResult> OnPostAsync(string returnUrl = null)
        {
            returnUrl = returnUrl ?? Url.Content("~/");
            if (ModelState.IsValid)
            {
                var user = new WebAppUser
                {
                    FullName = Input.FullName,
                    BirthDay = Input.BirthDay,
                    UserName = Input.Email,
                    Email = Input.Email
                };

                var result = await _userManager.CreateAsync(user, Input.Password);
                if (result.Succeeded)
                {
                    _logger.LogInformation("User created a new account with password.");

                    var code = await _userManager.GenerateEmailConfirmationTokenAsync(user);
                    var callbackUrl = Url.Page(
                        "/Account/ConfirmEmail",
                        pageHandler: null,
                        values: new { userId = user.Id, code = code },
                        protocol: Request.Scheme);

                    await _emailSender.SendEmailAsync(Input.Email, "Confirm your email",
                        $"Please confirm your account by <a href='{HtmlEncoder.Default.Encode(callbackUrl)}'>clicking here</a>.");

                    await _signInManager.SignInAsync(user, isPersistent: false);
                    return LocalRedirect(returnUrl);
                }
                foreach (var error in result.Errors)
                {
                    ModelState.AddModelError(string.Empty, error.Description);
                }
            }

            // If we got this far, something failed, redisplay form
            return Page();
        }
    }
}
Sau khi chỉnh file Register.cshtml.cs, giờ ta cần chỉnh giao diện đăng ký Register.cshtml
@page
@model RegisterModel
@{
    ViewData["Title"] = "Register";
}

<h2>@ViewData["Title"]</h2>

<div class="row">
    <div class="col-md-4">
        <form asp-route-returnUrl="@Model.ReturnUrl" method="post">
            <h4>Create a new account.</h4>
            <hr />
            <div asp-validation-summary="All" class="text-danger"></div>
            <div class="form-group">
                <label asp-for="Input.FullName"></label>
                <input asp-for="Input.FullName" class="form-control" />
                <span asp-validation-for="Input.FullName" class="text-danger"></span>
            </div>
            <div class="form-group">
                <label asp-for="Input.BirthDay"></label>
                <input asp-for="Input.BirthDay" class="form-control" />
                <span asp-validation-for="Input.BirthDay" class="text-danger"></span>
            </div>
            <div class="form-group">
                <label asp-for="Input.Email"></label>
                <input asp-for="Input.Email" class="form-control" />
                <span asp-validation-for="Input.Email" class="text-danger"></span>
            </div>
            <div class="form-group">
                <label asp-for="Input.Password"></label>
                <input asp-for="Input.Password" class="form-control" />
                <span asp-validation-for="Input.Password" class="text-danger"></span>
            </div>
            <div class="form-group">
                <label asp-for="Input.ConfirmPassword"></label>
                <input asp-for="Input.ConfirmPassword" class="form-control" />
                <span asp-validation-for="Input.ConfirmPassword" class="text-danger"></span>
            </div>
            <button type="submit" class="btn btn-default">Register</button>
        </form>
    </div>
</div>

@section Scripts {
    <partial name="_ValidationScriptsPartial" />
}
Ok vậy là ta cấu hình thêm 2 thuộc tính (FullName & BirthDay) vào chức năng Register, giờ ta thử chạy câu lệnh tạo dữ liệu database xem, nó có tạo 2 thuộc tính đó trong table AspNetUsers không
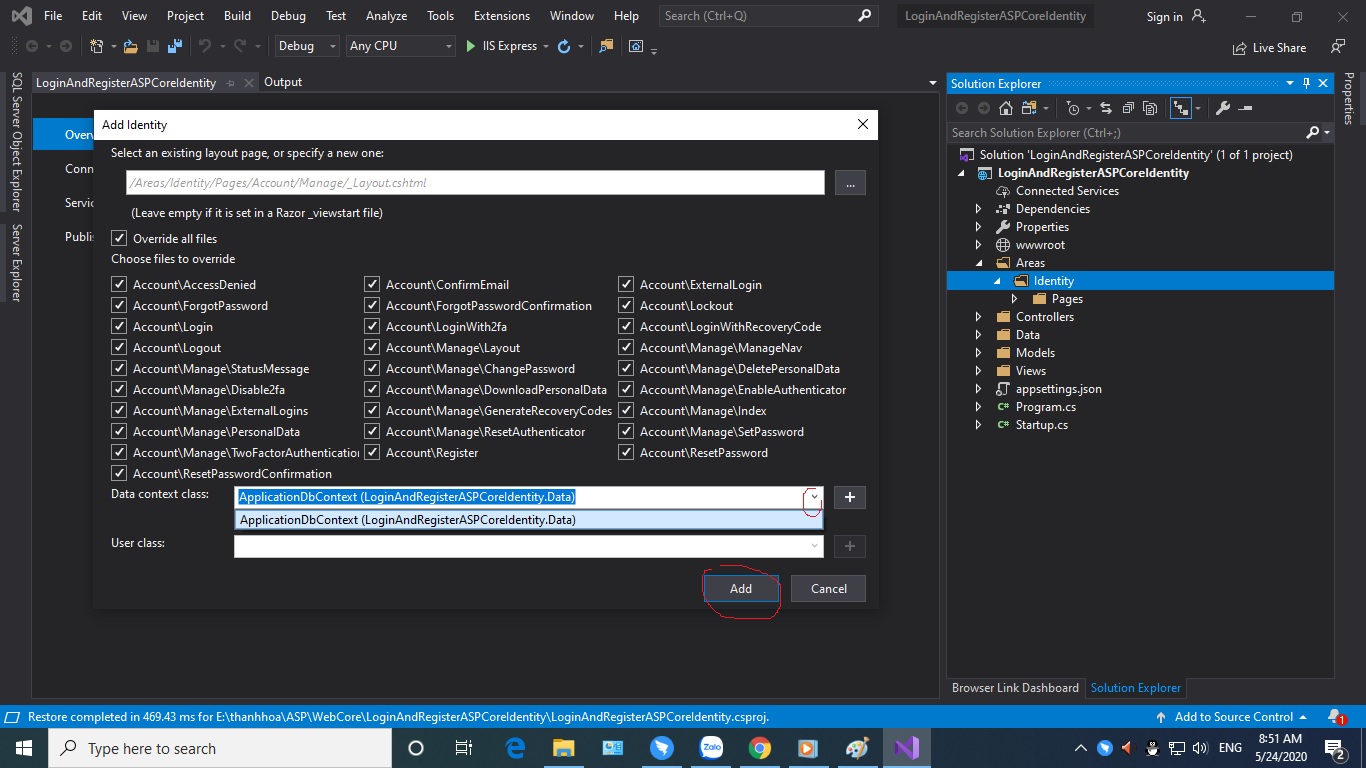
Mở Tools->Nutget Package Manager->Package Manager Console
Add-Migration db_aspcode21
Update-Database
Bạn sẽ được database như sau:
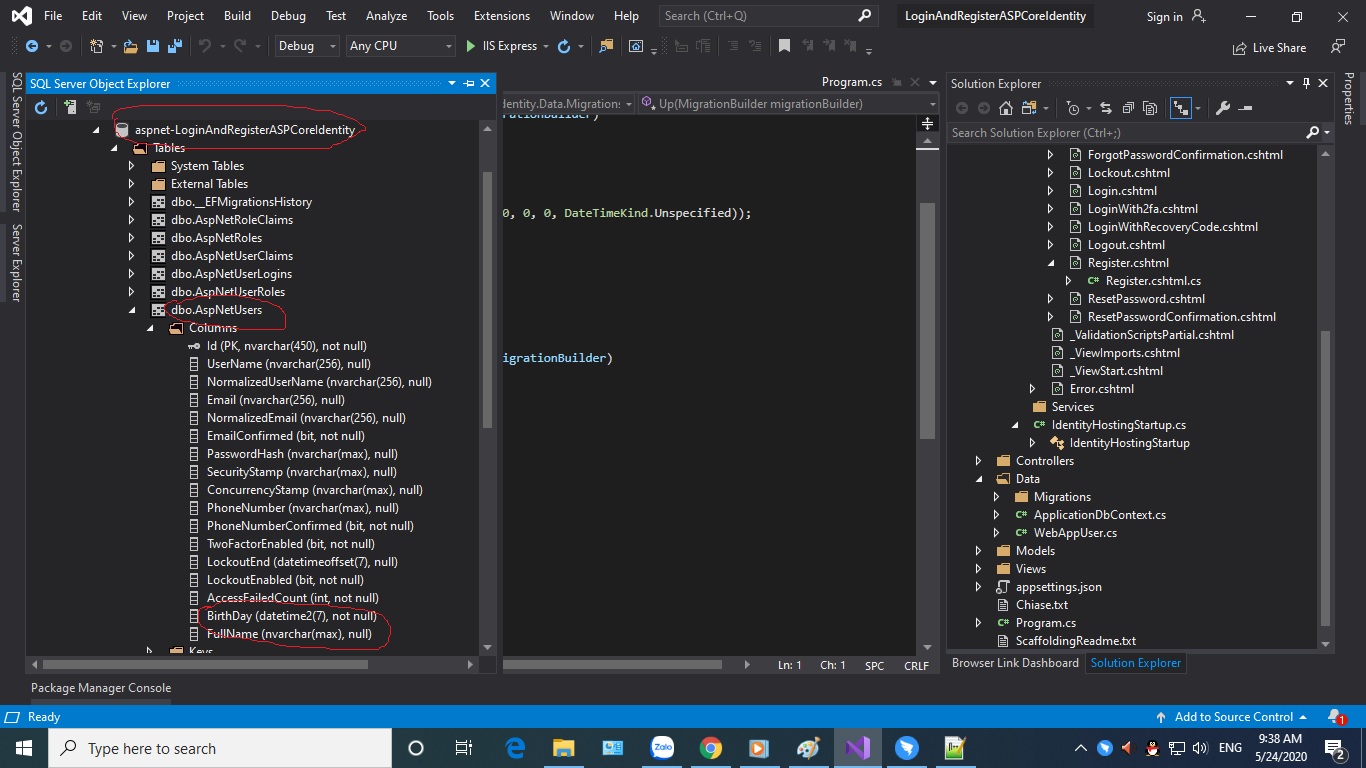
Sau khi có đã thêm được FullName & BirthDay vào table AspNetUsers trong database, ta thử Run project và đăng ký thử xem có thêm được dữ liệu vào không, bạn sẽ gặp lỗi giống thế này khi Run project như sau:
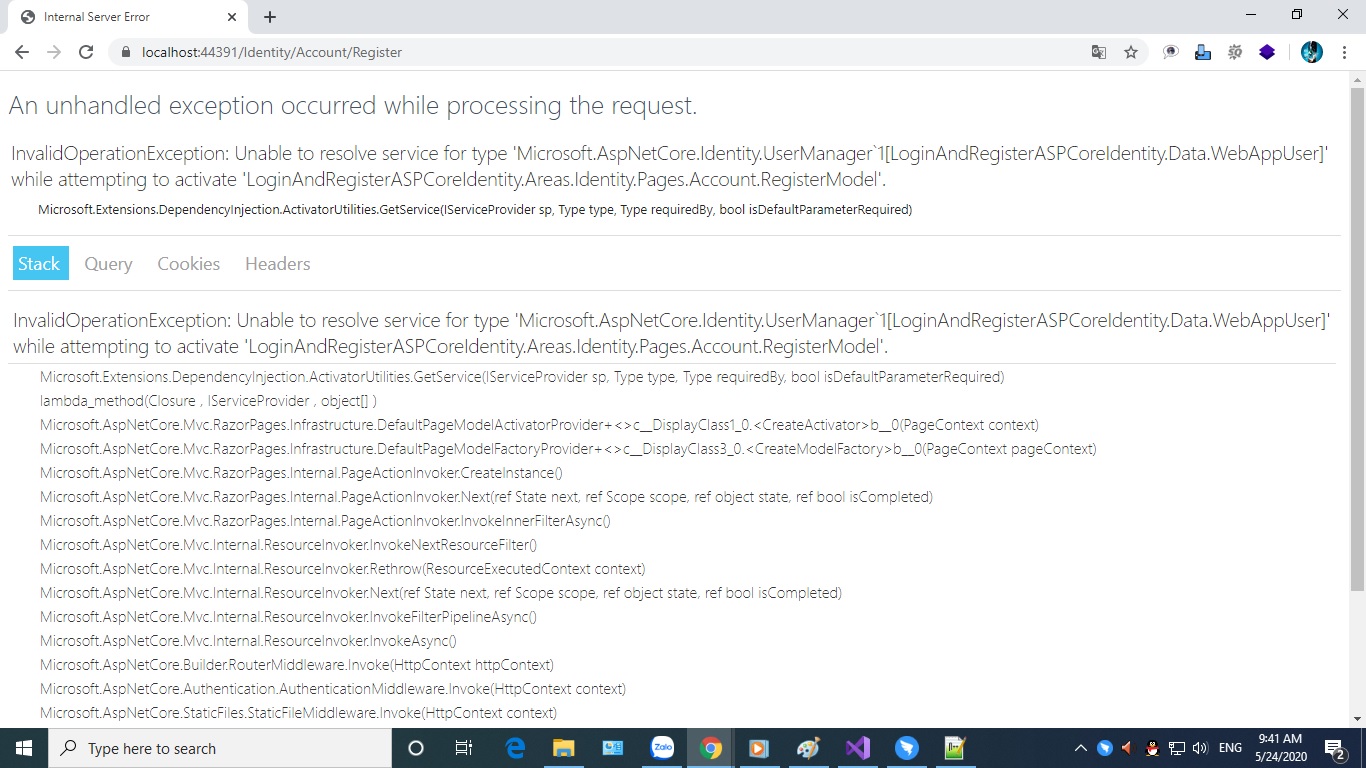
Vì thế bạn cần mở file Startup.cs chỉnh sửa như sau
services.AddDefaultIdentity<IdentityUser>()
                .AddEntityFrameworkStores<ApplicationDbContext>();

//Đổi thành->

  services.AddDefaultIdentity<WebAppUser>()
                .AddEntityFrameworkStores<ApplicationDbContext>();
Vào Views/Shared/_LoginPartial.cshtml chỉnh sửa lại như code dưới, ta đổi IdentityUser thành WebAppUser
@using LoginAndRegisterASPCoreIdentity.Data
@inject SignInManager<WebAppUser> SignInManager
@inject UserManager<WebAppUser> UserManager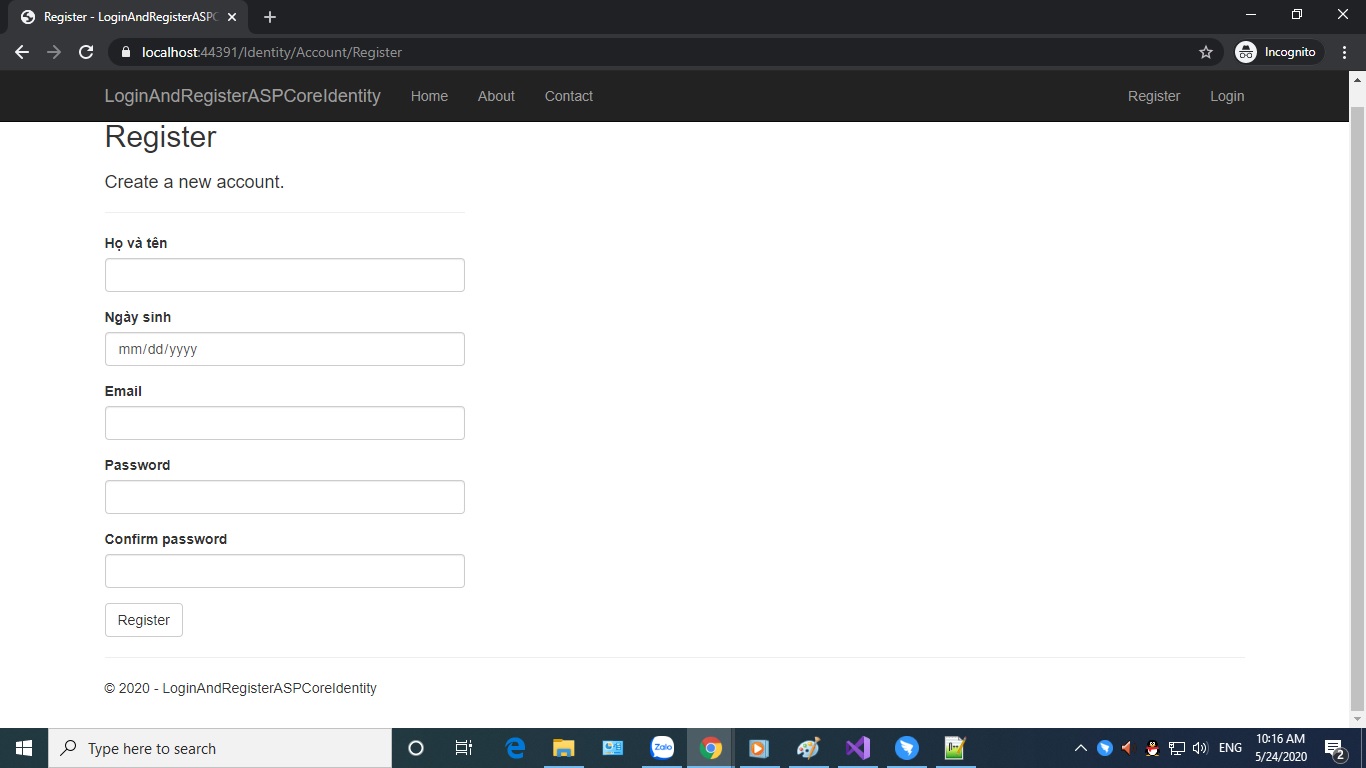
Sau đó Run project và hưởng thụ đoạn code ta vừa làm! Bạn nhớ giờ các file Template trong Identity/Pages ta thấy IdentityUser thì đổi về WebAppUser nhé vậy là xong!
