Trong vài bài viết trước ta đã đi qua các bước thiết lập Login and Registration with Identity, Adding Social Login to your ASP.NET core 2.1
Ta có thể xem lại tại đây:
ASP.NET Core 2.1 Login and Registration with Identity
Adding Social Login to your ASP.NET core 2.1
Với bài viết hôm này ta sẽ tiến hành Thêm một bảng mới vào ứng dụng ASP.NET Core 2.1 đã tích hợp Identity
VD:
- Chúng ta có một bài Post sẽ thuộc một User, đồng thời User sẽ có nhiều bài Post
- Một bài Post sẽ có một loại Category , Category sẽ có nhiều bài Post
Chúng ta sử dụng source ở các 2 bài viết trước nhé, Bạn xem lại và tạo project để thử hiện trong bài viết sau này
Đầu tiên vào thư mục Data: Create Post.cs và Category.cs
+ Data/Post.cs
public class Post
    {
        public int idPost { get; set; }
        public string Title { get; set; }
        public string Body { get; set; }
        public string idUser { get; set; }
        public WebAppUser WebAppUser { get; set; }
        public int idCategory { get; set; }
        public Category Category { get; set; }

    }
+ Data/Category.cs
public class Category
    {
        public int idCategory { get; set; }
        public string Name { get; set; }
        public virtual ICollection<Post> Posts { get; set; }
    }
+ Mở file WebAppUser.cs trong thư mục Data chỉnh sửa lại (nếu bạn xem trong bài viết trước sẽ phát hiện file này)
public class WebAppUser : IdentityUser
    {
        [PersonalData]
        public string FullName { get; set; }
        [PersonalData]
        public DateTime BirthDay { get; set; }

        public virtual ICollection<Post> Posts { get; set; }
    }
Sau khi thiết lập các class thực thể xong, ta vào Data/ApplicationDbContext.cs và chỉnh sửa lại như sau:
using System;
using System.Collections.Generic;
using System.Text;
using Microsoft.AspNetCore.Identity.EntityFrameworkCore;
using Microsoft.EntityFrameworkCore;
using Microsoft.AspNetCore.Identity;
namespace LoginAndRegisterASPCoreIdentity.Data
{
    public class ApplicationDbContext : IdentityDbContext<WebAppUser>
    {
        public ApplicationDbContext(DbContextOptions<ApplicationDbContext> options)
            : base(options)
        {
        }
        protected override void OnModelCreating(ModelBuilder modelBuilder)
        {
            base.OnModelCreating(modelBuilder);
            modelBuilder.Entity<Post>().HasKey(s => s.idPost);
            modelBuilder.Entity<Category>().HasKey(s => s.idCategory);
            modelBuilder.Entity<WebAppUser>()
                .HasMany<Post>(s => s.Posts)
                .WithOne(a => a.WebAppUser)
                .HasForeignKey(a => a.idUser)
                .OnDelete(DeleteBehavior.Restrict);
            modelBuilder.Entity<Category>()
                .HasMany<Post>(s => s.Posts)
                .WithOne(a => a.Category)
                .HasForeignKey(a => a.idCategory)
                .OnDelete(DeleteBehavior.Restrict);
        }
        public DbSet<Category> Orders { get; set; }
        public DbSet<Post> Chats { get; set; }
    }
}
Đoạn code trên ta cấu hình các khóa liên kết với nhau, bạn có thể tìm hiểu thêm tại đây:Database Relationships(One to Many, Many to Many) in ASP.NET CORE 2.1
Okay, giờ bạn hãy mở Package Manager Console lên và chạy câu lệnh cập nhật lại Database như sau:
Add-Migration AddPostCategory
Update-Database
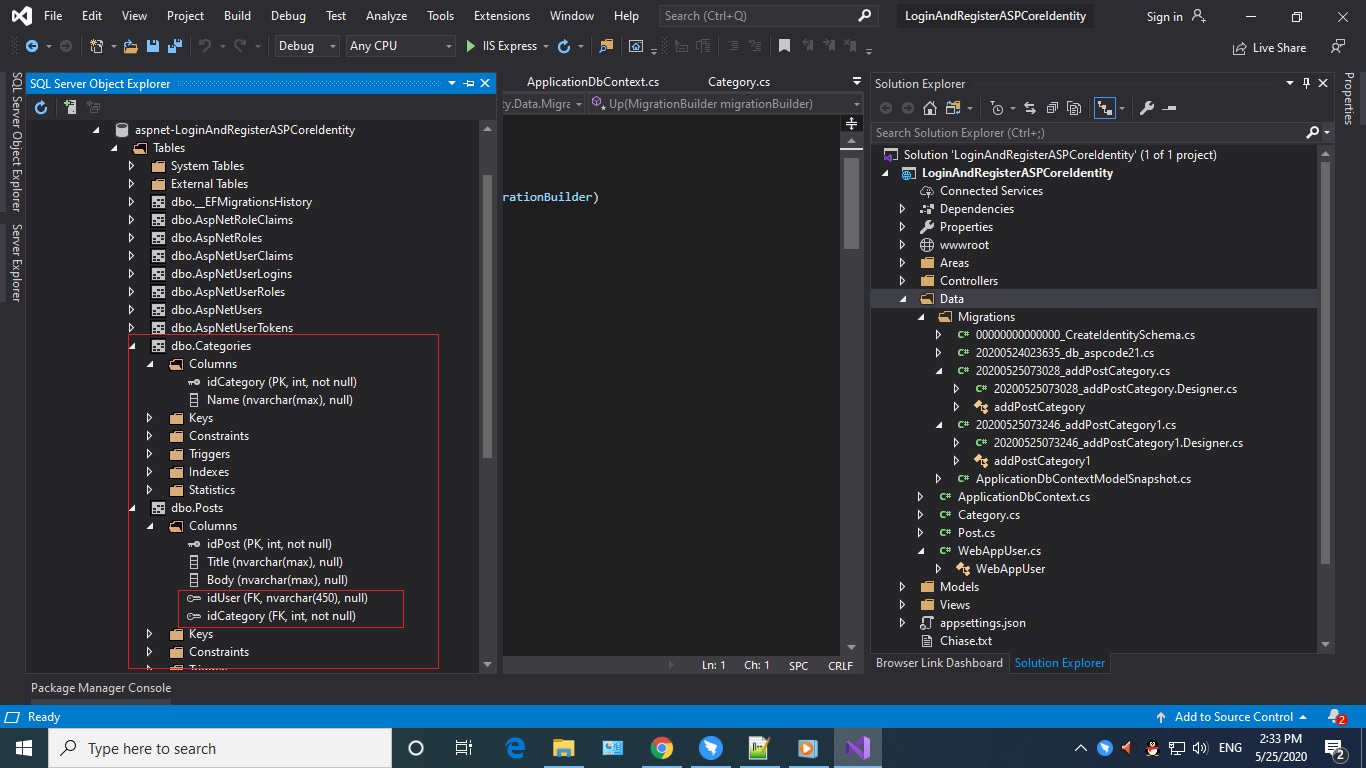
Sau khi chạy xong, giờ ta thử mở Database xem lại xem có tạo cho ta 2 table (Posts và Categories) chưa

Nếu đã có là bạn đã thành công! còn không được, bạn xem lại các câu lệnh thiết lập khóa của chúng!
