Nay mình sẽ giới thiệu mọi người về Middleware in ASP.NET CORE 2.1. Vậy Middleware là gì? Middleware là nơi nhận mọi yêu cầu (request,response), đễ xử lý các yêu cầu có phù hợp theo điều kiện của ta hay không, bạn có thể xử lý nó trong đây, sau đó nó sẽ Response về phía client, hoặc nó chuyển tiếp cho các Middleware tiếp theo, xử lý xong rồi trả về lại cho Client
Chúng ta cũng biết thông thường trong một ứng dụng ASP.NET CORE, thường có nhiều Middleware và ta có thể thiết lập thứ tự thực hiện Middleware hoặc chỉnh sửa yêu cầu Http và chuyển tiếp sang Middleware tiếp theo
Để chạy được Middleware , ta cần đăng ký trong phương thức Configure của class Startup.cs, các bạn chú ý trong Middleware có một kiểu tham số bắt đầu là HttpContext, HttContext nó sẽ nhận mọi (HttpRequest,HttpResponse)
Khi ta tạo một file Middelware , ta sẽ thấy nó set up cho ta một số thông tin như sau:
private readonly RequestDelegate _next;
        public CustomMiddleware(RequestDelegate next)
        {
            _next = next;
        }
RequestDelegate là được cài đặt mặc định khi bạn tạo lớp Middleware, cung cấp cho chúng ta một tham chiếu đến Middleware tiếp theo trong đường ống(pipeline)
Okay, nhìn tiếp trong file Middleware chúng ta thấy hàm Invoke, chúng ta có thể dùng bất đồng bộ(async ) hoặc đồng bộ nhé, về mặc định thì hàm Invoke được cài đặt đồng bộ, chúng ta nên sài async nhé
public async Task Invoke(HttpContext httpContext)
{
    /* thực thi code trước Middleware*/
    await _next(httpContext); /* gọi tiếp Middleware tiếp theo*/
    /* Mã được thực thi sau middleware tiếp theo */
}
Để Middleware được thực thi, ta cần vào phương thức Configure in Startup.cs, đăng ký gọi Middleware
Cách dùng sau đây được áp dụng cho tất cả Middleware, chỉ cần chỉ lớp Middleware cần gọi
public void Configure(IApplicationBuilder app)
{
    app.UseMiddleware<CheckLoginMiddleware>();
}
Còn cách sau đây ta có thể gọi là cách tiếp cận tới file mở rộng Middleware, trong file Middleware khi tạo, nó có tạo cho ta một class mở rộng, như code dưới đây
 // Extension method used to add the middleware to the HTTP request pipeline.
    public static class CheckLoginMiddlewareExtensions
    {
        public static IApplicationBuilder UseCheckLoginMiddleware(this IApplicationBuilder builder)
        {
            return builder.UseMiddleware<CheckLoginMiddleware>();
        }
    }
Ta có thể gọi Middleware mở rộng như sau, vào file Startup.cs và sửa lại lệnh gọi Middleware như sau:
app.UseCheckLoginMiddleware();Okay, về cơ bản Middleware thì cũng ta chắc cũng có tìm hiểu sơ qua nó ở một vài bài viết nào rồi, mình chỉ nói sơ sơ qua thôi, giờ ta làm thử ví dụ để hình dung nó như thế nào!
Create Project ASP.NET Core 2.1
Bước 1: Trong Visual Studio 2019, Bạn chọn File->New, chọn Project
Bước 2: Chọn Create a new project
Bước 3: Chọn ASP.NET Core Web Application template
Bước 4: Đặt tên Project, chọn Create.
Bước 5: Select .NET Core, ASP.NET Core 2.1, Chọn Web Application (Model-View-Controller), Create
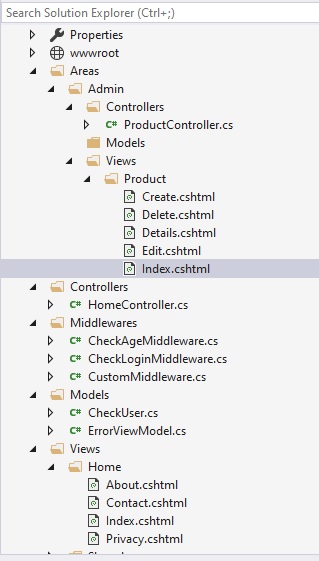
Sau khi tạo được Project, bạn tiến hành tạo một thư mục Middlewares, dùng chứa các lớp Middleware xử lý
Đến thư mục Middlewares-> click phải vào thư mục -> add -> New Item -> sao đó chọn Middleware class ->rồi tạo lớp CustomMiddleware.cs
Okay, Đoạn code dưới đây chúng ta cần kiểm tra, nếu người dung đã đăng nhập thành công, thì chuyển đến /admin/product
Còn nếu người dùng không đăng nhập, mà gõ vào trình duyệt là /admin hoặc /admin/product, ta kiểm tra không tồn tại Session, thì chuyển hướng người dùng về trang đăng nhập
using System;
using System.Diagnostics;
using System.IO;
using System.Collections.Generic;
using System.Linq;
using System.Threading.Tasks;
using Microsoft.AspNetCore.Builder;
using Microsoft.AspNetCore.Http;

namespace CustomMiddlewareASPcore21.Middlewares
{
    // You may need to install the Microsoft.AspNetCore.Http.Abstractions package into your project
    public class CustomMiddleware
    {
        private readonly RequestDelegate _next;

        public CustomMiddleware(RequestDelegate next)
        {
            _next = next;
        }

        public async Task Invoke(HttpContext httpContext)
        {
            var path = httpContext.Request.Path;
            if (path.HasValue && path.Value.StartsWith("/admin/product") || path.Value.StartsWith("/admin"))
            {
                if (httpContext.Session.GetString("username")==null)
                {
                    httpContext.Response.Redirect("/Home/index");
                }
            }
            await _next(httpContext);
        }
    }

    // Extension method used to add the middleware to the HTTP request pipeline.
    public static class CustomMiddlewareExtensions
    {
        public static IApplicationBuilder UseCustomMiddleware(this IApplicationBuilder builder)
        {
            return builder.UseMiddleware<CustomMiddleware>();
        }
    }
}
+ Tạo lớp CheckUser.cs trong thư mục Models
public class CheckUser
    {
        public string user { get; set; }
        public string pass { get; set; }
        public int age { get; set; }

    }
Ok, Tiếp theo ta vào thư mục Controllers, mở file HomeController.cs chỉnh sửa lại như code dưới đây:
+ Đầu tiền kiểm tra đăng nhập chưa, nếu chưa redirect đến trang đăng nhập
+ Nếu đăng nhập rồi, ta cần check Session có tồn tại không, nếu đúng, redirect đến /admin/product
using System;
using System.Collections.Generic;
using System.Diagnostics;
using System.Linq;
using Microsoft.AspNetCore.Http;
using System.Threading.Tasks;
using Microsoft.AspNetCore.Mvc;
using CustomMiddlewareASPcore21.Models;
namespace CustomMiddlewareASPcore21.Controllers
{
    public class HomeController : Controller
    {
        public IActionResult Index()
        {
            if (HttpContext.Session.GetString("username") != null)
            {
                return RedirectToRoute(new { action = "Index", controller = "Product", area = "Admin" });
            }
            return View();
        }

        [HttpPost]
        [ValidateAntiForgeryToken]
        public IActionResult CheckUser(CheckUser _user)
        {
           if(_user.user=="abc" && _user.pass == "12345678")
           {
                HttpContext.Session.SetString("username", _user.user);
                return RedirectToAction("Index", "Home");
           }
           return RedirectToAction("Index", "Home");
        }


    }
}
Chỉnh sửa giao diện đăng nhập, vào Views/Home/Index.cshtml mở file lên và chỉnh sửa form đăng nhập như sau:
@{
    ViewData["Title"] = "Home Page";
}
<div class="row">
    <div class="col-md-8">
        <h2>Form Đăng Nhập</h2>
        <form asp-controller="Home" asp-action="CheckUser">
            @Html.AntiForgeryToken()
            <div class="form-group">
                <label>Username</label>
                <input type="text" name="user" placeholder="Enter name" class="form-control" />
            </div>
            <div class="form-group">
                <label>Password</label>
                <input type="text" name="pass" placeholder="Enter pass" class="form-control" />
            </div>
            <div class="form-group">
                <label>Age</label>
                <input type="text" name="age" placeholder="Enter age" class="form-control" />
            </div>
            <div class="form-group">
                <button type="submit" class="btn btn-primary">Submit</button>
            </div>
        </form>
    </div>
</div>
Tại project, tạo thư mục Areas, trong thư mục Areas gồm có thư mục(Controllers,Models,Views)
+ Areas
+ Controlelrs
+ Models
+ Views

Okay, Ta vào thư mục Areas/Controllers, tạo file ProductController.cs và dán code dưới đây vào
using System;
using System.Collections.Generic;
using System.Linq;
using System.Threading.Tasks;
using Microsoft.AspNetCore.Http;
using Microsoft.AspNetCore.Mvc;

namespace CustomMiddlewareASPcore21.Areas.Admin.Controllers
{
    [Area("admin")]
    [Route("admin")]
    public class ProductController : Controller
    {
        // GET: Product
        [Route("")]
        [Route("product")]
        [Route("product/index")]
        public ActionResult Index()
        {
            return View();
        }

    }
}
Trong đoạn code trên, ta cấu hình Route trỏ đến Action, /admin, /admin/product, /admin/product/index. Bạn có thể xem lại bài viết : Routing in ASP.NET Core 2.1
Chúng ta thấy:
+ asp-controller="Home" : nó gọi tới file điều khiển Controllers/HomeController.cs
+ asp-action="CheckUser" : nó gọi tới phương thức hành động CheckUser trong file Controllers/HomeController.cs
Tiếp theo ta vào thư mục Areas/Views/Product/Index.cshtml, ai chưa có file này thì thêm nó nhé, sau đó chỉnh lại như sau, chúng ta xuất ra thông báo để cho biết là đăng nhập thành công thì Redirect tới /admin/product
@{
    ViewData["Title"] = "Index";
}

<h2>You can select Product</h2>
Okay, giờ ta cần đăng ký Middleware vừa tạo vào phương thức Configure trong file Startup.cs
using System;
using System.Collections.Generic;
using System.Linq;
using System.Threading.Tasks;
using Microsoft.AspNetCore.Builder;
using Microsoft.AspNetCore.Hosting;
using Microsoft.AspNetCore.Http;
using Microsoft.AspNetCore.HttpsPolicy;
using Microsoft.AspNetCore.Mvc;
using Microsoft.Extensions.Configuration;
using Microsoft.Extensions.DependencyInjection;
using CustomMiddlewareASPcore21.Middlewares;
namespace CustomMiddlewareASPcore21
{
    public class Startup
    {
        public Startup(IConfiguration configuration)
        {
            Configuration = configuration;
        }

        public IConfiguration Configuration { get; }

        // This method gets called by the runtime. Use this method to add services to the container.
        public void ConfigureServices(IServiceCollection services)
        {

            services.AddDistributedMemoryCache();

            services.AddSession(options =>
            {
                // Set a short timeout for easy testing.
                options.IdleTimeout = TimeSpan.FromSeconds(10);
                options.Cookie.HttpOnly = true;
                // Make the session cookie essential
                options.Cookie.IsEssential = true;
            });
            services.Configure<CookiePolicyOptions>(options =>
            {
                // This lambda determines whether user consent for non-essential cookies is needed for a given request.
                options.CheckConsentNeeded = context => true;
                options.MinimumSameSitePolicy = SameSiteMode.None;
            });
            services.AddMvc().SetCompatibilityVersion(CompatibilityVersion.Version_2_1);
        }

        // This method gets called by the runtime. Use this method to configure the HTTP request pipeline.
        public void Configure(IApplicationBuilder app, IHostingEnvironment env)
        {
            // app.UseCustomMiddleware();

            if (env.IsDevelopment())
            {
                app.UseDeveloperExceptionPage();
            }
            else
            {
                app.UseExceptionHandler("/Home/Error");
                app.UseHsts();
            }

            app.UseHttpsRedirection();
            app.UseStaticFiles();
            app.UseCookiePolicy();
            app.UseSession();

            app.UseCustomMiddleware();

            app.UseMvc(routes =>
            {
                /*routes.MapRoute(
                     name: "MyArea",
                     template: "{area:exists}/{controller=Admin}/{action=Index}/{id?}");*/
                routes.MapRoute(
                    name: "default",
                    template: "{controller=Home}/{action=Index}/{id?}");
            });
        }
    }
}
Trong đoạn code trên ta cũng cần app.UseSession() trong phương thức Configure và services.AddSession() trong phương thức ConfigureServices , để có thể sử dụng được Session
Ok, vậy là xong, bạn chạy test nó xem
