Bài viết tiếp theo với nội dung sử dụng (State & Props) trong React. Trong chia sẻ này, mình dùng source của bài viết trước, bạn có thể xem lại tại đây:
+ Getting Started with React
+ Create Component in React
State in React
Đầu tiên ta vào thư mục src/components/home/Home.js, mình sẽ thiết lập biến "name", mình sử dụng State đễ xác định trạng thái "name" và đặt dữ liệu mẫu cho nó
import React, { Component } from 'react'
class Home extends Component {
    constructor(props){
        super(props)
        this.state = {
            name:"Iphone 11 Pro",
        }
        this.changeName = this.changeName.bind(this)

    }
    changeName(e){
        this.setState({
            name:e.target.value
        })
    }
    render() {
        return (
            <div style={{padding:"10px 0"}}>
                <h1>Enter name product</h1>
                <input type="text" onChange={this.changeName} />
                <span style={{display:"block",padding:"10px 0"}}>Name : {this.state.name}</span>
            </div>
        )
    }
}
export default Home
Các thành phần React có một thuộc tính đặc biệt có tên là State(trạng thái), được sử dụng để xác định dữ liệu State, như sau:
this.state = {
  name:"Iphone 11 Pro"
}
Để hiển thị State "name", ta nhìn dùng như sau:
<span style={{display:"block",padding:"10px 0"}}>Name : {this.state.name}</span>Làm thế nào để thay đổi dữ liệu trong State? ta thử cài đặt một chức năng. Thay đổi thay đổi giá trị nhập, hãy mở file Home.js lên sửa lại như sau:
import React, { Component } from 'react'
class Home extends Component {
    constructor(props){
        super(props)
        this.state = {
            name:"Iphone 11 Pro",
        }
        this.changeStateData1 = this.changeStateData1.bind(this)

    }
    changeStateData1(e){
        this.setState({
            name:e.target.value
        })
    }
    changeStateData2 = () => {
        this.setState({
            name: this.state.name === "Iphone 11 Pro" ? "Iphone 11 Pro ->(yes)" : "Iphone 11 Pro ->(no)"
        })
    }
    render() {
        return (
            <div style={{padding:"10px 0"}}>
                <h1>Enter name product</h1>
                <input type="text" onChange={this.changeStateData1} />

                <button onClick={ this.changeStateData2 }>
                    Check
                </button>
                <span style={{display:"block",padding:"10px 0"}}>Name : {this.state.name}</span>
            </div>
        )
    }
}
export default Home
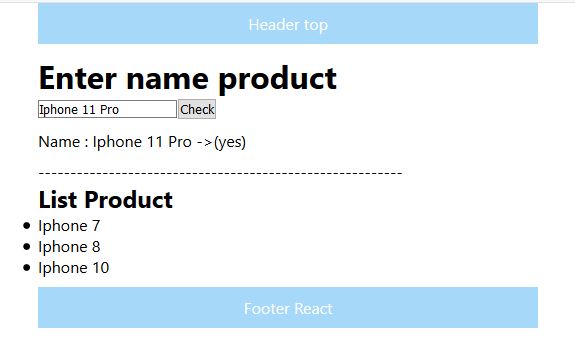
Các bạn nhìn thấy đoạn code bên trên!
<input type="text" onChange={this.changeStateData1} />Khi ta nhập giá trị vào input, thì hàm this.changeStateData1 được thực thi!
changeStateData1(e){
        this.setState({
            name:e.target.value
        })
    }
Code trên ta dùng setState để thay đổi giá trị "name". Đồng thời ta sử dụng nút <button> dùng kiểm tra xem giá trị ta nhập vào <input> có đúng không. Nên ta đã cái đặt hàm changeStateData2
changeStateData2 = () => {
        this.setState({
            name: this.state.name === "Iphone 11 Pro" ? "Iphone 11 Pro ->(yes)" : "Iphone 11 Pro ->(no)"
        })
}
Props in React
Trong React props là một thuộc tính rất quan trọng , nó chuyền dữ liệu giữa các Component với nhau. Sau đây ta sẽ làm một ví dụ về Props
+ src/compoments/product/Product.js
import React, { Component } from 'react'
import ListProduct from './ListProduct'
class Product extends Component {
    constructor(props){
        super(props)
        this.state = {
            title:"List Product",
            _products:[
                {
                    id:1,
                    name:"Iphone 7"
                },
                {
                    id:2,
                    name:"Iphone 8"
                },
                {
                    id:3,
                    name:"Iphone 10"
                }
            ]
        }
    }
    render() {
        return (
            <div>
                <ListProduct title = {this.state.title} products = {this.state._products} />
            </div>
        )
    }
}
export default Product
Trong đoạn code trên, ta cài đặt giá trị cho product thông qua state
+ src/components/product/ListProduct.js: tạo file ListProduct.js nhận dữ liệu từ component Product gửi qua, sau đó hiển thị dữ liệu ra ngoài.
+ Ta dùng, {this.props.products} đễ nhận dữ liệu từ component Product gửi qua
<ListProduct title = {this.state.title} products = {this.state._products} />+ File ListProduct.js
import React, { Component } from 'react'
class ListProduct extends Component {
    constructor(props){
        super(props)
    }
    render() {
        return (
            <div>
                <h2>{this.props.title}</h2>
                <ul>
                   {
                      this.props.products.map((item,index)=>(
                          <li key={index}>{item.name}</li>
                      ))
                   }
               </ul>
            </div>
        )
    }
}
export default ListProduct
Ok, giờ ta thử một ví dụ khác, giờ ta sẽ gửi dữ liệu từ component ListProduct.js đến component Product.js
+ src/compoments/product/Product.js : Ta tạo thêm hàm addProduct trong file Product.js
addProduct = (item)=>{
        let items = this.state._products;
        items.push(item);
        this.setState({
            _products:items
        })
}
và thêm callback = {this.addProduct} vào <ListProduct /> thành như sau:
<ListProduct title = {this.state.title} products = {this.state._products} callback = {this.addProduct}/> Tại file ListProduct.js để gọi sự kiện hàm "addProduct" ta thông qua key "callback" : ta chỉnh sửa lại file như sau:
import React, { Component } from 'react'
class ListProduct extends Component {
    constructor(props){
        super(props)
        this.state = {
            id:0,
            name:""
        }
        this.changeId = this.changeId.bind(this)
        this.changeName = this.changeName.bind(this)
        this.addProduct = this.addProduct.bind(this)
    }
    changeId = (e)=>{
        this.setState({
            id:e.target.value
        })
    }
    changeName = (e)=>{
        this.setState({
            name:e.target.value
        })
    }
    addProduct=()=>{
        let item = {
            id:parseInt(this.state.id),
            name:this.state.name
        }
        console.log(item)
        this.props.callback(item)
    }
    render() {
        return (
            <div>
                <h2>Form Add Product</h2>
                <label>id: </label>
                <input type="text" value={this.state.id} onChange={this.changeId}/>
                <label>Name: </label>
                <input type="text" value={this.state.name} onChange={this.changeName}/>
                <button onClick={this.addProduct}>Add</button>

                <h2>{this.props.title}</h2>
               <ul>
                   {
                   this.props.products.map((item,index)=>(
                       <li key={index}>{item.name}</li>
                   ))}
               </ul>

            </div>
        )
    }
}
export default ListProduct
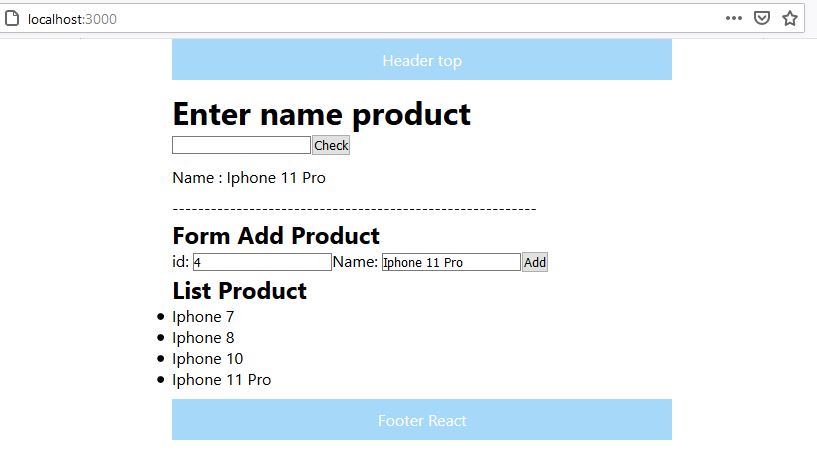
Ta dùng {this.props.callback(item)} ta gọi tới sự kiên addProduct(item) trong file component Product.js
Ok, vậy là xong , các bạn thử chạy test thử, cho dễ hình dung hơn!


