
Xin chào mọi người này mình trở lại nối tiếp với phần 1 mình đã hướng dẫn ở phần trước nhé các bạn có thể xem lại phần 1 để phần 2 có thể hiểu rỏ hơn nhé Hướng dẫn cài đặt laravel 5.4 phần 1
Này mình sẽ hướng dẫn các bạn các bước cơ bản nhất để sử dụng Laravel
Cách tạo Migrations trong laravel
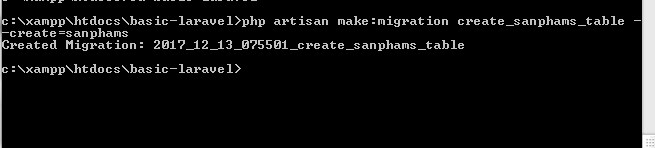
- Mình sẽ tạo một table tên là sanphams và mình sẽ sử dụng migrations trong laravel để tạo, đầu tiên mình thực hiện câu lệnh sau
php artisan make:migration create_sanphams_table --create=sanphamsKhi bạn tạo chạy câu lệnh trên bạn sẽ nhìn thấy một file trong đường dẫn sau:C:\xampp\htdocs\basic-laravel\database\migrations
Bạn sẽ thấy code trong file mình vừa mới tạo như sau
<?php

use Illuminate\Support\Facades\Schema;
use Illuminate\Database\Schema\Blueprint;
use Illuminate\Database\Migrations\Migration;

class CreateSanphamsTable extends Migration
{

    public function up()
    {
        Schema::create('sanphams', function (Blueprint $table) {
            $table->increments('id');
            $table->timestamps();
        });
    }

    public function down()
    {
        Schema::dropIfExists('sanphams');
    }
}
?>
up(): được chạy dầu tiên phi bạn thực hiện câu lệnh php artisan migrate để tạo ra table trong database hệ thống
down(): chúng ta dùng để rollback trở lại, ví dụ: trong function up() chúng ta thiết kế thiếu chúng ta cần chỉnh sửa lại trong function up() khi thực hiện chỉnh sửa xong, bạn cần thưc hiện lệnh rollback câu lệnh như sau: php artisan migrate:rollback để laravel hiểu mình cần tạo lại table.
Giờ mình tạo table sanphams có các thuộc tính như sau(id,tensp,gia) và mình sẽ tạo trong function up() như sau
<?php

use Illuminate\Support\Facades\Schema;
use Illuminate\Database\Schema\Blueprint;
use Illuminate\Database\Migrations\Migration;

class CreateSanphamsTable extends Migration
{
    /**
     * Run the migrations.
     *
     * @return void
     */
    public function up()
    {
        Schema::create('sanphams', function (Blueprint $table) {
            $table->increments('id');
            $table->string('tensp');
            $table->integer('giasp');
            $table->timestamps();
        });
    }

    /**
     * Reverse the migrations.
     *
     * @return void
     */
    public function down()
    {
        Schema::dropIfExists('sanphams');
    }
}
Sau đó bạn gỏ php artisan migrate
Đôi lúc bạn sẽ gặp một số lỗi như không tao bảng được
Để khác phục lỗi này, lỗi này là do csdl mình là utf8_unicode_ci mà laravel csdl đã chuyển về utf8mb4
Nên mình phải thực hiện sửa lỗi này như sau:vào đường dẫn C:\xampp\htdocs\basic-laravel\app\Providers
mờ file AppServiceProvider.php và chỉnh sửa lại như sau
<?php

namespace App\Providers;

use Illuminate\Support\ServiceProvider;
use Illuminate\Support\Facades\Schema;
class AppServiceProvider extends ServiceProvider
{
    /**
     * Bootstrap any application services.
     *
     * @return void
     */
    public function boot()
    {
        //
        Schema::defaultStringLength(191);
    }

    /**
     * Register any application services.
     *
     * @return void
     */
    public function register()
    {
        //
    }
}
?>
Sao đó chúng ta xóa các bảng trong database và chạy lại câu lệnh php artisan migrate
Như vậy là ta dã tạo migrations thành công!
Cách tạo Controller trong laravel
Bạn thực hiện câu lệnh sau
php artisan make:controller SanphamController --resourceBạn sẽ mình thấy file SanphamController trong đường dẫn sao:C:\xampp\htdocs\basic-laravel\app\Http\Controllers
Cách tạo Model trong laravel
php artisan make:model Sanphamvậy là bạn sẽ có một file model trong đường dẫn C:\xampp\htdocs\basic-laravel\app giờ chúng ta thiết lập model nhé
Ban đầu mình đã tạo table sanphams rồi giờ chúng ta cần thiết lập file model để đọc table sanphams này thì ta làm như sau
<?php

namespace App;

use Illuminate\Database\Eloquent\Model;

class Sanpham extends Model
{
    protected $table="sanphams";//table
    protected $fillable = ['tensp', 'giasp'];//field

}
?>
Cách dùng Route trong laravel
Trong laravel chúng ta có một thư mục routers trong file này chưa file web.php các bạn mở file này lên và xem nhé
Chúng ta thấy mặc định có một Route điều hướng giờ chúng ta muốn router này điều hướng sang một file khác thì làm như sau
Chung ta tạo một file home.blade.php trong thư mục resources/views/home.blade.php với nội dung như sau
File web.php
Route::get('/home',function(){
	return view('home');
});
Và chúng ta thử gỏ địa chỉ như sau https://localhost/basic-laravel/home nó sẽ chuyên qua trang home.blade.php mà mình vừa tạo. Phần Route mình chỉ nói sơ qua vậy thôi, phần sau mình sẽ hướng dẫn kỷ hơn cách điều hướng route và hiển thị dữ liệu ra Blade template nhé!
Hẹn gặp lại các bạn phần hướng dẫn sau nhé! bye