Hôm nay mình sẽ làm một ví dụ về CRUD trong NextJS + Prisma + PostgreSQL . Vừa qua thì mình cũng chia sẻ những thứ nhỏ về cách sử dụng PostgreSQL thông qua chạy Docker và cách sử dụng Prisma để kết nối với PostgreSQL, mọi người có thể xem lại tại đây
Gitlab : how-to-build-a-crud-app-with-nextjs-and-prisma-postgresql
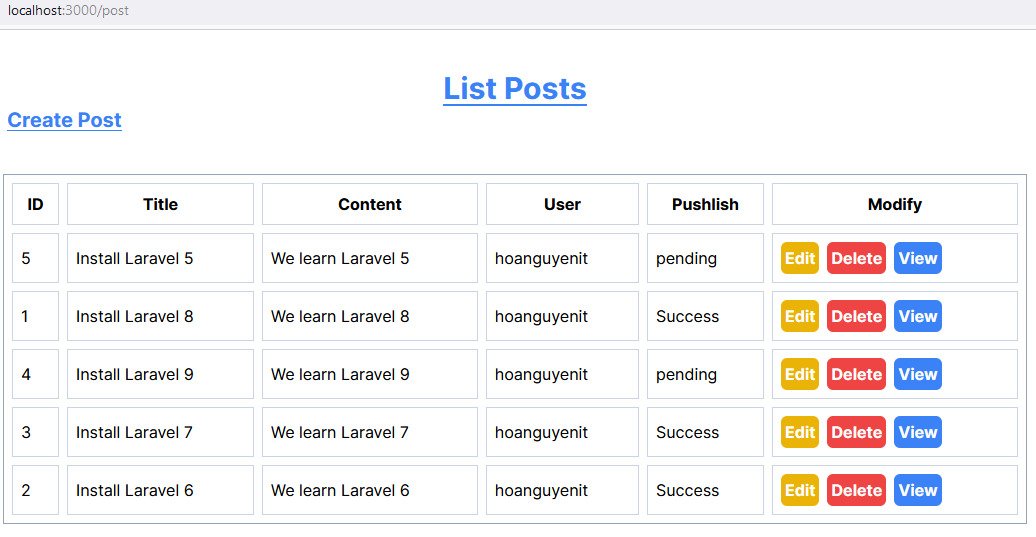
Demo:
Okay, chúng ta bắt đầu xây dựng thôi
Install PostgreSQL using Docker
Mình sẽ nói sơ lại về việc sử dụng PostgreSQL trong Docker nhé, Vì bài trước mình đã chia sẻ qua rồi nên tại đây mình chỉ lấy code trước và sử dụng thôi
Đầu tiên bạn cần tạo , một file docker-compose.yml, Hãy đặt file ở đâu cũng được, yêu cầu cd tới thư mục chứa file đó và chạy docker-compose up -d là được , trong đây mình cấu hình (user, password, database) để hồi ta dùng Prisma connect Postgresql nhé
# docker-compose.yml

version: '3.8'
services:
    postgres_db:
        image: postgres:13.5
        container_name: PostgresCount
        restart: always
        environment:
            - POSTGRES_USER=hoadev
            - POSTGRES_PASSWORD=hoadev123
            - POSTGRES_DB=hoadev_db
        volumes:
            - postgres_db:/var/lib/postgresql/data
        ports:
            - '5432:5432'
volumes:
    postgres_db:
        driver: local
Để chạy file trên bạn cần cài đặt Docker trên máy tính nhé, sau đó chạy như sau:
docker-compose up -d
docker-compose ps
Nếu bạn có cài Docker trên Window bạn có thể xem thấy hình như sau:
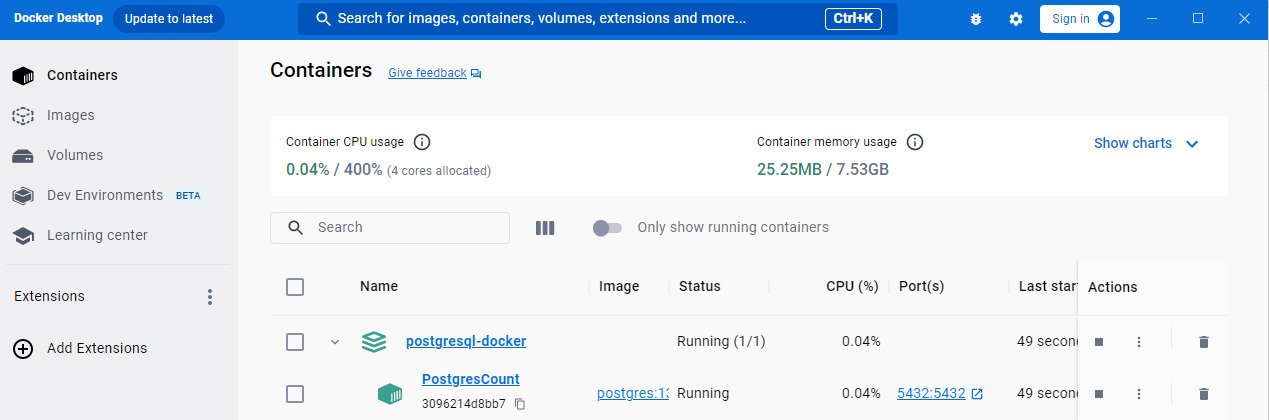
Còn trên Mackbook bạn cũng có thể Cài Docker để quản lý nhé
Còn không muốn dùng giao diện quản lý thì phải dùng câu lệnh ::), chẳng hạng dùng docker-compose ps để show ra danh sách các container đang có ,....
Vậy là xong phần chạy PostgreSQL
Install a Project Nextjs
npx create-next-app@latest
Chúng ta chọn các yêu cầu mà ta muốn
What is your project named? my-app
Would you like to use TypeScript? No / Yes
Would you like to use ESLint? No / Yes
Would you like to use Tailwind CSS? No / Yes
Would you like to use `src/` directory? No / Yes
Would you like to use App Router? (recommended) No / Yes
Would you like to customize the default import alias? No / Yes
What import alias would you like configured? @/*
Bạn có thể xem lại cách tạo project Nextjs : Create A Project With Next.Js
Sau khi chúng ta tạo xong, sẽ được một project rồi, thì tiếp tục chúng ta cài đặt Prisma
Install Prisma in Project NextJS
Okay, ta mở command line lên và chạy các câu lệnh bên dưới đây, để cài đặt thư viện prisma và đồng thời câu lệnh bên dưới nó cũng config cấu hình kết nối Prisma + PostgreSQL cho ta luôn
cd my-app
npm install typescript ts-node @types/node --save-dev
npx tsc --init
npm install prisma --save-dev
npx prisma init --datasource-provider postgresql
Đoạn code chạy lệnh trên, tạo ra một thư mục prisma , các bạn xem trong thư mục đó có một file tên là schema.prisma , các bạn mở file lên và cấu hình các Model table cho database để tí nửa ta chạy lệnh generate, nó sẽ tạo các table đó đến database mà ta cấu hình trong postgresql
// This is your Prisma schema file,
// learn more about it in the docs: https://pris.ly/d/prisma-schema

generator client {
  provider = "prisma-client-js"
}

datasource db {
  provider = "postgresql"
  url      = env("DATABASE_URL")
}

model User {
  id    Int     @id @default(autoincrement())
  email String  @unique
  name  String?
  posts Post[]
}

model Post {
  id        Int     @id @default(autoincrement())
  title     String
  content   String?
  published Boolean @default(false)
  author    User    @relation(fields: [authorId], references: [id])
  authorId  Int
}
Các bạn nhìn file bên sẽ thấy env("DATABASE_URL"), chúng ta sẽ thấy file .env trong thư mục project của ta , khi các ta chạy các lệnh trên nó cũng tạo ra file .env sẵn cho ta, hãy mở file lên và cập nhật username, password , database cho đúng nhé. Ví dụ của mình là đường dẫn sau
DATABASE_URL="postgresql://hoadev:hoadev123@localhost:5432/hoadev_db?schema=public"Sau khi cấu hình xong Prisma rồi, thì là lúc các bạn chạy lệnh generate ,để cho Prisma kết nối tới PostgreSQL , để tạo các table cho chúng ta
npx prisma migrate dev --name init
Sau khi chạy lệnh trên bạn sẽ thấy được một thư mục migrations trong thư mục prisma , các bạn có thể xem lại bài viết tại đây : Connecting To PostgreSQL Databases In Prisma
Để muốn biết xem, đã có table trong database chưa, bạn có thể dụng giao diện quản lý database trong prisma như sau:
npx prisma studio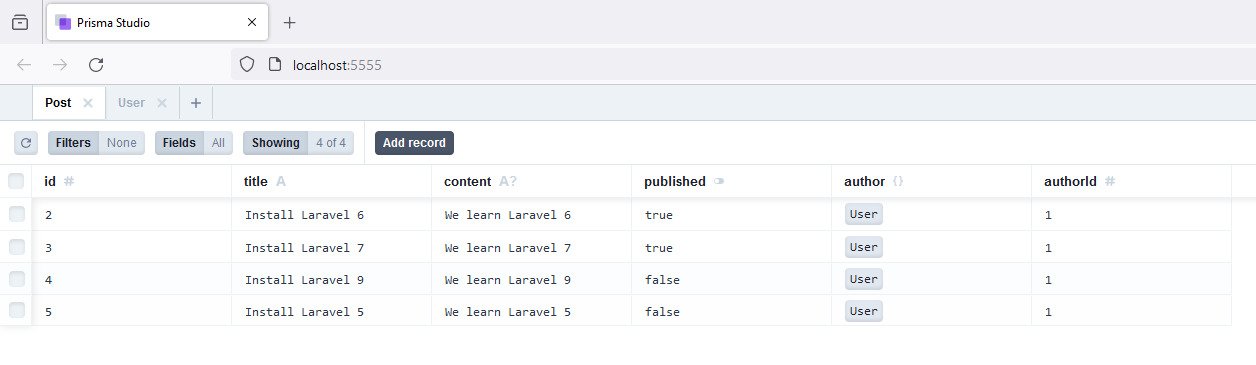
Okay vậy là xong Prisma + Postgresql rồi, tiếp theo ta cài đặt một vài thư nhỏ trong project nextjs là xong
Tại thư mục my-app ban đầu của chúng ta , chạy lệnh
npm install @prisma/client
npx prisma generate
Với hai câu lệnh bên trên, câu lệnh đầu giúp chúng ta hồi có thể sử dụng prisma trong Nextjs, câu lệnh thứ 2 nó chạy migration để config đúng với ứng dụng cấu hình của ta
Vậy là ngon lành cành đao rồi đó mấy Men ::)
Giớ là lúc chúng ta cấu hình từng tệp trong project nextjs để có thể sử dụng Postgresql + Prisma
+ _lib/prisma.ts : Cấu hình PrismaClient, để connect Prisma tới NextJS, ta dùng file này để sử dụng các thao tác như (create , read, edit, delete) nói chung là câu lệnh truy vấn để Postgresql
+ (route)/api/post/route.ts : xây dựng các Method , để request api , trong file này chúng ta cài đặt 2 method (GET, POST), dùng để lấy tất cả dữ liệu bằng phương thức GET, còn phương thức POST chúng ta dùng để thêm một bài viết
+ (route)/api/post/[id]/route.ts : Còn file này, cấu hình các method (GET, PUT, DELETE) dùng để request API cho chức năng (Read, Update, Delete)
+ (route)/post/page.tsx : xây dựng giao diện hiện thị tất cả bài viết, lúc này ta cần phải request "api/post" (sử dụng method "GET") để lấy tất cả sản phẩm
+ (route)/post/create/page.tsx : Dùng để thêm một bài viết mới , request "api/post" (sử dụng method "POST")
+ (route)/post/edit/[id]/page.tsx : Hiện thị thông tin bài viết theo ID cần chỉnh sửa. Ta cần request "api/route/[id]" , ví dụ: https://localhost:3000/api/post/123, sau đó tiếp tục request "api/post/123" (sử dụng method "PUT") để cập nhật bài viết
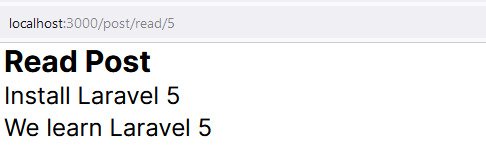
+ (route)/post/read/[id]/page.tsx : Đọc bài viết theo ID , ta cần request "api/post/[id]" sử dụng method "GET"
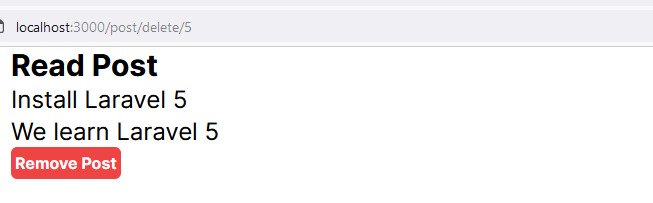
+ (route)/post/delete/[id]/page.tsx : Xóa bài viết theo ID , ta cần request "api/post/[id]" sử dụng method "DELETE"
Bên trên là chú thích các file mà tiếp theo ta cần phải đi qua trong project Nextjs
+ _Iib/prisma.ts :
import { PrismaClient } from '@prisma/client';
let prisma: PrismaClient;
if (process.env.NODE_ENV === 'production') {
  prisma = new PrismaClient();
} else {
  if (!global.prisma) {
    global.prisma = new PrismaClient();
  }
  prisma = global.prisma;
}
export default prisma;
+ (route)/api/post/route.ts : Cấu hình các method (GET,POST), để lấy thông tin dữ liệu và thêm dữ liệu, các bạn sẽ thấy mình import thư viện _lib/prisma , để sử dụng các hàm (findMany, create,...) trong Prisma, các bạn có thể xem thêm tại đây: https://www.prisma.io/docs/concepts/components/prisma-client/crud
import { NextRequest, NextResponse } from 'next/server';
import prisma from '../../../_lib/prisma';
export async function GET() {
    const posts = await prisma.post.findMany({
      /*   where: { published: true }, */
        include: {
          author: {
            select: { name: true },
          },
        },
      });

    return NextResponse.json(posts);
}

export async function POST(request: NextRequest) {
  const body = await request.json();
  const { title, content,published ,authorId} = body;

  const newPost = await prisma.post.create({
    data: {
      title: title,
      content: content,
      author: { connect: { id:  authorId } },

    },
    include: {
      author: true,
    },
  });
  return NextResponse.json({"success":1,"message":"create success","post":newPost});
}
+ (route)/api/post/[id]/route.ts :
import { NextRequest, NextResponse } from 'next/server';
import prisma from '../../../../_lib/prisma';
export async function GET(request : NextRequest,{ params }: { params: { id: number } }) {
    const id =  params.id
    if (!id) {
        return NextResponse.error("Missing 'id' parameter");
      }

      const post = await prisma.post.findUnique({
        where: {
          id: parseInt(id),
        },
        include: {
          author: {
            select: { name: true },
          },
        },
      });

      return NextResponse.json(post);
}
export async function PUT(request : NextRequest,{ params }: { params: { id: number } }) {
    const id =  params.id
    if (!id) {
      return NextResponse.error("Missing 'id' parameter");
    }

   const post = await prisma.post.findUnique({
      where: {
        id: parseInt(id),
      },
    })

    const { title, content } = await request.json();
     const updatedPost = await prisma.post.update({
      where: {
        id: parseInt(id),
      },
      data: {
        title: title,
        content: content,

      },
    });

    return NextResponse.json({success:1,"post":updatedPost,"message":"Update success"});
}

export async function DELETE(request : NextRequest,{ params }: { params: { id: number } }) {
  const id =  params.id
  if (!id) {
    return NextResponse.error("Missing 'id' parameter");
  }

 const deletePost = await prisma.post.delete({
    where: {
      id: parseInt(id),
    },
  })

  return NextResponse.json({success:1,"message":"Delete success"});
}
+ (route)/post/page.tsx : cài đặt page để hiện thị danh sách bài viết, sử dụng request api/posts , để lấy danh sách bài viết, bên dưới đoạn code dưới, mình có sử dụng thư viện swr , bạn có thể cài đặt thông qua npm nhé npm install swr
'use client'
import Link from 'next/link';
import useSWR from 'swr';
const fetcher = (url: string) => fetch(url).then((res) => res.json());

const PostPage = () => {
    const { data: posts, error, isLoading } = useSWR<any>(`/api/posts`, fetcher);
    if(error) return <div>failed to load</div>
    if(isLoading) return <div>loading...</div>
    return (
        <div className="w-full max-w-5xl m-auto">
            <h1 className='text-3xl text-blue-500 text-center pt-10 font-bold underline'>List Posts</h1>
            <Link href="/post/create" className='text-xl text-blue-500 text-center p-1 font-bold underline'>Create Post</Link>
           <table className='w-full mt-10 border-separate border-spacing-2 border border-slate-400'>
                <tr>
                <th className='border border-slate-300 p-2'>ID</th>
                    <th className='border border-slate-300 p-2'>Title</th>
                    <th className='border border-slate-300 p-2'>Content</th>
                    <th className='border border-slate-300 p-2'>User</th>
                    <th className='border border-slate-300 p-2'>Pushlish</th>
                    <th className='border border-slate-300 p-2'>Modify</th>
                </tr>
                {posts?.map(post =>
                    {
                        return (
                            <tr>
                                <td className='border border-slate-300 p-2'>{post.id}</td>
                                <td className='border border-slate-300 p-2'>{post.title}</td>
                                <td className='border border-slate-300 p-2'>{post.content}</td>
                                <td className='border border-slate-300 p-2'>{post.author.name}</td>
                                <td className='border border-slate-300 p-2'>{post.published?"Success":"pending"}</td>
                                <td className='border border-slate-300 p-2 flex flex-row gap-2'>
                                    <Link href={`/post/edit/${post.id}`} className='bg-yellow-500 font-bold p-1 inline-block rounded-md text-white'>Edit</Link>
                                    <Link href={`/post/delete/${post.id}`} className='bg-red-500 font-bold p-1 inline-block rounded-md text-white'>Delete</Link>
                                    <Link href={`/post/read/${post.id}`} className='bg-blue-500 font-bold p-1 inline-block rounded-md text-white'>View</Link>
                                </td>
                            </tr>
                        )
                    }
                )}


           </table>
        </div>
    );

}

export default PostPage;
+ (route)/post/read/[id]/page.tsx : Hiện thị bài viết theo ID, request "api/post/[id]"
'use client'
import React from 'react'
import useSWR from "swr";
const fetcher = (url: string) => fetch(url).then((res) => res.json());
const ReadPage = ({params} :{params:{id:number}}) => {
const { data: post, error, isLoading } = useSWR<any>(`/api/posts/`+params.id, fetcher);
if(error) return <div>failed to load</div>
if(isLoading) return <div>loading...</div>
return <div className="w-full max-w-5xl m-auto">
<h1 className="text-3xl font-bold">Read Post</h1>
<p className="text-2xl">{post?.title}</p>
<p className="text-2xl">{post?.content}</p>
</div>
}
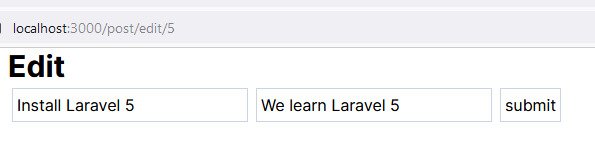
export default ReadPage+ (route)/post/edit/[id]/page.tsx : Hiện thị bài viết cần chỉnh sửa theo ID, đồng thời , cập nhật bài viết
'use client'
import React,{useEffect, useState} from 'react'
import { useRouter } from 'next/navigation'
import useSWR from "swr";
const fetcher = (url: string) => fetch(url).then((res) => res.json());
const EditPage = ({params} :{params:{id:number}}) => {
    const router = useRouter();
    const [title, setTitle] = useState('')
    const [content, setContent] = useState('')
    const { data: post, error, isLoading } = useSWR<any>(`/api/posts/`+params.id, fetcher);
    useEffect(()=>{
        if(post){
            setTitle(post.title);
            setContent(post.content);
        }
    },[post])
    const saveData = (e)=>{
        e.preventDefault();
        if(title!="" && content !=""){
            var data = {
                "title":title,
                "content":content
            }
            console.log(data);
            fetch(`/api/posts/`+params.id, {
                method: 'PUT',
                headers: {
                    'Content-Type': 'application/json',
                },
                body:JSON.stringify(data),
            })
            .then((response) => response.json())
            .then((data) => {
                if(data.success>0){
                    alert(data.message);
                    router.push('/post')
                }
            })
        }

    }
    if(error) return <div>failed to load</div>
    if(isLoading) return <div>loading...</div>
    return <div className="w-full max-w-5xl m-auto">
        <h1 className="text-3xl font-bold">Edit</h1>
        <form onSubmit={saveData}>
            <input type="text" name="title" id="title" className="border border-slate-300 p-1 m-1" value={title} onChange={e => setTitle(e.target.value)}/>
            <input type="text" name="content" id="content" className="border border-slate-300 p-1 m-1" value={content} onChange={e => setContent(e.target.value)}/>
            <input type="submit" value="submit" className="border border-slate-300 p-1 m-1" />
        </form>
    </div>
}
export default EditPage
+ (route)/post/create/page.tsx : Tạo form để thêm bài viết mới
'use client'
import React,{ useState} from 'react'
import { useRouter } from 'next/navigation'
const CreatePage = ({params} :{params:{id:number}}) => {
    const route = useRouter()
    const [title, setTitle] = useState('')
    const [content, setContent] = useState('')
    const saveData = (e : any)=>{
        e.preventDefault();
        if(title!="" && content !=""){
            var data = {
                "title":title,
                "content":content,
                "published":true,
                "authorId":1
            }
            console.log(data);
            fetch(`/api/posts`, {
                method: 'POST',
                headers: {
                    'Content-Type': 'application/json',
                },
                body:JSON.stringify(data),
            })
            .then((response) => response.json())
            .then((data) => {
                if(data.success>0){
                    alert(data.message);
                    route.push('/post')
                }
            })
        }

    }
    return <div className="w-full max-w-5xl m-auto">
        <h1 className="text-3xl font-bold">Create</h1>
        <form onSubmit={saveData}>
            <input type="text" name="title" id="title" className="border border-slate-300 p-1 m-1"  onChange={e => setTitle(e.target.value)}/>
            <input type="text" name="content" id="content" className="border border-slate-300 p-1 m-1"  onChange={e => setContent(e.target.value)}/>
            <input type="submit" value="submit" className="border border-slate-300 p-1 m-1" />
        </form>
    </div>
}
export default CreatePage
+ (route)/post/delete/[id]/page.tsx : Hiện thị bài viết cần xóa, theo ID, yêu cầu request đến "api/posts/[id]" , sử dụng method "DELETE"
'use client'
import React from 'react'
import useSWR from "swr";
import { useRouter } from 'next/navigation'
const fetcher = (url: string) => fetch(url).then((res) => res.json());
const ReadPage = ({params} :{params:{id:number}}) => {
    const router = useRouter();
    const { data: post, error, isLoading } = useSWR<any>(`/api/posts/`+params.id, fetcher);
    const deletePost = (id)=>{
        fetch(`/api/posts/`+id, {
            method: 'DELETE',
        })
        .then((response) => response.json())
        .then((data) => {
            if(data.success>0){
                alert(data.message);
                router.push('/post')
            }
        })
    }
    if(error) return <div>failed to load</div>
    if(isLoading) return <div>loading...</div>
    return <div className="w-full max-w-5xl m-auto">
        <h1 className="text-3xl font-bold">Read Post</h1>
        <p className="text-2xl">{post?.title}</p>
        <p className="text-2xl">{post?.content}</p>
        <button className="bg-red-500 font-bold p-1 inline-block rounded-md text-white" onClick={()=>deletePost(params.id)}>Remove Post</button>
    </div>
}
export default ReadPage
Okay để chạy project bạn có thể sử dụng câu lệnh sau
npm run devĐể xem các bảng table trong postgresql bạn thể chạy lệnh sau:
npx prisma studioHình ảnh DEMO
.jpg)
Hẹn mọi người ở bài viết sau, nếu thấy hay thì hãy ủng hộ bằng cách chia sẻ bài viết này với mọi người!