Chào mọi người! nay mình chia sẻ với mọi người cách tạo một Form đăng ký bằng Nodejs + Vuejs , dữ liệu được lưu vào database , trong bài này mình dùng cở sở dữ liệu lưu trữ bằng Xampp Phpmydamin
Đầu tiên mình tạo database đặt tên là "demo" với tạo một table tên là "users" trong phpmyadmin các bạn có thể copy đoạn code bên dưới để tạo table nhé!
CREATE TABLE `users` (
  `ID_User` int(11) NOT NULL,
  `First_name` varchar(50) COLLATE utf8_unicode_ci NOT NULL,
  `Last_name` varchar(50) COLLATE utf8_unicode_ci NOT NULL,
  `Email` varchar(50) COLLATE utf8_unicode_ci NOT NULL,
  `Password` varchar(50) COLLATE utf8_unicode_ci NOT NULL
) ENGINE=InnoDB DEFAULT CHARSET=utf8 COLLATE=utf8_unicode_ci;

ALTER TABLE `users`
 ADD PRIMARY KEY (`ID_User`),
  ADD UNIQUE KEY `Email` (`Email`);
Với bài hướng dẫn này mình đi vào vấn đề làm thế nào để connect được mysql trong phpmyadmin sử dụng bằng Nodejs? và dùng câu lệnh insert trong Nodejs, mình sẽ bỏ qua các bước cài đặt Nodejs kết hợp với Vuejs cho đở tốn thời gian, để cài được Nodejs + Vuejs bạn xem lại bài HƯỚNG DẪN KẾT HỢP NODEJS + VUEJS
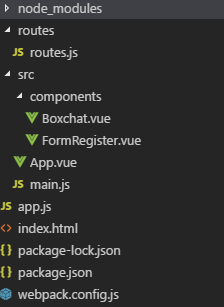
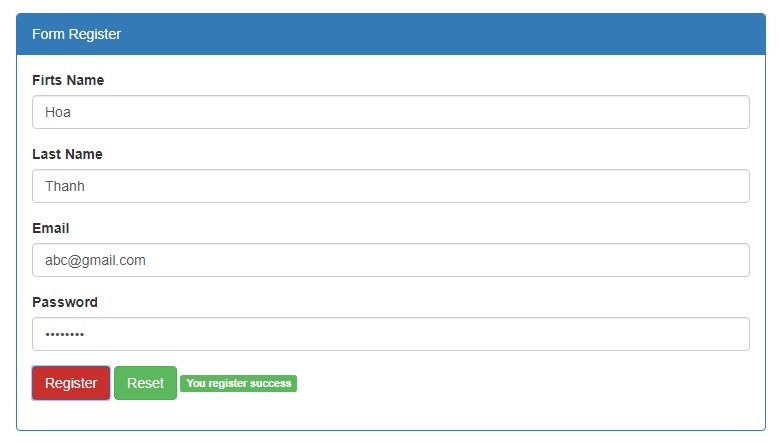
* Đầu tiên các bạn tạo một file tên là FormRegister.vue trong thư mục components của vuejs ví dụ:"src/components/FormRegister.vue" trong file này bạn tạo giao diện template để hiển thị Form đăng ký cho người dùng, đồng thời bạn còn có một đoạn script để phục vụ cho việc bạn bấm submit gửi thông tin về cho Nodejs xử lý và lưu vào CSDL database. Các bạn xem cấu trúc thư mục file bên dưới đây

+ Source FormRegister,vue
<template>
    <div class="row" id="form-register">
        <div class="col-md-2"></div>
        <div class="col-md-8">
            <form action="" method="post" v-on:submit.prevent="register">
                <div class="panel panel-primary">
                    <div class="panel-heading">{{title}}</div>
                    <div class="panel-body">
                        <div class="form-group">
                            <label>Firts Name</label>
                            <input type="text" v-model="formdata.first_name" placeholder="First Name" class="form-control" name="first_name" id="first_name"/>
                        </div>
                        <div class="form-group">
                            <label>Last Name</label>
                            <input type="text" v-model="formdata.last_name" placeholder="Last Name" class="form-control" name="last_name" id="last_name"/>
                        </div>
                        <div class="form-group">
                            <label>Email</label>
                            <input type="email" v-model="formdata.email" placeholder="Enter Email" class="form-control" name="email" id="email"/>
                        </div>
                        <div class="form-group">
                            <label>Password</label>
                            <input type="password" v-model="formdata.password" placeholder="Enter Password" class="form-control" name="password" id="password"/>
                        </div>
                        <div class="form-group">
                            <button type="submit" class="btn btn-danger">Register</button>
                            <button type="reset" class="btn btn-success">Reset</button>
                            <label class="label label-success">{{message}}</label>
                        </div>

                    </div>
                </div>
            </form>
        </div>
        <div class="col-md-2"></div>
    </div>
</template>
<style>
    #form-register{
        margin-top:30px;
    }
</style>
<script>
    export default{
        data(){
            return{
                title:"Form Register",
                formdata:{},
                message:"",
                success:0,
            }
        },
        methods:{
           register(){
                this.axios.post("http://localhost:8888/form-register",this.formdata).then((response) => {
                       console.log(response);
                       if(response.data.success>0){
                           this.message="You register success";
                           this.success=response.data.success;
                       }
                       else{
                           this.message="Register to failed";
                           this.success=response.data.success;
                       }
                  });

            },

        }
    }

</script>
+ Với đoạn code bên trên các bạn xem phần mình đặt v-model trong input để nhận tất cả các giá trị trong Form và lưu vào "formdata" để bạn có thể gửi thông tin này về cho Nodejs thông qua thư viện Axios, Axios giống như các bạn gọi hàm Ajax trong jquery vậy
+ Các bạn thấy là Axios gọi đường dẫn url:"http://localhost:8888/form-register" đường dẫn này mình phải thiết lập trong Router của Nodejs, khi mà Axios gọi đến đường dẫn này!.
+ Khi Nodejs xử lý thành công thì nó trả về một json {success:1} nếu là thêm thành công! ngược lại là {success:0} là thêm không thành công! các bạn có thể xét biến đó theo ý của bạn hoặc bên phía Nodejs bạn trả về kiều gì cũng được miễn sao bạn xử lý được là ok!
* Bên phía Nodejs để Nodejs kết nối(connect) với Mysql trong phpmyadmin thì các bạn cần phải cài một thư viện mysql bằng câu lệnh như sau: npm install mysql
+ Thiết lập tham số kết nói mysql trong Nodejs như sau:
var mysql      = require('mysql');
var connection = mysql.createConnection({
  host     : 'localhost',
  user     : 'root',
  password : '',
  database : 'demo'
});
connection.connect();
- Đoạn code bên trên dùng để connect đến phpmyadmin của minh, với các tham số chắc mọi người cũng biết rồi ::)
+ Giờ các bạn tạo cho mình một file tên là routes.js nằm trong thư mục "routes/routes.js"
var express = require('express')
var router = express.Router()
var bodyParser = require('body-parser');
var mysql      = require('mysql');
var md5 = require('md5');
var connection = mysql.createConnection({
  host     : 'localhost',
  user     : 'root',
  password : '',
  database : 'demo'
});
connection.connect();
router.post("/form-register",function(req,res){
  var dataform = req.body;
  var first_name = dataform.first_name;
  var last_name = dataform.last_name;
  var email = dataform.email;
  var password = md5(dataform.password);
  var sql = "INSERT INTO users SET ?";
  var post ={First_name:first_name,Last_name:last_name,Email:email,Password:password};
  var query = connection.query(sql,post,function (error, results, fields) {
     if (error){
       res.json({success:0});//nếu email bị trùng thì trả về 0
     }
     else{
      console.log("Number of records inserted: " + results.affectedRows);
       res.json({success:1});//nếu thêm thành công trả về 1;
     }

  });
  console.log(query.sql);

});
module.exports = router
- Trong đoạn code bên trên mình có gọi rất là nhiều thư viện:
+ Thư viện md5 dùng cho chúng ta chuyển một chuỗi string của chúng ta về một dạng mã MD5 giống như trong PHP của chúng ta
+ Thư viện mysql dùng để thiết lập lời gọi kết nối đến phpmyadmin
- Để chạy được Nodejs ta cũng phải có File app.js các bạn có thể xem source file app.js dưới đây như sau:
var express = require('express');
var app = express();
var bodyParser = require('body-parser');
var cors = require('cors');

var http = require('http').Server(app);
var io = require('socket.io')(http);
var routes = require('./routes/routes.js');
app.use(bodyParser.json());
app.use(cors());
//ket noi router
app.use(routes);

http.listen(process.env.PORT || 8888, function(){
    console.log('listening on *:8888');
});
- Các bạn cần phải cài thư viện Cors: nếu các bạn không cài thư viện này bạn sẽ gặp lỗi bảo mật. khi mà Axios gọi đến đường dẫn của Router trong Nodejs, nên các bạn cần phải cài với câu lệnh như sau: npm install cors
- Trong file app.js bên trên các bạn import file routes mà mình vừa tạo import vào, các bạn có thể xem lại mấy bài trước mình đã viết chia sẻ để hiểu hơn về bài hướng dẫn này nhé!
- Cũng như thường lệ bạn cũng phải khởi động 2 server để chạy ứng dụng: Nodejs + Vuejs
+ Bước 1: Bạn chạy Vuejs trước ở đây Vuejs dùng port(3000) nhé: npm start
+ Bước 2: Bạn chạy Nodejs lên: node app.js
Hẹn gặp lại các bạn ở bài chia sẻ kiến thức lập trình tiếp theo!
