Xin chào mọi người cũng khá lâu rồi mình mới chia sẽ với mấy bạn về lập trình hi, mình cũng không có hay gì đâu các bạn đừng nghĩ vậy mình chỉ thích chia sẽ những gì mình làm được, để chia sẽ với mấy bạn thôi ::)
Nay mình sẽ hướng dẫn mấy bạn sự kết hợp hoàn hảo của NodeJS + VueJS để làm một chức năng (Thêm,Sửa,Xóa) các quyển sách,trong cơ sở dữ liệu, Nhưng ở đây mình dùng file .json để lưu các thông tin quyển sách như(masp,name,price,image).
Đầu tiên để bạn được thực hiện sự kết hợp này bạn cần phải cài đặt nodejs:https://nodejs.org/en/ các bạn download về và cài đặt vào máy nhé
Tiếp theo các bạn tạo cho mình một project: nodejs-vuejs(tùy bạn muốn đặt gì thì đặt):
Bước 1: cd nodejs-VueJS
Bước 2: npm init
Bước 3: bạn vào thưc mục sẽ có một file tên là package.json bạn mở lên và copy đoạn copy dưới đây dán vào nhé
*package.json
{
  "name": "demo_nodejs_vuejs",
  "version": "1.0.0",
  "description": "",
  "scripts": {
    "start": "webpack-dev-server"
  },
  "author": "Skipperhoa",
  "license": "ISC",
  "devDependencies": {
    "axios": "^0.16.2",
    "babel-core": "^6.25.0",
    "babel-loader": "^7.1.1",
    "babel-plugin-transform-runtime": "^6.23.0",
    "babel-preset-es2015": "^6.24.1",
    "babel-preset-stage-3": "^6.24.1",
    "babel-runtime": "^6.25.0",
    "css-loader": "^0.28.4",
    "file-loader": "^0.11.2",
    "vue": "^2.4.2",
    "vue-router": "^2.7.0",
    "vue-axios": "^2.0.2",
    "vue-loader": "^13.0.2",
    "vue-template-compiler": "^2.4.2",
    "webpack": "^3.4.1",
    "webpack-dev-server": "^2.6.1"
  },
  "dependencies": {
    "body-parser": "^1.18.2",
    "cors": "^2.8.4",
    "express": "^4.16.3",
    "jsonfile": "^4.0.0",
    "mongoose": "^5.0.12",
    "multer": "^1.3.0",
    "nodemon": "^1.17.2",
    "socket.io": "^2.1.0"
  }
}
Bạn cần chú y đến (script,devDependencies,dependencies) copy lại file package.json trong project hiện tại của bạn vừa mới tạo
Bước 4: npm install
- Bước này giúp bạn cài các modules trong file package.json mà ở bước 3 mình đã khai báo, bạn sẽ thấy trong projec của bạn có một thư mục là node_modules
* Phần Front-End
- Đầu tiên bạn tạo cho mình một thư mục trong project của bạn là src, dùng để chứa các file vue, tiếp theo bạn tạo một file tên là CreateItem.vue trong thư mục src mới vừa tạo
+ Source CreateItem.vue
<template>
	<div>
			<div class="row">
				<div class="col-md-6">
					<h1>Create An Item</h1>
					 <form v-on:submit.prevent="addItem">
					 	<div class="form-group">
							<label>Ma Item:</label>
							<input type="text"  class="form-control" v-model="item.masp"/>
						</div>
						<div class="form-group">
							<label>Item Name:</label>
							<input type="text"  class="form-control" v-model="item.name"/>
						</div>
						<div class="form-group">
							<label>Item price:</label>
							<input type="text" class="form-control col-md-6" v-model="item.price">

						</div>
						<div class="form-group">
							<label>Item image:</label>
							<input @change="uploadImage" type="file" name="image" accept="image/*">
						    <img :src="imageSrc" class="image">
						</div>
						<div class="form-group">
				          <button class="btn btn-primary">Add Item</button>
				        </div>
				    </form>
				      <button class="btn btn-success" v-on:click="updateItem">Update Item</button>
				</div>
				<div class="col-md-6">

							<h1>Danh sach Item</h1>
							<table class="table">
								<thead>
									<tr>
										<th>Ma</th>
										<th>Name</th>
										<th>Price</th>
										<th>Image</th>
										<th>Edit</th>
										<th>Delete</th>
									</tr>

								</thead>
							</table>


				</div>
			</div>

	</div>

</template>
<style>
	.image{
		width:150px;
		height: 150px;
	}
	.class_img{
		width:80px;
		height: 100px;
	}
</style>
<script>
	export default{
		data(){
			return {
				item:{},
				imageSrc: 'https://hoanguyenit.com/public/img/logo33.png'
			}
		}
    }
</script>
- Sau khi bạn tạo file CreateItem.vue, tiếp theo bạn cần phải tạo một file App.vue và main.js trong thư mục src luôn nhé
+ Source App.vue (dùng để router view template ra)
<template>
    <div class="container">
        <div>
            <transition name="fade">
                <router-view></router-view>
            </transition>
        </div>
    </div>
</template>

<style>
    .fade-enter-active, .fade-leave-active {
      transition: opacity .5s
    }
    .fade-enter, .fade-leave-active {
      opacity: 0
    }
</style>

<script>

    export default{
    }
</script>
+ Source main.js (dùng để import các thư viện vuejs,cầu hình router và import template của vuej mình mới tạo)
import Vue from 'vue'
import VueRouter from 'vue-router'
import VueAxios from 'vue-axios';
import axios from 'axios';
Vue.use(VueAxios,axios);

//import template vuejs
import App from './App.vue';
import CreateItem from './CreateItem.vue';
import UploadImage from './UploadImage.vue';
Vue.use(VueRouter)
const routes = [
  {
        name: 'CreateItem',
        path: '/',
        component: CreateItem
    },
    {
        name: 'UploadImage',
        path: '/upload',
        component: UploadImage
    }
];
const router = new VueRouter({ mode: 'history', routes: routes});
new Vue(Vue.util.extend({ router }, App)).$mount('#app');
Bạn cần chú ý là những file template nào bạn import trong file main.js này, bắt buộc bạn phải có tạo, mới import được nếu không có thì sẽ báo lỗi nhé chẳng hạn bạn import UploadImage from './UploadImage.vue'; mà bạn không có tạo file này sẽ báo lỗi nhé.
- Tiếp theo bạn tạo cho mình file index.html để render giao diện ra nhé:
+ Source index.html (Bạn nhìn file dưới có id="app" dùng khai báo ứng dụng trong file main.js để nhận biết mà nó load ra nhé)
<!DOCTYPE html>
<html>
  <head>
    <meta charset="utf-8">
    <title>VueJS NodeJS and Express example</title>
    <link rel="stylesheet" href="https://maxcdn.bootstrapcdn.com/bootstrap/3.3.7/css/bootstrap.min.css" integrity="sha384-BVYiiSIFeK1dGmJRAkycuHAHRg32OmUcww7on3RYdg4Va+PmSTsz/K68vbdEjh4u" crossorigin="anonymous">
  </head>
  <body>
    <div id="app"></div>
    <script src="bundle.js"></script>
  </body>
</html>
- Tiếp tục bạn cần phải tạo file webpack.config.js chùng để chạy
+ Source webpack.config.js
// webpack.config.js
module.exports = {
  // This is the "main" file which should include all other modules
  entry: './src/main.js',
  // Where should the compiled file go?
  output: {

    filename: 'bundle.js'
  },
  resolve: {
  alias: {
    vue: 'vue/dist/vue.js'
  }
},
  module: {
    // Special compilation rules
    loaders: [
      {
        // Ask webpack to check: If this file ends with .js, then apply some transforms
        test: /\.js$/,
        // Transform it with babel
        loader: 'babel-loader',
        // don't transform node_modules folder (which don't need to be compiled)
        exclude: /node_modules/
      },
      {
        // Ask webpack to check: If this file ends with .vue, then apply some transforms
        test: /\.vue$/,
        // don't transform node_modules folder (which don't need to be compiled)
        exclude: /(node_modules|bower_components)/,
        // Transform it with vue
      use: {
        loader: 'vue-loader'
      }
    }
  ]
},
devServer: {
       port: 3000
   }
}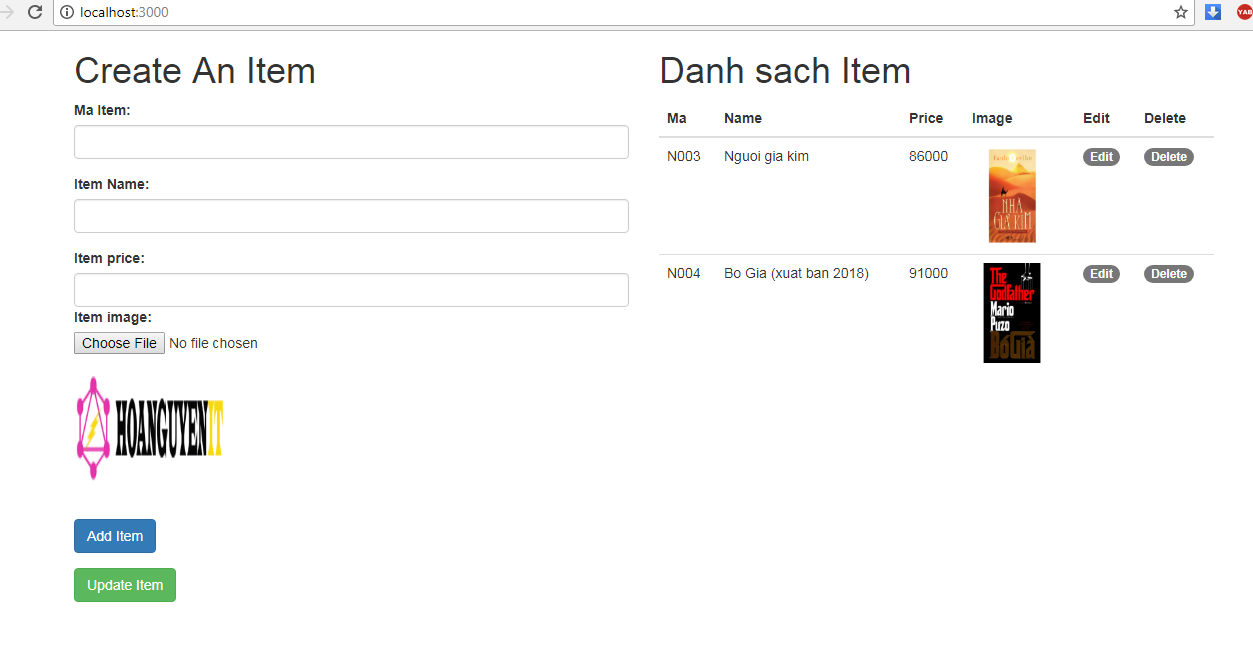
- Giờ bạn thử chạy câu lệnh như sau: npm start và bạn gõ trên trình duyệt https://localhost:3000 bạn sẽ thấy giao diện bạn vừa tạo ở file CreateItem.vue
Còn nếu bạn chạy câu lệnh npm start báo lỗi bạn kiểm tra lại các bước ban đầu lại nhé
* Phần Back-End
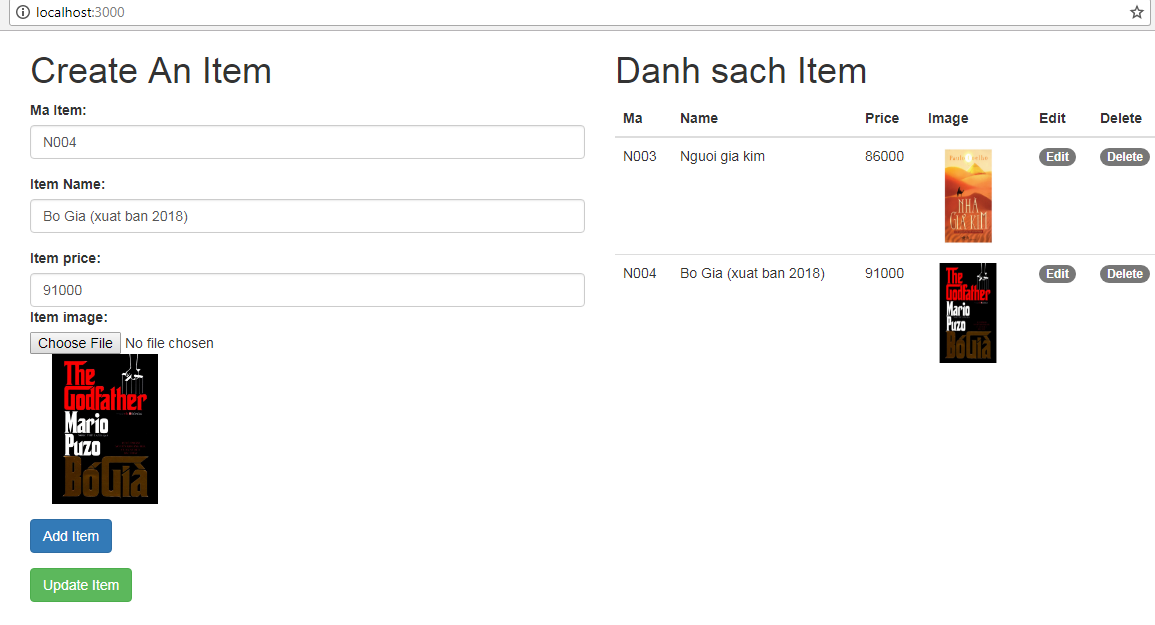
- Giờ bạn mở file CreateItem.vue và chỉnh sửa lại như sau nhé. Mình thêm các hàm để lấy dữ liệu, thêm, sửa ,xóa và bạn sẽ thắc mắt, các hàm đó lấy từ đâu,
thì mình sẽ giải thích cho mấy bạn hiểu, các this.axios.get hoặc post, nó gọi đến Nodejs và nodejs nó sẽ lấy dữ liệu và trả về ngược lại cho vuejs
* Source CreateItem.vue
<template>
<div>
<div class="row">
<div class="col-md-6">
<h1>Create An Item</h1>
<form v-on:submit.prevent="addItem">
<div class="form-group">
<label>Ma Item:</label>
<input type="text" class="form-control" v-model="item.masp"/>
</div>
<div class="form-group">
<label>Item Name:</label>
<input type="text" class="form-control" v-model="item.name"/>
</div>
<div class="form-group">
<label>Item price:</label>
<input type="text" class="form-control col-md-6" v-model="item.price">
</div>
<div class="form-group">
<label>Item image:</label>
<input @change="uploadImage" type="file" name="image" accept="image/*">
<img :src="imageSrc" class="image">
</div>
<div class="form-group">
<button class="btn btn-primary">Add Item</button>
</div>
</form>
<button class="btn btn-success" v-on:click="updateItem">Update Item</button>
</div>
<div class="col-md-6">
<h1>Danh sach Item</h1>
<table class="table">
<thead>
<tr>
<th>Ma</th>
<th>Name</th>
<th>Price</th>
<th>Image</th>
<th>Edit</th>
<th>Delete</th>
</tr>
</thead>
<tbody>
<tr v-for="(sp,index) in dulieu[0]" v-if="sp !== null" >
<td>{{sp.masp}}</td>
<td>{{sp.name}}</td>
<td>{{sp.price}}</td>
<td><img :src="sp.image" class="class_img" /></td>
<td><span class="badge badge-info" v-on:click="editItem(index)">Edit</span></td>
<td><span class="badge badge-danger" v-on:click="deleteItem(index)">Delete</span></td>
</tr>
</tbody>
</table>
</div>
</div>
<div class="row">
<div class="col-md-6">
<!-- <router-link :to="{name:'UploadImage'}">Upload Image</router-link> -->
</div>
</div>
</div>
</template>
<style>
.image{
width:150px;
height: 150px;
}
.class_img{
width:80px;
height: 100px;
}
</style>
<script>
export default{
data(){
return {
item:{},
dulieu:[],
imageSrc: 'https://hoanguyenit.com/public/img/logo33.png',
}
},
created:function(){
this.getItems();
},
methods:{
addItem(){
this.axios.post("https://localhost:8888/add",this.item).then((response) => {
console.log(response);
this.dulieu[0].push({
"masp":this.item.masp,
"name":this.item.name,
"price":this.item.price,
"image":"uploads/"+this.item.image
})
});
},
editItem(index){
//console.log(this.dulieu[0][index]);
var data_edit = this.dulieu[0][index];//lấy dữ liệu cần edit
this.item=data_edit;//đưa dữ liệu vào item
this.imageSrc = this.item.image;//gắn image lại
},
updateItem(){
this.axios.post("https://localhost:8888/update",this.item).then((response) => {
var image = this.item.image.replace('uploads/', '');
console.log(image);
var index = response.data['vitri'];
this.dulieu[0][index].masp=this.item.masp;
this.dulieu[0][index].name=this.item.name;
this.dulieu[0][index].price=this.item.price;
this.dulieu[0][index].image="uploads/"+image;
this.item={};
// console.log(this.dulieu[0][index].image="uploads/"+this.item.image);
console.log(this.dulieu[0]);
});
},
deleteItem(index){
var masp = this.dulieu[0][index].masp;
//console.log(masp);
this.axios.get("https://localhost:8888/delete/"+masp).then((response)=>{
console.log(response.data);
this.dulieu[0].splice(index, 1);
});
},
getItems(){
this.axios.get("https://localhost:8888/getItems").then((response) => {
this.dulieu.push(response.data);
console.log(this.dulieu);
});
},
uploadImage: function(e) {
var files = e.target.files;
this.item.image = files[0].name;
if(!files[0]) {
return;
}
var data = new FormData();
data.append('image', files[0]);
var reader = new FileReader();
reader.onload = (e) => {
this.imageSrc = e.target.result;
};
this.axios.post('https://localhost:8888/uploads', data, {headers: { 'Content-Type': 'multipart/form-data' } }).then(function (response) {
reader.readAsDataURL(files[0]);
}).catch(function (error) {
console.log(error) // catch your error
});
reader.readAsDataURL(files[0]);
}
}
}
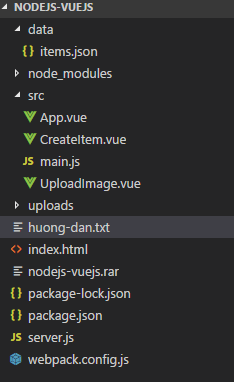
</script>- Giờ bạn tạo cho mình một thư mục data dùng để chứa file json lưu thông tin các quyển sách mà mình thêm, bạn tạo file items.json năm trong thư mục data này
+ Sourec items.json (bạn cần tạo cấu trúc file json như vậy nhé)
{"sanphams":[]}
- Tiếp tục bạn cần tạo một file server.js, file này dùng để cầu hình nodejs, như import các module của nodejs và các hàm để vuejs có thể truy xuất lấy dữ liệu,với các thao tác thêm,sửa,Xóa
+ Source server.js
var express =  require('express');
var app      = express();
var jsonfile = require('jsonfile');
var path = require('path');
var fs = require('fs');
var multer  = require('multer');
var https = require('https').Server(app);
var bodyParser = require('body-parser');
var cors = require('cors');
app.use(express.static(__dirname + '/uploads'));
app.use(bodyParser.json());
app.use(cors());
var file = __dirname+'/data/items.json';
var storage = multer.diskStorage({
  destination: function (req, file, cb) {
    cb(null, 'uploads/')
  },
  filename: function (req, file, cb) {
    cb(null, file.originalname)
  }
});

var upload = multer({ storage: storage });


app.post("/add",function(req,res){
	var sanpham = req.body;
	var data=jsonfile.readFileSync(file);
	 data.sanphams.push({
              "masp":sanpham.masp,
              "name":sanpham.name,
              "price":sanpham.price,
              "image":"uploads/"+sanpham.image
            });
    fs.writeFile('data/items.json', JSON.stringify(data), 'utf-8', function(err) {
      if (err) throw err
      console.log('Done!');
    });

    res.json(data);
});
app.post('/update',function(req,res){
	var data_list=jsonfile.readFileSync(file);//get dữ liệu
	var sanpham = req.body;
	var f=0;
	var xacnhan=0;
	while(f<data_list['sanphams'].length){
              if(data_list['sanphams'][f].masp==sanpham.masp){
                xacnhan=1;
                break;
              }
              f++;
    }
   // return res.json(data_list['sanphams'][f]);
    if(xacnhan>0){
    	data_list['sanphams'][f]={
              "masp":sanpham.masp,
              "name":sanpham.name,
              "price":sanpham.price,
              "image":"uploads/"+sanpham.image.replace("uploads/","")
            };
    	//console.log(data_list['sanphams']);

	    fs.writeFile('data/items.json', JSON.stringify(data_list), 'utf-8', function(err) {
	      if (err) throw err
	      console.log('Done!');
	  	return res.json({"vitri":f});
	    });
    }
    else{
    	return res.json("success");
    }

});
app.get('/delete/:masp',function(req,res){
  var data_list=jsonfile.readFileSync(file);//get dữ liệu
  var masp = req.params.masp;
  var f=0;
  var xacnhan = 0;
  while(f<data_list['sanphams'].length){
      if(masp == data_list['sanphams'][f].masp){
        xacnhan = 1;
        break;
      }
      f++;
  }
  //neu xac nhan bang 1 la ton tai co masp
  if(xacnhan>0){


    var deletedItem = data_list.sanphams.splice(f,1);
     fs.writeFile('data/items.json', JSON.stringify(data_list), 'utf-8', function(err) {
      if (err) throw err
      console.log('Done!');
      return res.json(data_list);
    });
  }
  else{
   return res.json("Khong ton tai");
  }

});
app.get('/getItems',function(req,res){
  var data = jsonfile.readFileSync(file);

   return res.json(data['sanphams']);
});
app.post('/uploads', upload.single('image'), (req, res) => {
   console.log(req.body);
    return res.json(req.body);
});
https.listen(process.env.PORT || 8888, function(){
  console.log('listening on *:8888');
});
- Các bạn nhìn file server.js bên trên bạn cũng sẽ thắt mắc làm sao để chạy file này lên, để cho vuejs biết mà truy xuất để chạy được file này bạn cần làm như sau:
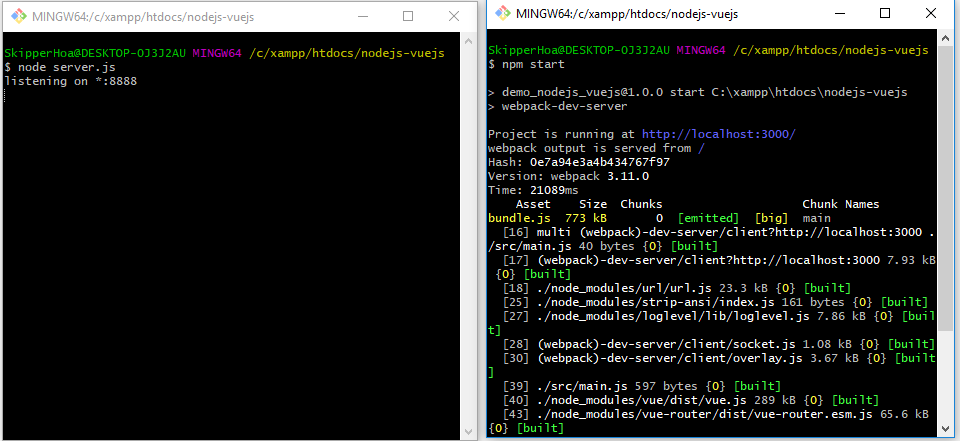
Bước 1: Bạn cần mở command chạy webpack của Vuejs trước: npm start
Bước 2: Bạn mở command cửa sổ thứ 2 chạy: node server.js
- Có nghĩa là bạn cần mở 2 cửa sổ command nhé vì nó là riêng biệt cái chạy vuejs và cái chạy server nodejs, nếu bạn chỉ khỏi động chỉ một cái thì khi get dữ liệu thông qua axios sẽ báo lỗi liền.