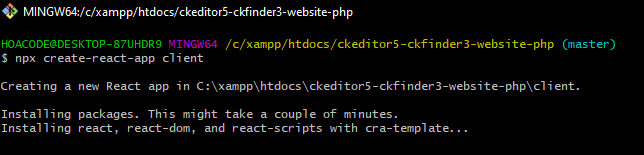
Ở bài viết trước mình đã kết hợp Ckeditor 5 + Ckfinder 3 trong website php rồi, nay mình tích hợp React làm front-end , bạn xem lại bài viết trước và download source trên github về nhé, tại phần này, mình sẽ tạo thư mục react trong project trước
+ ADD CKEDITOR 5 + CKFINDER 3 TO WEBSITE PHP
Github Full:Ckeditor 5 + Ckfinder 3 [PHP + React]
Sau khi bạn git clone soure trước về, ta tiến hành cài đặt react trong thư mục đó như sau:
# Cài đặt thư viện ckeditor5 trong React
npm install --save @ckeditor/ckeditor5-react @ckeditor/ckeditor5-build-classic
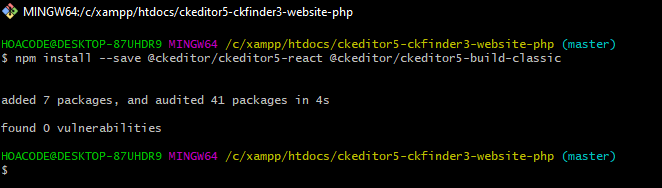
Bạn có thể xem thêm tại trang chủ ở đây: https://ckeditor.com/docs/ckeditor5/latest/installation/getting-started/frameworks/react.html
# Chỉnh sửa tập tin App.js trong thư mục client/src của ta
Thư mục client chính là thư mục react mà ta vừa download ở hình bên trên
import logo from './logo.svg';
import './App.css';
import { CKEditor } from '@ckeditor/ckeditor5-react';
import ClassicEditor from '@ckeditor/ckeditor5-build-classic';
console.log(ClassicEditor.builtinPlugins.map( plugin => plugin.pluginName ))
function App() {
  return (
    <div className="App">
       <CKEditor
                    editor={ ClassicEditor }
                    data="<p>Hello from CKEditor 5!</p>"
                    config={{
                        ckfinder: {
                            // Upload the images to the server using the CKFinder QuickUpload command.
                            uploadUrl: '/ckeditor5-ckfinder3-react-php/ckfinder/core/connector/php/connector.php?command=QuickUpload&type=Files&responseType=json',
                            // Define the CKFinder configuration (if necessary).
                            options: {
                                resourceType: 'Images'
                            }
                        },

                      toolbar: [ 'Essentials', 'CKFinderUploadAdapter', 'Autoformat', 'Bold', 'Italic', 'BlockQuote', 'CKBox', 'CKFinder', 'CloudServices', 'EasyImage', 'Heading', 'Image', 'ImageCaption', 'ImageStyle', 'ImageToolbar', 'ImageUpload', 'Indent', 'Link', 'List', 'MediaEmbed', 'Paragraph', 'PasteFromOffice', 'PictureEditing', 'Table', 'TableToolbar', 'TextTransformation' ],
                      heading: {
                          options: [
                              { model: 'paragraph', title: 'Paragraph', class: 'ck-heading_paragraph' },
                              { model: 'heading1', view: 'h1', title: 'Heading 1', class: 'ck-heading_heading1' },
                              { model: 'heading2', view: 'h2', title: 'Heading 2', class: 'ck-heading_heading2' }
                          ]
                      }
                    }}
                    onReady={ editor => {
                        // You can store the "editor" and use when it is needed.
                        console.log( 'Editor is ready to use!', editor );
                    } }
                    onChange={ ( event, editor ) => {
                        const data = editor.getData();
                        console.log( { event, editor, data } );
                    } }
                    onBlur={ ( event, editor ) => {
                        console.log( 'Blur.', editor );
                    } }
                    onFocus={ ( event, editor ) => {
                        console.log( 'Focus.', editor );
                    } }
                />
    </div>
  );
}

export default App;
Đoạn code bên trên ta cần import thư viện của ckedtor5 vào file để sử dụng nhé
import { CKEditor } from '@ckeditor/ckeditor5-react';
import ClassicEditor from '@ckeditor/ckeditor5-build-classic';
Chú ý ở bần config ckfinder trong file trên, ta cần gọi cung cấp url trỏ tới ckfinder của ta trong thư mục project nhé
ckfinder: {
           // Upload the images to the server using the CKFinder QuickUpload command.
           uploadUrl: '/ckeditor5-ckfinder3-react-php/ckfinder/core/connector/php/connector.php?command=QuickUpload&type=Files&responseType=json',
           // Define the CKFinder configuration (if necessary).
         options: {
                                resourceType: 'Images'
       }
  },
Sẽ có nhiều bạn sẽ hỏi, ủa mình để đường dẫn uploadUrl trên như thế, nó mặc định sẽ nhận đường dẫn của react http://localhost:3000 của ta rồi , sao hoạt động được
Okay, đễ giải quyết vấn đề trên ta cần chỉnh sửa proxy cho react thôi,
Hãy mỏ tập tin package.json trong project của react thêm đoạn code sao, nó sẽ trỏ tới đường dẫn backend có chứa thư mục ckfinder
"proxy": "http://localhost",
  "secure": false
File package.json
{
  "name": "client",
  "homepage": "http://localhost/ckeditor5-ckfinder3-react-php/admin",
  "version": "0.1.0",
  "private": true,
  "dependencies": {
    "@testing-library/jest-dom": "^5.16.4",
    "@testing-library/react": "^13.3.0",
    "@testing-library/user-event": "^13.5.0",
    "react": "^18.2.0",
    "react-dom": "^18.2.0",
    "react-scripts": "5.0.1",
    "web-vitals": "^2.1.4"
  },
  "scripts": {
    "start": "react-scripts start",
    "build": "react-scripts build",
    "test": "react-scripts test",
    "eject": "react-scripts eject"
  },
  "eslintConfig": {
    "extends": [
      "react-app",
      "react-app/jest"
    ]
  },
  "browserslist": {
    "production": [
      ">0.2%",
      "not dead",
      "not op_mini all"
    ],
    "development": [
      "last 1 chrome version",
      "last 1 firefox version",
      "last 1 safari version"
    ]
  },
  "proxy": "http://localhost",
  "secure": false
}
Okay, bây giờ bạn có thể chạy npm start được rồi
Nhưng có một điều, bạn chỉ upload được hình thôi, chứ không thể mở ckfinder manager để chọn hình được,
Để làm được điều đó, bạn phải add đường dẫn trỏ tới file ckfinder.js trong file public/index.html của project react
<!DOCTYPE html>
<html lang="en">
  <head>
    <meta charset="utf-8" />
    <link rel="icon" href="%PUBLIC_URL%/favicon.ico" />
    <meta name="viewport" content="width=device-width, initial-scale=1" />
    <meta name="theme-color" content="#000000" />
    <meta
      name="description"
      content="Web site created using create-react-app"
    />
    <link rel="apple-touch-icon" href="%PUBLIC_URL%/logo192.png" />
    <!--
      manifest.json provides metadata used when your web app is installed on a
      user's mobile device or desktop. See https://developers.google.com/web/fundamentals/web-app-manifest/
    -->
    <link rel="manifest" href="%PUBLIC_URL%/manifest.json" />
    <!--
      Notice the use of %PUBLIC_URL% in the tags above.
      It will be replaced with the URL of the `public` folder during the build.
      Only files inside the `public` folder can be referenced from the HTML.

      Unlike "/favicon.ico" or "favicon.ico", "%PUBLIC_URL%/favicon.ico" will
      work correctly both with client-side routing and a non-root public URL.
      Learn how to configure a non-root public URL by running `npm run build`.
    -->
    <title>React App</title>
  </head>
  <body>
    <noscript>You need to enable JavaScript to run this app.</noscript>
    <div id="root"></div>
    <!--
      This HTML file is a template.
      If you open it directly in the browser, you will see an empty page.

      You can add webfonts, meta tags, or analytics to this file.
      The build step will place the bundled scripts into the <body> tag.

      To begin the development, run `npm start` or `yarn start`.
      To create a production bundle, use `npm run build` or `yarn build`.
    -->
    <script src="http://localhost/ckeditor5-ckfinder3-react-php/ckfinder/ckfinder.js"></script>

  </body>
</html>
Cuối cùng để nó hoàn thiện ,ta cần build nó ra và upload đến thư mục mà ta đã cấu hình trên website.
Chú ý ở "homepage" trong package.json của React nhé, nó là nơi ta cấu hình router của react, ta chỉ việc copy file của react khi build thành công vào là được, để bạn mới có thể sài ckeditor5+ckfinder3 trong React đầy đủ tính năng
npm run buildChạy lệnh trên ta sẽ có thư mục build, chứa các file mà react đã biên dịch cho ta, ta chỉ việc copy tất cả file đó, để đến thư mục ta cần dùng là được!