Hôm nay mình chia sẻ với mọi người cách tích hợp xác thực Authentication Json Web Token (JWT) to Laravel 8. Đầu tiên bạn vào đường dẫn sau để download hoặc git clone source về máy tính nhé : https://github.com/laravel/laravel/tree/8.x
Sau khi tải về bạn tiến hành giải nén và cd tới thư mục project chạy lệnh: composer install để cài các thư viện cần thiết của laravel, bạn sẽ thấy được thư mục vendor
Okay giờ hãy tạo một cơ sở dữ liệu database, nếu bạn đã có sẵn thì tiến hành mở file .env lên chỉnh sửa connect tới database của bạn
DB_CONNECTION=mysql
DB_HOST=127.0.0.1
DB_PORT=3306
DB_DATABASE=jwt
DB_USERNAME=root
DB_PASSWORD=MẬT_KHẨU_MYSQL
Tiến hành chạy câu lệnh: php artisan migrate
Laravel sẽ tạo các table cần thiết đến database của bạn, bạn có thể vào database xem thử nhé
# Cài đặt cấu hình JWT trong laravel bằng câu lệnh sau:
composer require tymon/jwt-auth:^1.0.2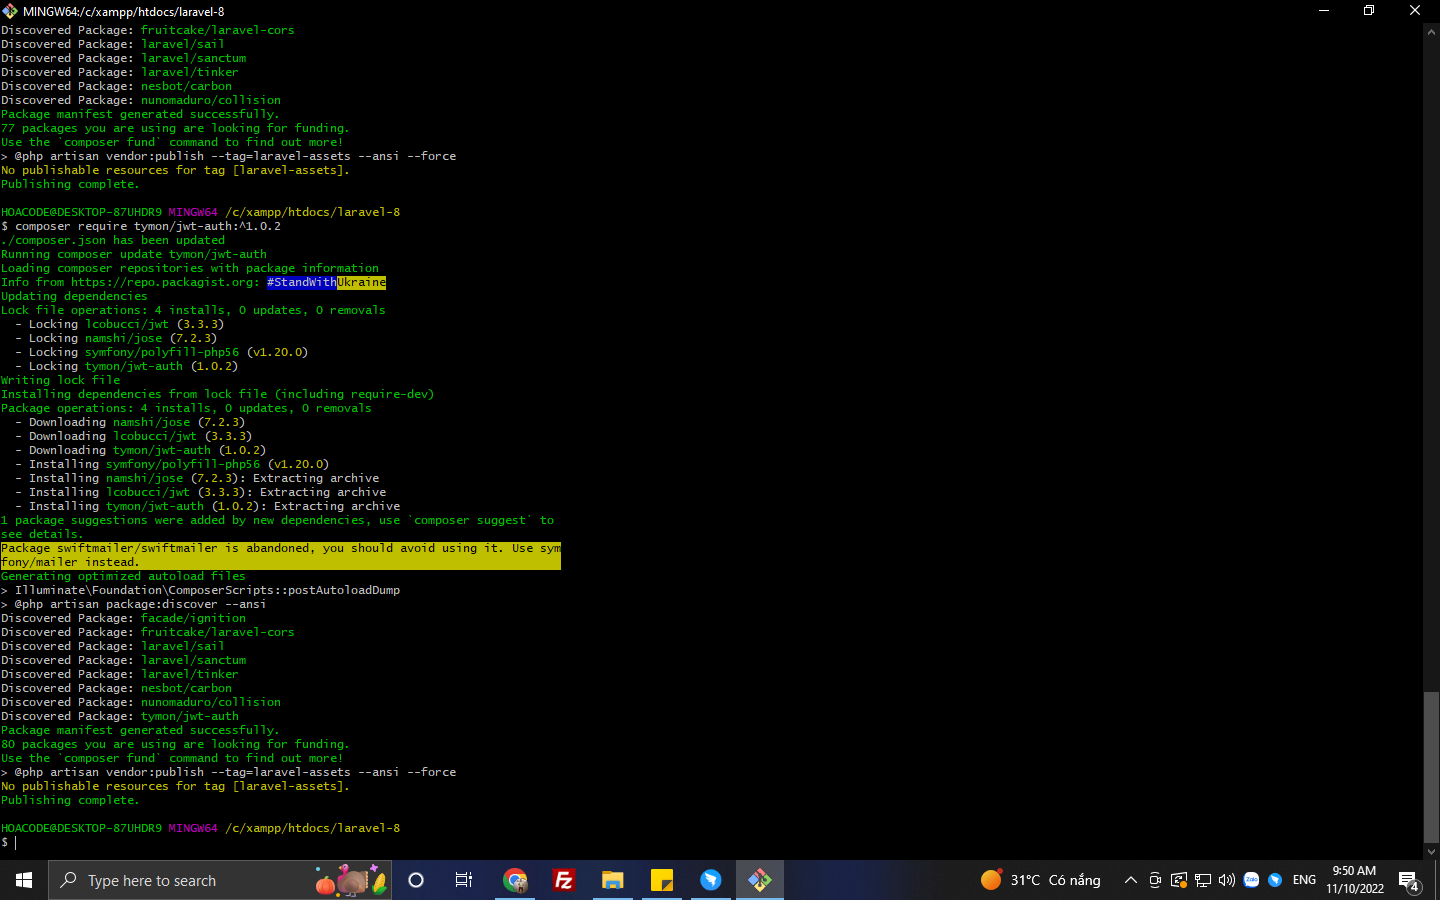
Sau khi cài đặt thành công! tiếp theo ta cần phải tích hợp một số code đến file config/app.php
'providers' => [
    ....
    ....
    Tymon\JWTAuth\Providers\LaravelServiceProvider::class,
],
Thêm các facades sau vào mảng aliases:
'aliases' => [
    ....
    'JWTAuth' => Tymon\JWTAuth\Facades\JWTAuth::class,
    'JWTFactory' => Tymon\JWTAuth\Facades\JWTFactory::class,
    ....
],
Tiếp đó, sử dụng lệnh sau để public các file JWT Auth từ trong vendor sang config/jwt.php:
php artisan vendor:publish --provider="Tymon\JWTAuth\Providers\LaravelServiceProvider"
Tiếp theo là việc tạo mã khóa bí mật của ta thôi, nó là mã khóa secret key
php artisan jwt:secret
Bạn sẽ thấy một secret key được tạo trong file .env
* Thiết lập Model User
Các bạn mở file App\Models\User.php lên và implement interface Tymon\JWTAuth\Contracts\JWTSubject; thư viện này vào nhé
<?php

namespace App\Models;

use Illuminate\Notifications\Notifiable;
use Illuminate\Contracts\Auth\MustVerifyEmail;
use Illuminate\Database\Eloquent\Factories\HasFactory;
use Illuminate\Foundation\Auth\User as Authenticatable;
use Tymon\JWTAuth\Contracts\JWTSubject;

class User extends Authenticatable implements JWTSubject
{
    use HasFactory, Notifiable;

    /**
     * The attributes that are mass assignable.
     *
     * @var array
     */
    protected $fillable = [
        'name',
        'email',
        'password',
    ];

    /**
     * The attributes that should be hidden for arrays.
     *
     * @var array
     */
    protected $hidden = [
        'password',
        'remember_token',
    ];

    /**
     * The attributes that should be cast to native types.
     *
     * @var array
     */
    protected $casts = [
        'email_verified_at' => 'datetime',
    ];

    /**
     * Get the identifier that will be stored in the subject claim of the JWT.
     *
     * @return mixed
     */
    public function getJWTIdentifier() {
        return $this->getKey();
    }

    /**
     * Return a key value array, containing any custom claims to be added to the JWT.
     *
     * @return array
     */
    public function getJWTCustomClaims() {
        return [];
    }
}
Các bạn chú ý ở mình Class User mình có implements JWTSubject, đồng thời mình thêm 2 function này(getJWTCustomClaims,getJWTIdentifier)
# Thiết lập JWT Auth Guard để bảo vệ quá trình xác thực của ứng dụng Laravel
Hãy mở file config/auth.php lên và chỉnh sửa như sau:
 /*
    |--------------------------------------------------------------------------
    | Authentication Defaults

    */

    'defaults' => [
        'guard' => 'api',//default "web"
        'passwords' => 'users',
    ],

    /*
    |--------------------------------------------------------------------------
    | Authentication Guards

    |
    */

    'guards' => [
        'web' => [
            'driver' => 'session',
            'provider' => 'users',
        ],
        'api' => [
            'driver' => 'jwt',  //default "token"
            'provider' => 'users',
            'hash' => false,
        ],
    ],
# Tạo Controller đễ xác thực người dùng :
Bạn chạy câu lệnh dưới sẽ được một file AuthController.php trong thư mục App\Controllers\Api
php artisan make:controller Api/AuthControllerBạn mở file lên và viết các phương thức Login,Register, Refetch Token, ChangePassword,....
<?php

namespace App\Http\Controllers\Api;
use Illuminate\Http\Request;

use Illuminate\Support\Facades\Auth;
use App\Models\User;
use Validator;


class AuthController extends Controller
{
    /**
     * Create a new AuthController instance.
     *
     * @return void
     */
    public function __construct() {
        $this->middleware('auth:api', ['except' => ['login', 'register']]);

    }

    /**
     * Get a JWT via given credentials.
     *
     * @return \Illuminate\Http\JsonResponse
     */
    public function login(Request $request){
    	$validator = Validator::make($request->all(), [
            'email' => 'required|email',
            'password' => 'required|string|min:6',
        ]);

        if ($validator->fails()) {
            return response()->json($validator->errors(), 422);
        }

        if (! $token = auth('api')->attempt($validator->validated())) {
            return response()->json(['error' => 'Unauthorized'], 401);
        }

        return $this->createNewToken($token);
    }

    /**
     * Register a User.
     *
     * @return \Illuminate\Http\JsonResponse
     */
    public function register(Request $request) {
        $validator = Validator::make($request->all(), [
            'name' => 'required|string|between:2,100',
            'email' => 'required|string|email|max:100|unique:users',
            'password' => 'required|string|confirmed|min:6',
        ]);

        if($validator->fails()){
            return response()->json($validator->errors()->toJson(), 400);
        }

        $user = User::create(array_merge(
                    $validator->validated(),
                    ['password' => bcrypt($request->password)]
                ));

        return response()->json([
            'message' => 'User successfully registered',
            'user' => $user
        ], 201);
    }


    /**
     * Log the user out (Invalidate the token).
     *
     * @return \Illuminate\Http\JsonResponse
     */
    public function logout() {
        auth('api')->logout();

        return response()->json(['message' => 'User successfully signed out']);
    }

    /**
     * Refresh a token.
     *
     * @return \Illuminate\Http\JsonResponse
     */
    public function refresh() {
        return $this->createNewToken(auth('api')->refresh());
    }

    /**
     * Get the authenticated User.
     *
     * @return \Illuminate\Http\JsonResponse
     */
    public function userProfile() {
        return response()->json(auth('api')->user());
    }

    /**
     * Get the token array structure.
     *
     * @param  string $token
     *
     * @return \Illuminate\Http\JsonResponse
     */
    protected function createNewToken($token){
        return response()->json([
            'access_token' => $token,
            'token_type' => 'bearer',
            'expires_in' => auth('api')->factory()->getTTL() * 60,
            'user' =>auth('api')->user()
        ]);
    }

    public function changePassWord(Request $request) {
        $validator = Validator::make($request->all(), [
            'old_password' => 'required|string|min:6',
            'new_password' => 'required|string|confirmed|min:6',
        ]);

        if($validator->fails()){
            return response()->json($validator->errors()->toJson(), 400);
        }
        $userId =auth('api')->user()->id;

        $user = User::where('id', $userId)->update(
                    ['password' => bcrypt($request->new_password)]
                );

        return response()->json([
            'message' => 'User successfully changed password',
            'user' => $user,
        ], 201);
    }
}
Okay mình sẽ giải thích sơ qua cho mọi người hiểu cơ chế xử lý nó như thế nào nhé
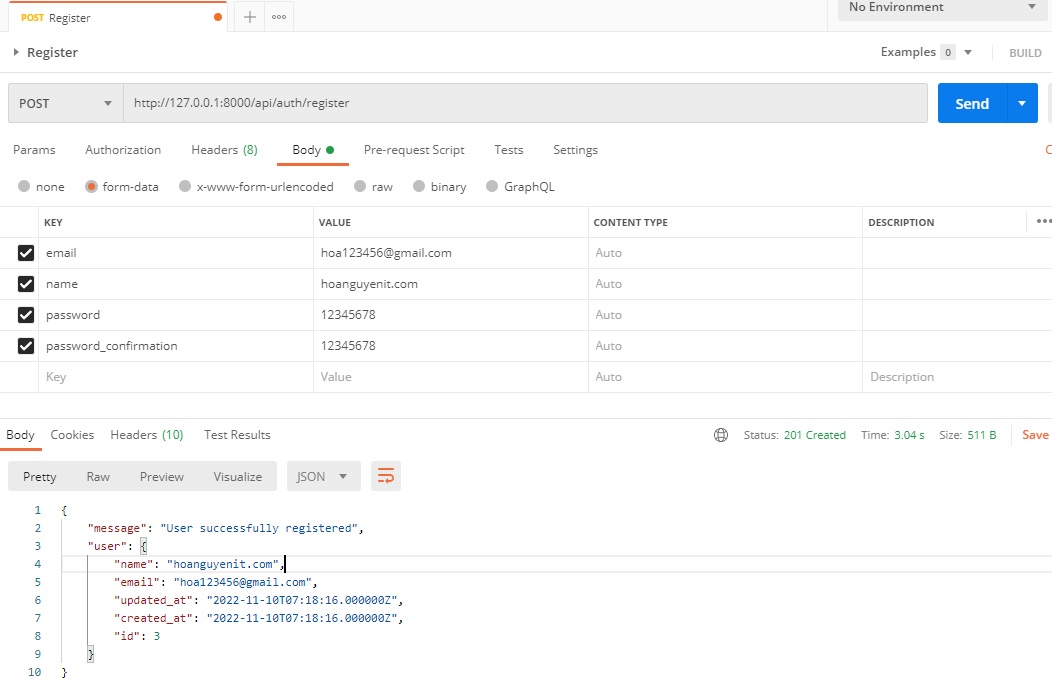
1. Đăng ký user ta cần khi báo 4 tham số (name,email,password, password_confirmation)
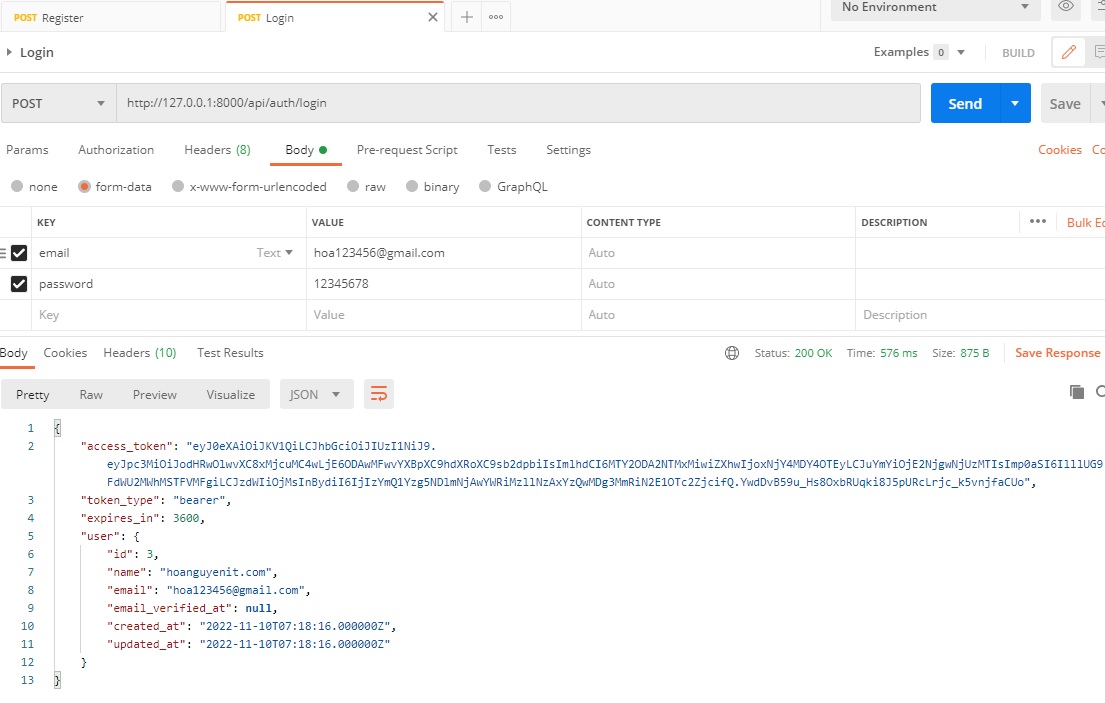
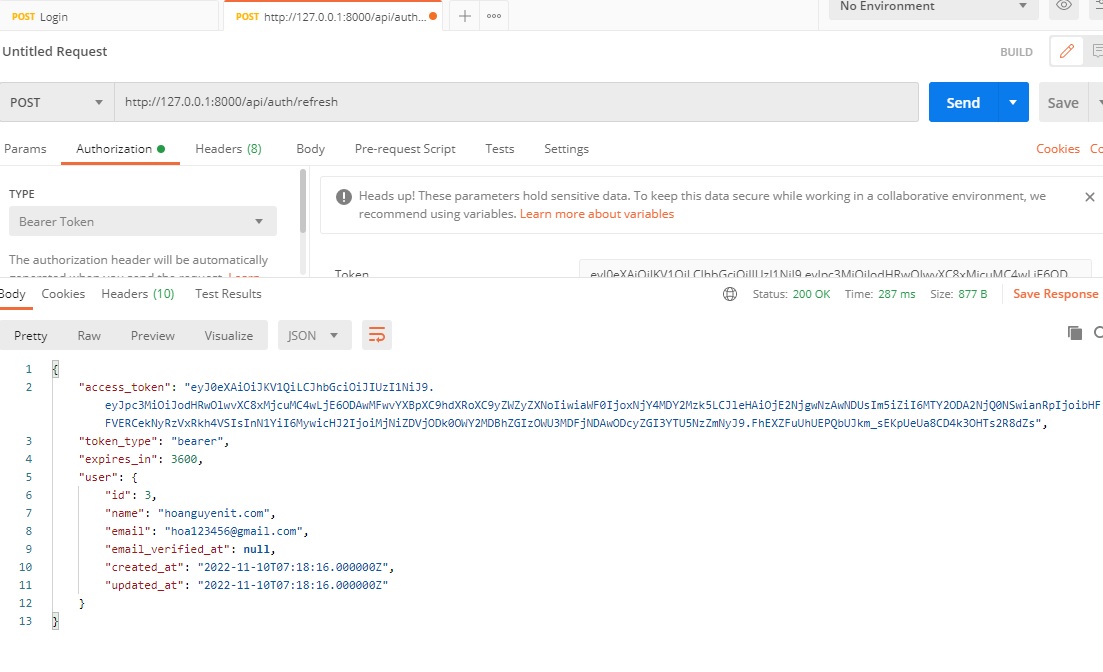
2. Login ta cần 2 tham số(email,password), nếu login thành công ta sẽ được một access_token
3. Lấy access_token đó gắn vào header Bearer token để ta có thể lấy thông tin user
4. Nếu access_token hết hạn, ta cần gửi access_token đến server để tạo lại token mới cho ta (nhớ là phải gắn nó vào header bearer token nhé)
5. Logout ta cũng như bước 2,3 cũng kèm access_token đó trong header bearer token
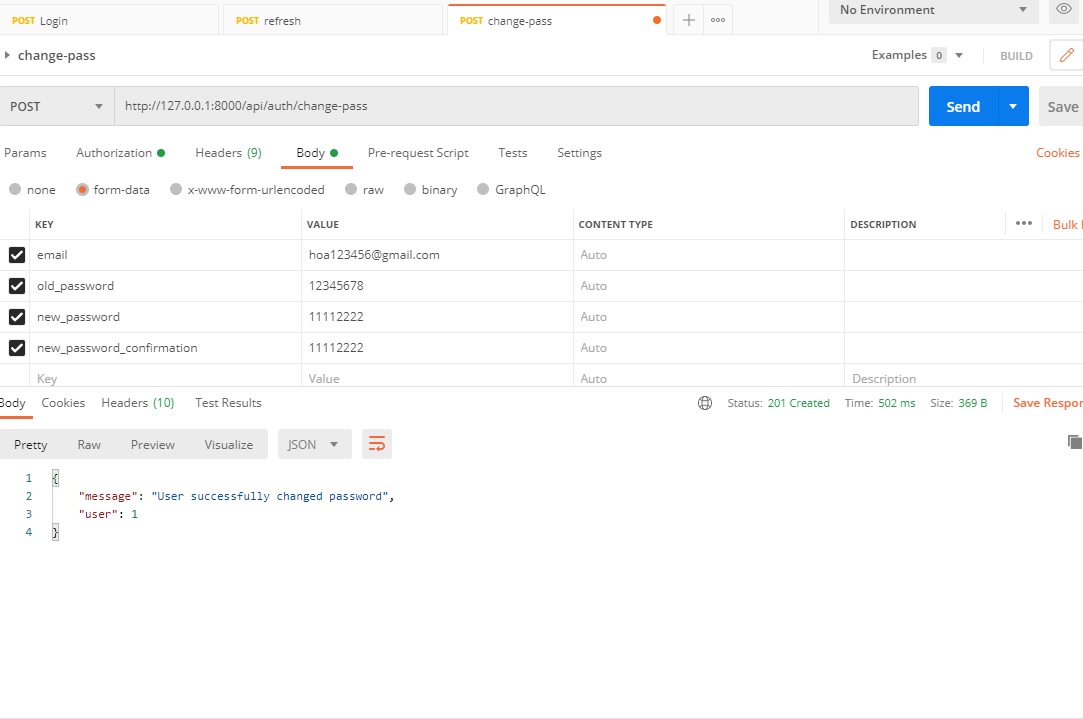
6. Change password ta cần gửi 3 tham số (email, old_password, new_password, new_password_confirmation) , đồng thời cũng kèm access_token đến trong header nhé
# Thiết lập Route
Hãy mời routes/api.php
Route::group([
    'middleware' => 'api',
    'namespace' => 'App\Http\Controllers',
    'prefix' => 'auth'

], function ($router) {
    Route::post('/login', 'Api\AuthController@login');
    Route::post('/register','Api\AuthController@register');
    Route::post('/logout', 'Api\AuthController@logout');
    Route::post('/refresh', 'Api\AuthController@refresh');
    Route::get('/user-profile','Api\AuthController@userProfile');
    Route::post('/change-pass', 'Api\AuthController@changePassWord');
});
Giờ chúng ta thực hành thôi, nảy giờ làm từa lưa hết rồi, không biết có chạy không kaka, run server thôi: php artisan serve
Hình 1: Register
Hình 2: Login
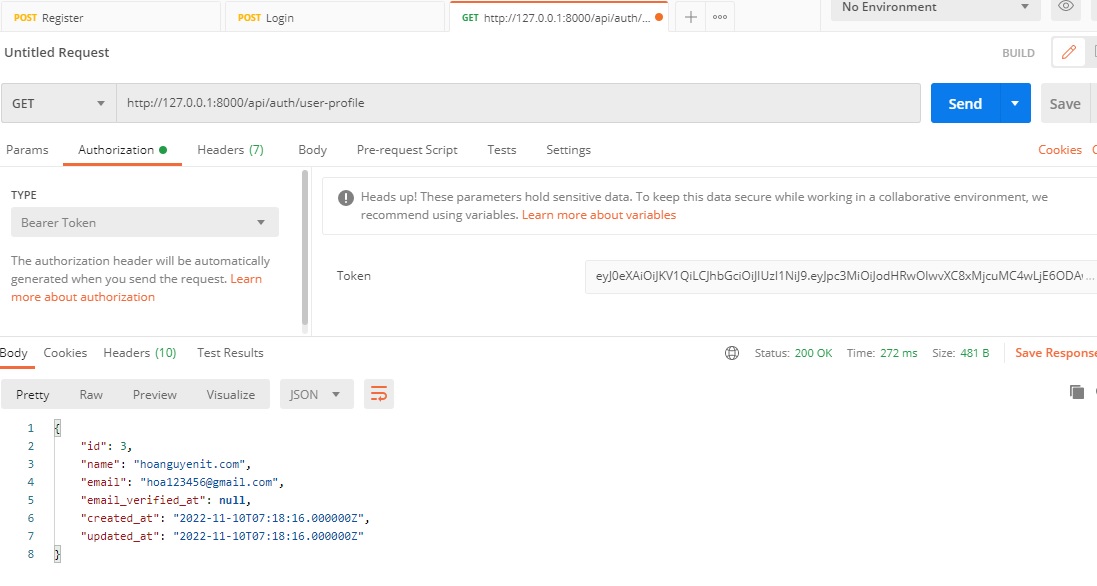
Hình 3: get thông tin user, chúng ta cần lấy access_token trả về khi login, gắn vào header bearer token để lấy thông tin người dùng
Hình 4: Logout token, chúng ta cần lấy access_token trước đó gắn trong header bearer token. Để xử lý logout

Hình 5: Giả sử bạn chưa logout, bạn dẫn còn access_token mà nó đã hết hạn, thì bạn có thể gắn refresh token , để createToken mới về cho ta, cách làm cũng như các bước trên, gắn token vào header bearer token
Hình 6: Lấy access_token gắn vào header bearer token để cập nhật password nhé :
Okay vậy là xong , các bạn có thể thực hành thử nhé. ở đây mình chia sẻ một số kinh nghiệm khi gặp phải như sau:
- Giả sử web bạn đã cài đặt php artisan make:auth rồi, giờ bạn muốn gắn jwt nửa, bạn sẽ gặp một lỗi là sử dụng login auth trên web không được, mà login jwt api trên postman thì ok.
- Chính vì trong Auth nó cũng sử dụng auth()->user() nó đụng với jwt mà bạn thấy người ta thường cài đặt auth()->user() nửa
- Chính vì thế mà bạn có thể xem lại đoạn code bên trên của mình có chỉ định rõ gàn cho auth('api')->user() trong file AuthController. Để tránh ảnh hưởng xung đột lẫn nhau
Thì lúc này bạn đã có thể vừa sử dụng được login auth trên web và sử dụng jwt api bên postman
Nói chung hơi lu bu, Mình cũng mới gặp phải, nên chia sẻ với mọi người, nếu mọi người gặp phải thì xử lý vụ đó thử xem nhé!