
Nay mình sẽ làm một example React cùng với Redux-Toolkit cho mọi người xem thử nhé, nói chung nó cũng đơn giản thôi. Mình làm ví dụ về comment, bao gồm các chức năng như( Add, Update, Remove), Okay let's go @@
Github: Redux-Toolkit CRUD example with React Hooks
# Install Project Redux-Toolkit
npx create-react-app my-app --template redux
Nhiệm vụ như sau:
Create commentSlice.js
Create Component Comment.js
Create comment.module.css
Add commentReduce to Store.js
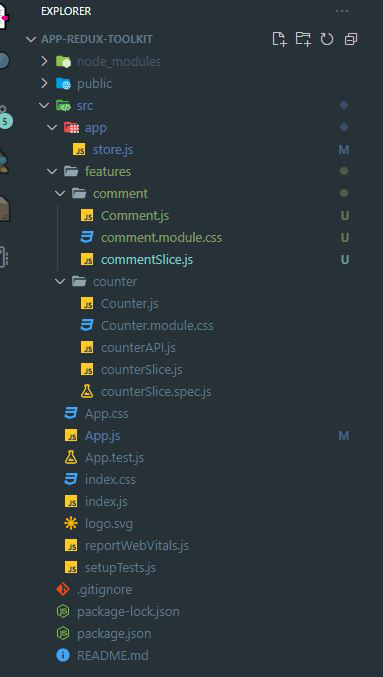
Bạn sẽ thấy thư mục project của mình như sau:
Tiến hành khởi tạo commentSlice.js
Create commentSlice.js trong đường dẫn thư mục /features/comment, trong file này ta cần cấu hình một số state, actions trong reducers để ta có thể gọi chúng trong Comment.js
import { createAsyncThunk, createSlice, current } from '@reduxjs/toolkit';
//setup state
const initialState = {
  comments: [],
};
export const commentSlice = createSlice({
  name: 'comment',
  initialState,
  reducers: {
    add: (state,action) => {
    // setup opject comment
      let cmt = {
         _id:1,
         _cmt:action.payload.cmt
      }

     // kiểm tra đã có comment nào chưa, nếu có ta setup id bằng chiều dài của mảng + 1
      if(state.comments.length>0) cmt._id = state.comments.length + 1

     // thêm comment vào mảng
      state.comments.push(cmt)
    },
    update: (state, action) => {
       //lấy dữ liệu từ state ra
       let data = state.comments;

       /**
        * ta có thể sử dụng current để console dữ liệu ra xem trước
        */
       console.log(current(data))

       //kiểm tra có _id comment trùng với action.payload._id không, nếu có tiến hành update tại vị trí đó
       data.map(item=>{
         if(item._id===action.payload._id) item._cmt = action.payload._cmt
       })
       // cập nhật lại state.comments kết quả mới
       state.comments = data
    },
    remove: (state,action) =>{
      //kiểm tra xóa _id trong mảng comments, sau đó cập nhật mảng comments lại
      state.comments = state.comments.filter(item=>item._id!=action.payload._id)
    }
  },
});

/*
kết xuất các function add, update, remove
trong Comment.js ta có thể gọi nó, để ta có thể dispatch action
import { add , update , remove , selectComments } from './commentSlice';
 let payload = {
        cmt : body
    }
    dispatch(add(payload))
*/
export const { add, update, remove } = commentSlice.actions;

/*
lấy giá trị data comments
trong Comment.js ta có thể select nó ra : const data = useSelector(selectComments)
*/
export const selectComments = (state)=> state.comment.comments;
export default commentSlice.reducer;
Mình cũng đã giải thích một số chức năng trong đoạn code trên.
Create Component Comment.js
Ta tiến hành tạo Comment.js để cài đặt giao diện cho người dùng đăng comment thôi
import React, { useEffect, useState } from 'react'
import styles from './comment.module.css';
import { add , update , remove , selectComments } from './commentSlice';
import { useDispatch, useSelector } from 'react-redux';
export default function Comment() {
const dispatch = useDispatch();
const [body,setBody] = useState();
//select state.comments từ trong commentSlice.js
const data = useSelector(selectComments)
//**set state comment edit */
const [dataEdit,setDataEdit] = useState()
//check onClick edit
const [edit,setEdit] = useState(false);
/** add comment **/
const addComment = ()=>{
let payload = {
cmt : body
}
dispatch(add(payload))
}
/** show modal edit comment **/
const editComment=(item)=>{
//set data edit, để hiển dữ liệu ra modal cần chỉnh sửa
setDataEdit(item);
//set onClick edit = true, để hiển thị modal cần chỉnh sửa
setEdit(true);
}
/**update comment */
const updateComment =()=>{
//btn update nó
dispatch(update(dataEdit))
//update lại trạng thái, để đóng modal
setEdit(false);
setDataEdit({})
}
/** close modal edit */
const closeEdit = ()=>{
setEdit(false);
setDataEdit({})
}
/** delete comment */
const removeComment = (item)=>dispatch(remove(item));
return (
<div className={styles.container}>
<div className={styles.boxcomment}>
<label>Body</label>
<textarea rows={5} cols={5} placeholder="Comment...!" onChange={(e)=>setBody(e.target.value)}></textarea>
<button onClick={()=>addComment()}>Send Comment</button>
</div>
<div className={styles.listComments}>
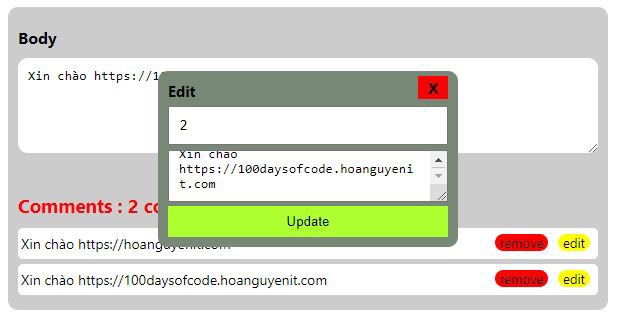
<h3>Comments : {data.length} comment</h3>
<ul>
{
data.length>0 && data.map((item)=>{
return (
<li key={item._id}>
<p className={styles.info}>{item._cmt}</p>
<div className={styles.control}>
<span onClick={()=>removeComment(item)}>remove</span>
<span onClick={()=>editComment(item)}>edit</span>
</div>
</li>
)
})
}
</ul>
</div>
<div className={styles.modal} style={{"display":edit?"block":"none"}}>
<label>Edit</label>
<span className={styles.close} onClick={()=>closeEdit()}>X</span>
<input type="text" value={dataEdit?._id} />
<textarea onChange={(e)=>setDataEdit({...dataEdit,_cmt:e.target.value})} value={dataEdit?._cmt}></textarea>
<button onClick={()=>updateComment()}>Update</button>
</div>
</div>
)
}
Đoạn code bên trên mình có giải thích một số chổ, bạn có thể xem nó, đồng thời ta cần hiển thị dữ liệu data ra khi có một dữ liệu được thêm vào
data.length>0 && data.map((item)=>{
    return (
      <li key={item._id}>
        <p className={styles.info}>{item._cmt}</p>
        <div className={styles.control}>
            <span onClick={()=>removeComment(item)}>remove</span>
            <span onClick={()=>editComment(item)}>edit</span>
        </div>
      </li>
    )
 })
Ta cần bắt sự kiện edit dữ liệu, ta cần cài đặt modal edit như sau:
  <div className={styles.modal} style={{"display":edit?"block":"none"}}>

            <label>Edit</label>
            <span className={styles.close} onClick={()=>closeEdit()}>X</span>
            <input type="text" value={dataEdit?._id} />
            <textarea onChange={(e)=>setDataEdit({...dataEdit,_cmt:e.target.value})} value={dataEdit?._cmt}></textarea>
            <button onClick={()=>updateComment()}>Update</button>
        </div>
Cũng khá đơn giản phải không nào kaka, để xử lý giao diện cho dễ nhìn ta cần phải setup file css nhé, comment.module.css
Create comment.module.css file
*{
    margin:0;padding:0;
}
.container{
    width: 600px;
    margin:20px auto;
    padding: 10px;
    box-sizing: border-box;
    background-color: #ccc;
    border-radius: 10px;
    position: relative;
}
.boxcomment{
    width: 100%;
}
.boxcomment label{
    font-weight: bold;
    display: block;
    padding:10px 0;
    text-align: left;
}
.boxcomment textarea{
    width: 100%;
    padding: 10px;
    box-sizing: border-box;
    border-radius: 10px;
    border:none;
    background-color: #fff;
}
.boxcomment button{
    padding: 8px;
    background-color: green;
    color:#fff;
    border:none;
}
.listComments h3{
    padding:5px 0;
    color:red;
    text-align: left;
}
.listComments ul li{
    margin:5px 0px;
    list-style: none;
    background-color: #fff;
    padding: 3px;
    border-radius: 5px;
    display: flex;
    flex-direction: row;
    justify-content: space-between;
}
.listComments ul li p.info{
    font-size: 14px;
    line-height: 25px;
    text-align: left;
    width: 70%;

}
.listComments ul li .control span{
    padding:0 5px;
    display: inline-block;
    margin:0 5px;
    cursor: pointer;
    border-radius: 10px;
    font-size: 13px;
}
.listComments ul li .control span:first-child{
    background-color: red;
    color:#000;
}
.listComments ul li .control span:last-child{
    background-color: yellow;
    color:#000;
}

.modal{
    position: absolute;
    top:50%;
    left:50%;
    transform: translate(-50%,-50%);
    width: 300px;
    margin: 0 auto;
    padding:10px;
    box-sizing: border-box;
    background-color: #787;
    border-radius: 10px;
    display: none;
}
.modal label{
    display: block;
    font-weight: bold;
    font-size: 15px;
    text-align: left;
}
.modal input{
    width: 100%;
    padding:10px;
    box-sizing: border-box;
    margin:5px 0;
}
.modal textarea{
    width: 100%;
    padding:10px;
    box-sizing: border-box;
}
.modal button{
    width: 100%;
    border:none;
    padding:8px;
    box-sizing: border-box;
    background-color: greenyellow;
}
.modal .close{
    padding: 1px;
    width: 30px;
    display: block;
    background: red;
    box-sizing: border-box;
    font-weight: bold;
    position: absolute;
    right: 10px;
    top: 5px;
    cursor: pointer;
}
Add commentReduce trong Store.js
import { configureStore } from '@reduxjs/toolkit';
//import commentSlice.js của ta
import commentReducer from '../features/comment/commentSlice';
import counterReducer from '../features/counter/counterSlice';

export const store = configureStore({
  reducer: {
    counter: counterReducer,
    comment: commentReducer
  },
});
Okay vậy ta có thể sử dụng được rồi, ta sẽ gọi Comment.js trong App.js như sau:
import React from 'react';
import Comment from './features/comment/Comment'
import './App.css';

function App() {
  return (
    <div className="App">
        <Comment />
    </div>
  );
}

export default App;
Vậy là xong phần sử dụng redux-toolkit, chạy nó thôi
npm startVí dụ mình làm ở trên cũng khá đơn giản, các bạn có thể phát triển nhé