Cũng khá lâu rồi không viết bài chia sẻ với mọi người, này mình chia sẻ với mọi người cách tạo một trang đang nhập quản lý trạng thái khi mình đã đang nhập thành công , có nghĩa là khi bạn đăng nhập xong bạn chuyển qua các router điều hướng khác nó không thay đổi , dẫn giữ nguyên trạng thái.
+ cài đặt Angular, để cài đặt được Angular bạn cần cài đặt Nodejs trước khi thực hiện câu lệnh install project từ angular nhé
npm install -g @angular/cli
+ tạo project tên AngularLogin: ng new AngularLogin
+ Sau khi tạo xong bạn mở cmd lên và cd tới project AngularLogin và chạy câu lệnh khởi động server lên như sau:
ng server hoặc ng serve --open
+ Kiểm tra phiên bản Angular:
ng -version
+ Để quản lý được trạng thái trong angular bạn cần phải cài đặt thư viện bên dưới đây nhé:
npm install @ngrx/store --save
+ Để điều hướng router cho đẹp chúng ta cũng cần phải cài đặt route của Angular hổ trợ cho chúng ta các bạn có thể vào trang chủ của angular mà xem thông tin thêm nhé
ng generate module app-routing --flat --module=app
- Tiếp theo các bạn tạo thư mục login trong đường dẫn AngularLogin/src/app/login và tạo các file trong thư mục login như sau:
+ login.component.ts
+ login.component.html
+ login.component.css
- Chúng ta nói rằng khi login xong thì chuyển qua trang thông tin của user đã login thành công, hiển thị thông tin của user đó ra màn hình nhé, ta cần tạo một folder detail và tạo component trong thư mục detail như sau:
+ detail.component.html
+ detail.component.ts
+ detail.compoennt.css
Tiếp tục bạn mở file login.component.ts lên và chỉnh nội dùng như sau, chúng ta cần khai báo một vài thư viên và thành phần cần thiết mà component cần phải có
  import {Component} from '@angular/core';
  @Component({
      selector:'box-login',
      templateUrl:'./login.component.html',
      styleUrls:['./login.component.css']
  })

  export class LoginComponent{
      title = "Box Login"
  }
Chúng ta đã khai báo xong, giờ để chạy được component Login, bạn cần khai báo LoginComponent trong file app.module.ts nhé
Mặc định file app.component.html có giao diện default ban đâu, giờ bạn xóa đi và sửa lại như bên dưới đây,chúng ta nhúng router vào nhé
Bạn vào file app-routing.module.ts và cái đặt điều hướng router như sau:
import { NgModule } from '@angular/core';
  import { CommonModule } from '@angular/common';
  import { RouterModule, Routes } from '@angular/router';
  import {LoginComponent} from './login/login.component';
  import {DetailComponent} from './detail/detail.component';
  const routes: Routes = [
  { path: '', redirectTo: '/login', pathMatch: 'full' },
  { path: 'login', component: LoginComponent },
  { path:'detail',component:DetailComponent}
  ];
  @NgModule({
  declarations: [],
  imports: [
  CommonModule,
  [ RouterModule.forRoot(routes) ],
  ],
  exports: [ RouterModule ]
  })
  export class AppRoutingModule { }
Sau khi hiển thị bạn có thể viết html,css giao diện cho form login của chúng ta, ở đây mình chuẩn bị sẵn, các bạn có thể làm giao diện khác cho đẹp nhé, nếu bạn muốn sử dụng bootstrap thi bạn cài đặt như sau:
npm install bootstrap font-awesome
Sau khi cài đặt xong bạn cần import đoạn code bên dưới đây để khai báo cho angular nhận biết chúng ta đang cần dùng chúng kaka, mở file style.css lên và import vô thôi nào anh em
@import "~bootstrap/dist/css/bootstrap.css";
@import "~font-awesome/css/font-awesome.css";
Thế là chúng ta đã sử dụng được bootstrap rồi đó, anh em ta sài thoải mái thôi, giờ đi lấy chai nước uống và làm giao diện login để sử dụng thôi
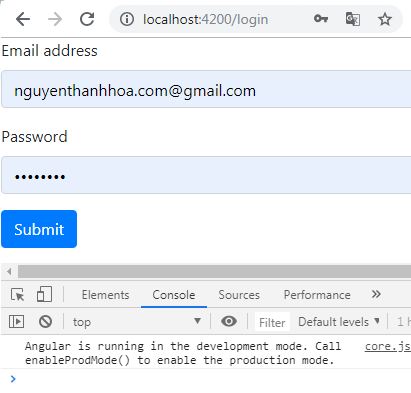
Giao điện login của file login.component.html của tôi như sau:
<div class="row">
    <div class="col-md-4"></div>
    <div class="col-md-4">
      <form [formGroup]="profileForm" (ngSubmit)="onSubmit()">
        <div class="form-group">
          <label for="email">Email address</label>
          <input type="email" class="form-control" id="email" name="email" placeholder="Enter email"
            formControlName="email">

        </div>
        <div class="form-group">
          <label for="password">Password</label>
          <input type="password" class="form-control" id="password" name="password" placeholder="Password"
            formControlName="password">
        </div>
        <button type="submit" class="btn btn-primary">Submit</button>
      </form>
    </div>
    <div class="col-md-4"></div>
  </div>
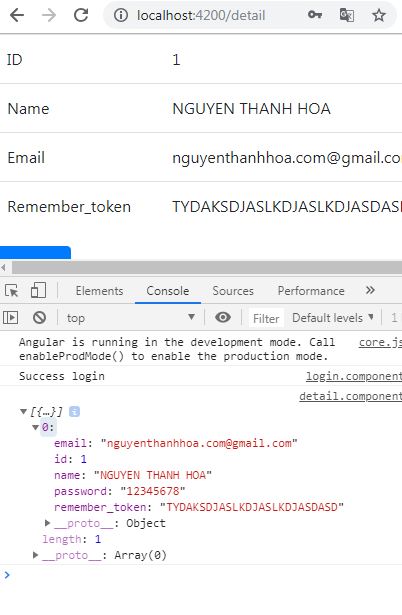
Giao diện detail.component.html dùng để hiển thị thông tin khi login thành công!
<div class="row">
    <div class="col-md-4"></div>
    <div class="col-md-4">
      <table class="table" *ngIf="dataUser?.length>0">
        <tr>
          <td>ID</td>
          <td>{{dataUser[0].id}}</td>
        </tr>
        <tr>
          <td>Name</td>
          <td>{{dataUser[0].name}}</td>
        </tr>
        <tr>
          <td>Email</td>
          <td>{{dataUser[0].email}}</td>
        </tr>
        <tr>
          <td>Remember_token</td>
          <td>{{dataUser[0].remember_token}}</td>
        </tr>
      </table>
      <button class="btn btn-primary" (click)="logout()">Logout</button>
    </div>
    <div class="col-md-4"></div>
  </div>
* Xây dựng quản lý trạng thái login trong Angular bạn có thể xem trại đây https://blog.nextzy.me/state-management-in-angular-with-ngrx-da57e59c7c89
Tại đây tôi tạo ra 3 thư mục như sao trong thư mục app
+ Thư mục _action, tạo file tên là userActions.ts: dùng để khai báo các hành động mà chúng ta cần thực hiện, hành động
được kích hoạt hay hiểu là được gọi trong các component [@ngrx calls “Dispatch”]
+ Thư mục _models, tạo file tên là user.ts: dùng khai báo các thuộc tính của một User
+ Thư mục _reducers, tạo file user.reducer.ts: dùng xử lý dữ liệu, thêm một dữ liệu vào mảng,...để thay đổi dữ liệu
trong Store, Sau khi xử lý xong ,dữ liểu được trả về Store. Sau đó các Component có thể get dữ liệu và hiển thị cho người dùng xem.
* FILE userActions.ts trong thư mục _actions, tôi xây dựng 2 hành động là: CheckLoginAction,LogoutLoginAction
import { Action } from '@ngrx/store';
import {User} from '../_models';

export const ActionTypes = {
    CHECK_LOGIN:"CHECK LOGIN",
    LOGOUT:"LOGOUT"
}
export class CheckLoginAction implements Action{
    type = ActionTypes.CHECK_LOGIN;
    constructor(public payload:User){}
}
export class LogoutLoginAction implements Action{
    type = ActionTypes.LOGOUT;
    constructor(){}
}

export type Actions = CheckLoginAction
* File user.ts trong thư mục _models: thôi thiết lập các thuộc tính dữ liệu cần lưu như sau:
export class User{
    id:number;
    name:string;
    email:string;
    password:string;
    remember_token:string;

}
* File user.reducer.ts trong thư mục _reducers: chúng ta cấn xác định cấu trúc dữ liệu được lưu, và xử lý thay đổi dữ liệu khi hành động được gọi tới
import {createSelector, createFeatureSelector} from '@ngrx/store';
import * as userLogins from '../_actions/userActions';
import {User} from "../_models";

export interface UserState{
    entities:Array<User>
}
const initialState: UserState = {
    entities:[]
};

export function userReducer(state = initialState,action:userLogins.Actions): UserState{
    switch(action.type){
        case userLogins.ActionTypes.CHECK_LOGIN:{
            const  user:User = action.payload;
            return{
                entities:[...state.entities,user]
            }
        }
        case userLogins.ActionTypes.LOGOUT:{
            return{
                ...state,
                entities:[]
            }
        }
        default:{
            return state;
        }
    }
}
Bây giờ chúng ta tạo file index.ts trong thư mục _reducers để tạo một nhóm reducers, để chúng ta có thể một dữ liệu từ Store
import {createSelector} from '@ngrx/store';
import * as fromUser from './user.reducers';
import * as User from '../_models';
import { StoreModule} from '@ngrx/store';
import { from } from 'rxjs';

export interface UserState{
    entitie:fromUser.UserState;
}
export const reducers = {
    entitie:fromUser.userReducer
}
export const getAppLogin = (state:UserState) =>state.entitie;
export const getLogin = createSelector(getAppLogin,(state:fromUser.UserState)=>{
    return state.entities;
})
Xong bước trên các bạn cần khai bao reducers trong app.module.ts nhé
import { BrowserModule } from '@angular/platform-browser';
import { NgModule } from '@angular/core';
import {FormsModule,ReactiveFormsModule} from '@angular/forms';
import {HttpClientModule} from '@angular/common/http';
import { AppComponent } from './app.component';
import {LoginComponent} from './login/login.component';
import {DetailComponent} from './detail/detail.component';
import {StoreModule} from "@ngrx/store";
import { reducers } from './_reducers';
import { AppRoutingModule } from './app-routing.module';
@NgModule({
  declarations: [
    AppComponent,
    LoginComponent,
    DetailComponent
  ],
  imports: [
    BrowserModule,
    FormsModule,
    HttpClientModule,
    ReactiveFormsModule,
    StoreModule.forRoot(reducers),
    AppRoutingModule
  ],
  providers: [],
  bootstrap: [AppComponent]
})
export class AppModule { }
Chỉ thế thôi đó là phần khó nhất giờ các bạn chỉ việc gọi lấy dữ liệu và thêm dữ liệu ra thôi, giờ chúng ta qua login.component.ts để xử lý hành động gửi tới Reducer cho chúng xử lý thôi.
import {Component} from '@angular/core';
import { FormGroup, FormControl } from '@angular/forms';
import {Store,State} from "@ngrx/store";
import {Observable, from} from "rxjs";
import {User} from "../_models";
import * as userLogins from '../_actions/userActions';
import {UserState, getLogin} from '../_reducers'
import { Router, ActivatedRoute } from '@angular/router';
@Component({
    selector:'box-login',
    templateUrl:'./login.component.html',
    styleUrls:['./login.component.css']
})

export class LoginComponent{
    title = "Box Login"
    profileForm = new FormGroup({
        email: new FormControl(''),
        password: new FormControl(''),
    });
    isCheckLogin:boolean = false;
    dataLogin = [
        {
            "id":1,
            "name":"NGUYEN THANH HOA",
            "email":"nguyenthanhhoa.com@gmail.com",
            "password":"12345678",
            "remember_token":'TYDAKSDJASLKDJASLKDJASDASD'
        },
        {
            "id":2,
            "name":"SKIPPERHOA",
            "email":"skipperhoa2013@gmail.com",
            "password":"hoa123",
            "remember_token":'TYDAKSDJASLKDJASLKDJASDASD'
        }
    ]

    constructor(private _store:Store<UserState>,private router:Router){}
    onSubmit() {
      //  console.warn(this.profileForm.value['email']);
       this.dataLogin.filter(item=>{
           if(item.email==this.profileForm.value['email'] && item.password==this.profileForm.value['password']){
               this.isCheckLogin=true;
               this._store.dispatch(new userLogins.CheckLoginAction({
                   id:item.id,
                   name:item.name,
                   email:item.email,
                   password:item.password,
                   remember_token:item.remember_token
                }));
           }
       });
       if(this.isCheckLogin){
            console.log("Success login");
            this.router.navigate(['/detail']);
       }
       else{
           console.log("Fail login");
       }
    }

}
File detail.component.ts như sau:
import {Component} from '@angular/core';
import {Store,State} from "@ngrx/store";
import {Observable, from} from "rxjs";
import {User} from "../_models";
import * as userLogins from '../_actions/userActions';
import {UserState, getLogin} from '../_reducers'
import { Router, ActivatedRoute } from '@angular/router';
@Component({
    selector:"box-detail",
    templateUrl:'./detail.component.html',
    styleUrls:['./detail.component.css']
})
export class DetailComponent{
    dataUser:any=[]
    constructor(private _store:Store<UserState>,private router:Router){
        this._store.select(getLogin).subscribe(item=>{
             this.dataUser = item;
             console.log(item)
        });
    }
    logout = ()=>{
        this._store.dispatch(new userLogins.LogoutLoginAction);
        this.router.navigate(['/login']);
    }
}
Demo:
Bạn có thể xem source tại đây Github:Login State in Angular 7


