
Xin chào mọi người, nay mình chia sẻ với mọi người cách sử dụng JWT(Json Web Token) trong Node.js. Để dùng được JWT thì chúng ta phải sử dụng thư viện sau :
$ npm install jsonwebtokenThư viện trên giúp ta có thể tạo Token để lưu thông tin data người dùng, khi họ đăng nhập vào chương trình thành công, ta sẽ dùng chuổi Token đó, request truy xuất lấy thông tin người dùng, thường hay dùng trong Restful API xây dựng giữa Client và Server
Bạn có thể tìm hiểu thêm về thư viện này tại đây : https://www.npmjs.com/package/jsonwebtoken
Demo:
Okay, giờ mình tạo một project và cài đặt một số thư viện sau :
npm init
npm install express body-parser jsonwebtoken sqlite3 dotenv cors nodemon
Mình sẽ nói sơ qua các thư viện trên như sau :
+ body-parser : Mình cứ hiểu là nó dùng phân tích dữ liệu Data, khi người dùng gửi đến server, bạn có thể tùy chọn phân tích dữ liệu (JSON body parser, Raw body parser, Text body parser, URL-encoded form body parser), bạn có thể xem thêm tại đây : https://www.npmjs.com/package/body-parser
+ jsonwebtoken : Giúp ta tạo mã Token, khi dười dùng Register & Login, dùng mã token đó lấy thông tin ra, kiểm tra thời gian của token, nếu hết hạn thì xử lý nó thế nào tùy bạn
+ sqlite3 : Sử dụng SQLite3 giúp ta tạo database quản lý dữ liệu, truy vấn các câu lệnh query(insert, select,update,delete,....). Bạn có thể xem thêm tại đây : https://www.sqlitetutorial.net/sqlite-nodejs/query/
+ dotenv : Giúp ta tạo file .env quản lý một số key bí mật chương trình
+ nodemon : Cái này thì nhiều bạn biết, nếu xây dựng server, khi có bắt cứ chỉnh sửa thao tác gì trong code, thì tự động restart lại server, thuận tiện cho việc chỉnh sửa code trong Node.js
Mình chỉ hiểu sao, nói đơn giản là vậy, các bạn có thể tìm hiểu thêm về các thư viện trên, thật sự mình còn chưa hiểu hết về chúng, chỉ sử dụng những cái cần làm thôi, ::)
Đầu tiên mình xây dựng một database lưu thông tin users, bạn hãy lên mạng tìm kiếm và tải phần mềm sqlite về dùng https://sqlitebrowser.org/dl/
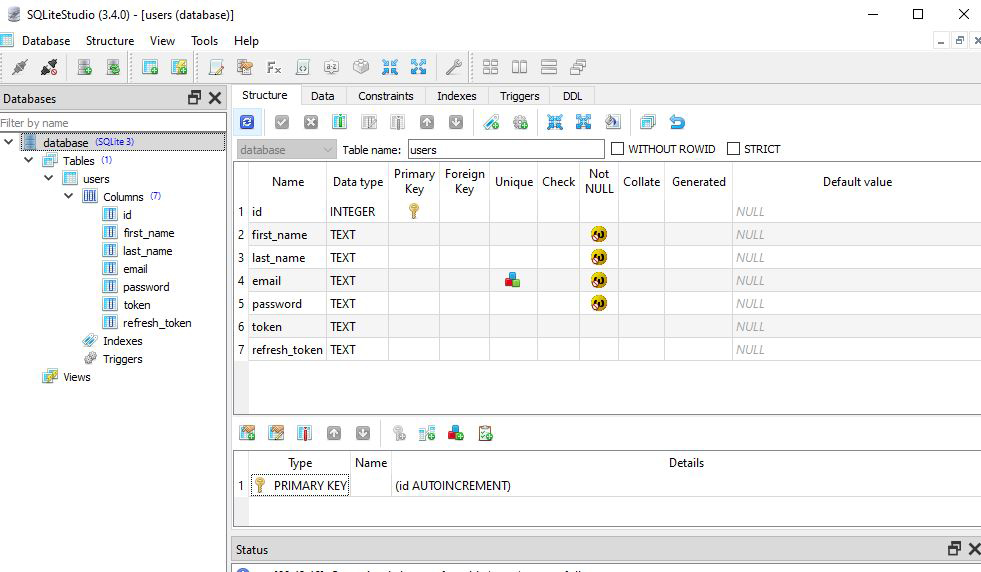
CREATE TABLE users (
    id            INTEGER,
    first_name    TEXT    NOT NULL,
    last_name     TEXT    NOT NULL,
    email         TEXT    NOT NULL UNIQUE,
    password      TEXT    NOT NULL,
    token         TEXT,
    refresh_token TEXT,
    PRIMARY KEY (
        id AUTOINCREMENT
    )
);
Sau khi tạo xong database nhớ lưu đến project của bạn, để tí ta dùng đến, Okay, bước đầu đã có database rồi, giờ ta đi thẳng vào chương trình luôn.
Hãy tạo file App.js và dán mã bên dưới vào
require("dotenv").config();
const express = require("express");
const jwt = require("jsonwebtoken");
const router = express.Router();
const app = express();
app.use(express.json());
/* DATA SIMBLE */
const sqlite3 = require('sqlite3').verbose();
// Setup the database connection
let conn = new sqlite3.Database("./database.db", err => {
if (err) {
return console.error(err.message);
}
console.log("Connected to the in-memory SQLite database.");
});
// Register
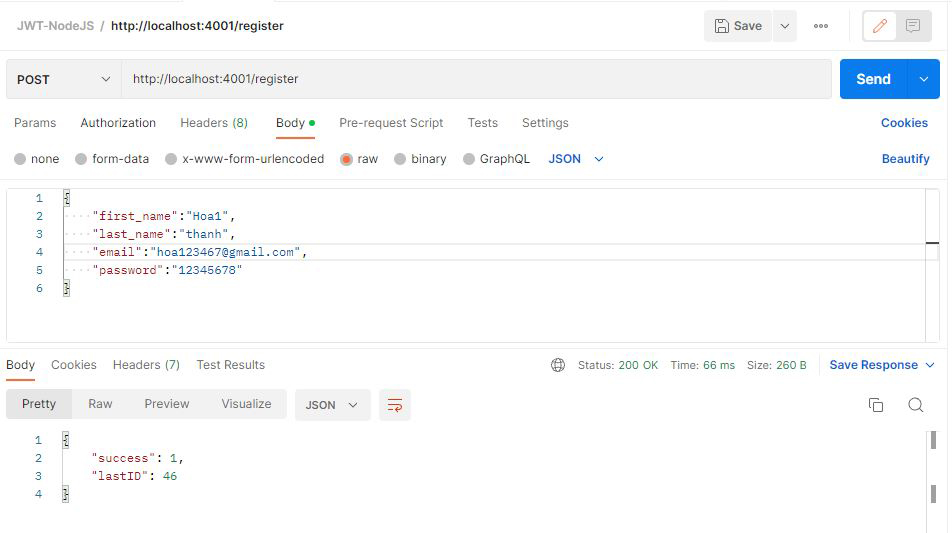
router.post("/register", async (req, res) => {
// Our register logic starts here
try {
// Get user input
const { first_name, last_name, email, password } = req.body;
// Validate user input
if (!(email && password && first_name && last_name)) {
res.status(400).send("All input is required");
}else{
var sql = "INSERT INTO users(first_name,last_name,email,password) values('" + first_name + "','" + last_name + "','" + email + "','" + password + "')";
conn.serialize(()=>{
conn.run(
sql, function (err) {
if (err) {
res.status(500).json(err.message);
}else{
let lastID = this.lastID;
res.status(200).json({"success":1,"lastID":lastID});
}
}
);
});
}
/* save user to databse */
} catch (err) {
console.log(err);
}
});
// Login
router.post("/login", async (req, res) => {
const { email, password } = req.body;
if (!(email && password)) {
res.status(400).send("All input is required");
}
conn.serialize(()=>{
conn.get("select * from users where email=? and password=?", [email, password],async function (err, row) {
if(err){
res.status(500).send({'Response':'Error updating user', err });
}
if(row){
let _id = row.id;
const {first_name,last_name,email} = row;
var user ={first_name,last_name,email};
var token = jwt.sign({ exp: Math.floor(Date.now() / 1000) + (60 * 60), user: user }, process.env.TOKEN_KEY);
var refresh_token = jwt.sign({ exp: Math.floor(Date.now() / 1000) + (24*60*60), user: user }, process.env.TOKEN_KEY);
conn.run("update users set token=?,refresh_token=? where id=?", [token,refresh_token, _id], function (err2) {
if (err2) {
res.status(400).json({ "description": "Đăng nhập không thành công" });
}else{
res.status(200).json({"success":1,"token":token,"refresh_token":refresh_token});
}
});
}else{
res.status(500).json({"success":0});
}
});
})
});
/**
* Lấy mã token mới sử dụng Refresh token
* POST /refresh_token
*/
router.post('/refresh_token', async (req, res) => {
const { refreshToken } = req.body;
conn.get("select token,refresh_token from users where refresh_token=?",[refreshToken],function(error,row){
if(error) res.status(400).json({"description":"refresh token không chính xác!"});
else{
try {
var decoded = jwt.verify(row['refresh_token'], process.env.TOKEN_KEY);
var token = jwt.sign({ exp: Math.floor(Date.now() / 1000) + (60*60), user: decoded.user }, process.env.TOKEN_KEY);
res.status(200).json({"success":1,"token":token,"refresh_token":row['refresh_token']});
} catch (err) {
return res.status(401).send("Invalid Token");
}
}
});
});
/**
* Middleware xác thực người dùng dựa vào mã token
* @param {*} req
* @param {*} res
* @param {*} next
*/
const TokenCheckMiddleware = async (req, res, next) => {
// Lấy thông tin mã token được đính kèm trong request
const token = req.body.token || req.query.token || req.headers['x-access-token'];
// decode token
if (token) {
// Xác thực mã token và kiểm tra thời gian hết hạn của mã
try {
var decoded = jwt.verify(token, process.env.TOKEN_KEY);
// Lưu thông tin giã mã được vào đối tượng req, dùng cho các xử lý ở sau
req.decoded = decoded;
next();
} catch (err) {
// Giải mã gặp lỗi: Không đúng, hết hạn...
console.error(err);
return res.status(401).json({
message: 'Unauthorized access.',
});
}
} else {
// Không tìm thấy token trong request
return res.status(403).send({
message: 'No token provided.',
});
}
}
router.post("/test",TokenCheckMiddleware, (req, res) => {
return res.status(200).json({"token":req.decoded})
});
router.use(TokenCheckMiddleware)
router.post("/welcome", (req, res) => {
const token =
req.body.token || req.query.token || req.headers["x-access-token"];
if (!token) {
return res.status(403).send("A token is required for authentication");
}
try {
var decoded = jwt.verify(token, process.env.TOKEN_KEY);
res.status(200).send(decoded.user);
} catch (err) {
return res.status(401).send("Invalid Token");
}
});
app.use('/', router);
module.exports = app;Bạn nhìn đoạn code trên đầu tiên ta cần gọi một số thư viện mà ban đầu ta đã cài đặt
require("dotenv").config();
const express = require("express");
const jwt = require("jsonwebtoken");
const sqlite3 = require('sqlite3').verbose();
Mình có gọi require("dotenv").config(), cho nên bạn cần tạo file .env trong project , lưu các KEY mà bạn cần dùng đến
API_PORT=4001
TOKEN_KEY=webtoken123
Để sử dụng được file .env bạn cần sử dụng câu lệnh process.env.TOKEN_KEY
Tiếp theo ta cần khai báo connect đến database trong sqlite, sử dụng câu lên bên dưới
let conn = new sqlite3.Database("./database.db", err => {
    if (err) {
        return console.error(err.message);
    }
    console.log("Connected to the in-memory SQLite database.");
});
Các bạn có thể tìm hiểu về các câu truy vấn Query như (insert, update, select,...) trong SQLite tại đây : https://www.sqlitetutorial.net/sqlite-insert/ vs https://www.sqlitetutorial.net/sqlite-nodejs/query/
db.run(sql, params, function(err){
  //
});
db.run(`INSERT INTO langs(name) VALUES(?)`, ['C'], function(err) {
    if (err) {
      return console.log(err.message);
    }
    // get the last insert id
    console.log(`A row has been inserted with rowid ${this.lastID}`);
});
Chức năng register cũng tương đối đơn giản bạn nhìn sẽ dễ hiểu, nên mình sẽ bỏ qua giải thích cái này,
Tiếp theo là phần login, sau khi login thành công, ta cần tạo Token, Refresh_token trong đoạn code trên, ta cần khai báo thời gian hết hạn của token và refresh_token, để khi token hết phiên làm việc, thì ta có thể thông báo cho người dùng biết phiên làm việc đã hết hạn. Khi đó người dùng sẽ cần mã refresh_token để tạo lại mã token mới
Mình khởi tạo Token có thời gian là 60 phút nhé
Còn refresh_token ta tạo ở đây là 1 ngày : 24*60*60 , nếu mã token hết hạn, ta cần refresh_token để gửi đến server để server tạo mã token mới gửi lại cho client
var token = jwt.sign({ exp: Math.floor(Date.now() / 1000) + (60 * 60), user: user }, process.env.TOKEN_KEY);
var refresh_token = jwt.sign({ exp: Math.floor(Date.now() / 1000) + (24*60*60), user: user }, process.env.TOKEN_KEY);
Đồng thời ta cần cập nhật lại token , refresh_token trong database như sau:
conn.run("update users set token=?,refresh_token=? where id=?", [token,refresh_token, _id], function (err2) {
if (err2) {
res.status(400).json({ "description": "Đăng nhập không thành công" });
}else{
res.status(200).json({"success":1,"token":token,"refresh_token":refresh_token});
}
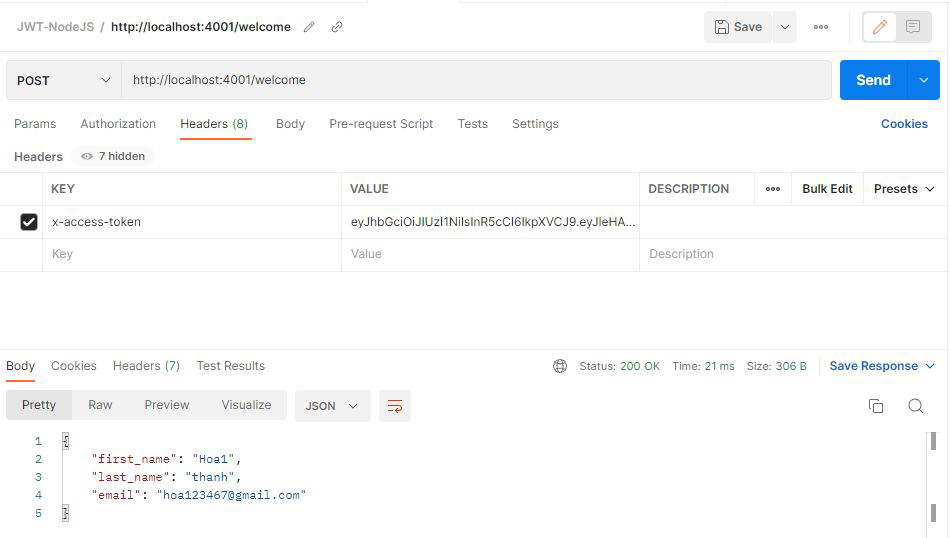
});Bây giờ sau khi ta login success, ta sẽ được mã token, refresh_token. Để lấy thông tin của user ta cần kèm token vào header request đến server nhé
//Client : bạn có thể sử dụng postman để test cho dễ nhé, tại phần header bạn chọn x-access-token và gán giá trị token vào , sau đó submit là được
curl --location --request POST 'http://localhost:4001/welcome' \
--header 'x-access-token: eyJhbGciOiJIUzI1NiIsInR5cCI6IkpXVCJ9.eyJleHAiOjE2Njg3NTUyNDQsInVzZXIiOnsiZmlyc3RfbmFtZSI6IkhvYTEiLCJsYXN0X25hbWUiOiJ0aGFuaCIsImVtYWlsIjoiaG9hMTIzNEBnbWFpbC5jb20ifSwiaWF0IjoxNjY4NzU1MTg0fQ.AKt7sc5dHZqLDatLvyS4iY1H1UbC83hQMw_sFMXstHM'
//Server : server sẽ get token trong header như dưới đây, nó sẽ kiểm tra token còn thời hạn hay không, nếu còn nó tiến hành giải nén trả về gói dữ liệu cho ta
router.post("/welcome", (req, res) => {
const token =
req.body.token || req.query.token || req.headers["x-access-token"];
if (!token) {
return res.status(403).send("A token is required for authentication");
}
try {
var decoded = jwt.verify(token, process.env.TOKEN_KEY);
res.status(200).send(decoded.user);
} catch (err) {
return res.status(401).send("Invalid Token");
}
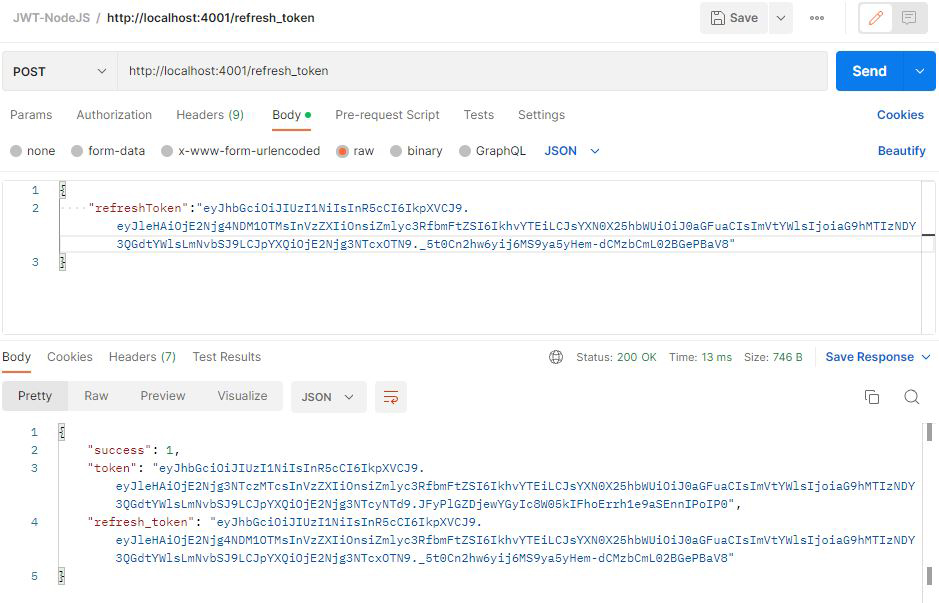
});Okay, Giả sử token đã hết hạn, ta cần refresh_token để tạo mã token mới như sau:
//Client:
curl --location --request POST 'http://localhost:4001/refresh_token' \
--header 'Content-Type: application/json' \
--data-raw '{
    "refreshToken":"eyJhbGciOiJIUzI1NiIsInR5cCI6IkpXVCJ9.eyJleHAiOjE2Njg4NDE1ODQsInVzZXIiOnsiZmlyc3RfbmFtZSI6IkhvYTEiLCJsYXN0X25hbWUiOiJ0aGFuaCIsImVtYWlsIjoiaG9hMTIzNEBnbWFpbC5jb20ifSwiaWF0IjoxNjY4NzU1MTg0fQ.eem6gUFk_fLDhflpJQv2cXrNxB8DZ4YSLU34xo0UXyc"
}'
//Server: sẽ kiểm tra mã token còn hạn hay không nửa nhé, nó mới tạo mã token mới
router.post('/refresh_token', async (req, res) => {
  const { refreshToken } = req.body;
    conn.get("select token,refresh_token from users where refresh_token=?",[refreshToken],function(error,row){
      if(error) res.status(400).json({"description":"refresh token không chính xác!"});
      else{
        try {
             var decoded = jwt.verify(row['refresh_token'], process.env.TOKEN_KEY);
             var token = jwt.sign({ exp: Math.floor(Date.now() / 1000) + (60*60), user: decoded.user }, process.env.TOKEN_KEY);
             res.status(200).json({"success":1,"token":token,"refresh_token":row['refresh_token']});
        } catch (err) {
            return res.status(401).send("Invalid Token");
        }
      }
   });

});
Check Middleware các router, ta luôn luôn cần phải check các token các router xem, mã token có còn hạn hay không, ta sẽ tạo một function kiểm tra token như sau:
const TokenCheckMiddleware = async (req, res, next) => {
  // Lấy thông tin mã token được đính kèm trong request
  const token = req.body.token || req.query.token || req.headers['x-access-token'];

  // decode token
  if (token) {
    // Xác thực mã token và kiểm tra thời gian hết hạn của mã
    try {
      var decoded = jwt.verify(token, process.env.TOKEN_KEY);
      // Lưu thông tin giã mã được vào đối tượng req, dùng cho các xử lý ở sau
      req.decoded = decoded;
      next();
    } catch (err) {
      // Giải mã gặp lỗi: Không đúng, hết hạn...
      console.error(err);
      return res.status(401).json({
        message: 'Unauthorized access.',
      });
    }
  } else {
    // Không tìm thấy token trong request
    return res.status(403).send({
      message: 'No token provided.',
    });
  }
}
Tại phần router ta có thể gán cho từng router cũng được nhé
router.post("/test",TokenCheckMiddleware, (req, res) => {

  return res.status(200).json({"token":req.decoded})
});
Còn không bạn đặt đoạn code sao, ở bên các router, mà bạn cần kiểm tra mã token trước khi bắt đầu thực hiện các hành vi bên trong router, nó sẽ đi qua function TokenCheckMiddleware nó sẽ kiểm tra nếu token còn hạn thì next() tiếp
router.use(TokenCheckMiddleware)Giờ hãy tạo file index.js trong project và viết code khởi chạy server với port gì đó mà bạn đã cung cấp trong file .env
const http = require("http");
const app = require("./app");
const server = http.createServer(app);

const { API_PORT } = process.env;
const port = process.env.PORT || API_PORT;

// server listening
server.listen(port, () => {
  console.log(`Server running on port ${port}`);
});
Code trên bạn cần nhớ khai bao file app.js vào nhé , giờ hãy mở file package.json chỉnh lại câu lệnh chạy server , bạn nhìn trong "scripts"
{
  "name": "nodejs-react",
  "version": "1.0.0",
  "description": "nodejs react",
  "main": "index.js",
  "scripts": {
    "start": "node index.js",
    "dev": "nodemon index.js",
    "test": "echo \"Error: no test specified\" && exit 1"
  },
  "keywords": [
    "nodejs",
    "react"
  ],
  "author": "hoanguyenit",
  "license": "ISC",
  "dependencies": {
    "bcryptjs": "^2.4.3",
    "body-parser": "^1.19.0",
    "cors": "^2.8.5",
    "dotenv": "^10.0.0",
    "express": "^4.17.1",
    "jsonwebtoken": "^8.5.1",
    "mongoose": "^6.0.9",
    "sqlite3": "^5.0.2",
    "uid": "^2.0.0"
  },
  "devDependencies": {
    "nodemon": "^2.0.13"
  }
}
Okay, ta chạy câu lệnh dưới đây khởi động server thôi
npm run devTest trong project của chúng ta có các bước sau :
Bước 1: request post("/register") đăng ký thành viên
Bước 2: post("/login") nếu đăng nhập đúng, tạo token,refresh_token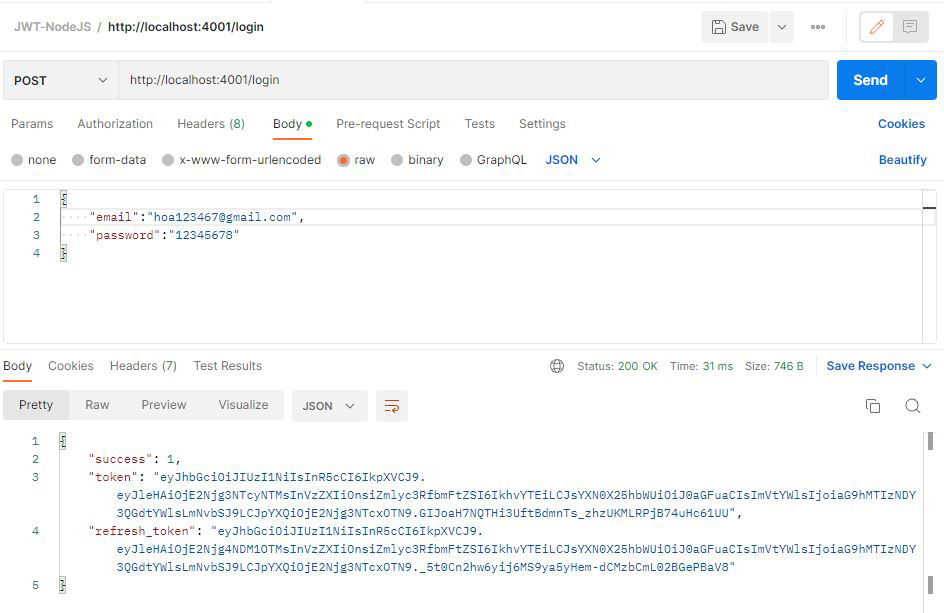 lưu thông tin người dùng
Bước 3: post("/welcome"), kèm mã token vào header, để gửi đến server xử lý để lấy thông tin dữ liệu người dùng đã đăng nhập thành công trước đó
Vậy là xong, hẹn bài viết chia sẻ kiến thức tiếp theo ::)
Bước 4: post("/refresh_token"), khi mã token đã hết hạn, ta kèm mã refresh_token trước đó, gửi đến server để tạo lại mã token
Bước 5: Check Middleware các router cần mã token
