Đầu tiên bạn tạo cho mình một project ASP.NET CORE 2.1. Trong bài này mình chia sẻ cách sử dụng Entity Framework Core. Mình dùng Code-First nhé, thường các lập trình viên ưa thích nhất, vì họ có thể xử lý các thuộc tính trực tiếp trên Class mô hình
Bạn nào thích sử dụng Database có sẵn thì import vào sử dụng nhé, vì mình thích chơi Code-First hơn, bạn có thể lên trang https://www.entityframeworktutorial.net/code-first/what-is-code-first.aspx tìm hiểu hơn
Sau khi tạo project xong, bạn tiến hành cài cho mình 3 cái plugin sau, nhớ chọn phiên bản 2.14 nhé
Microsoft.EntityFrameworkCore
Microsoft.EntityFrameworkCore.SqlServer : Hổ trợ xử lý connect SQL SERVER
Microsoft.EntityFrameworkCore.Tools : Hổ trợ xử lý các câu lệnh migration
Cấu hình chuỗi kết nối tới SQL SERVER của bạn như sau: mở file appsetting.json lên và chỉnh như sau:
{
  "Logging": {
    "LogLevel": {
      "Default": "Warning"
    }
  },
  "AllowedHosts": "*",
  "ConnectionStrings": {
    "EFDataContext": "Server=DESKTOP-GCABV8F\\SQLExpress;Database=ShopAspcore;Trusted_Connection=True;MultipleActiveResultSets=true"
  }
}
Chú ý:
- Khai báo đúng SERVER NAME
- Database name, bạn đặt sao cũng được, vì hồi ta chạy câu lệnh migration nó tự tạo ra cho ta, bạn không cần vào SQL SERVER tạo nhé.
Giờ ta cần tạo các mô hình thực thể như:(Product,Category), hãy vào thư mục Models tạo cho mình các file sau:
using System;
using System.Collections.Generic;
using System.Linq;
using System.Threading.Tasks;

namespace ShopAspCore.Models
{
    public class Product
    {
        public int idProduct { get; set; }
        public string Title { get; set; }
        public string UrlImage { get; set; }
        public string Price { get; set; }
        public string Detail { get; set; }
        public int idCategory { get; set; }
        public Category Category { get; set; }
    }
}
Trong file Models/Product.cs trên ta nói rằng Product chỉ thuộc một loại nào đó
Tạo file Category.cs trong thư mục Models như sau:
using System;
using System.Collections.Generic;
using System.Linq;
using System.Threading.Tasks;

namespace ShopAspCore.Models
{
    public class Category
    {
        public int idCategory { get; set; }
        public string Name { get; set; }
        public virtual ICollection<Product> Products { get; set; }

    }
}
Với file Models/Category.cs: ta nói rằng một Category có nhiều Products
Sau khi ta tạo 2 class mô hình trên xong, ta cần phải tạo một class kế thừa từ DBContext để xử lý chuổi kết nối tới SQL SERVER của ta, đồng thời ta cần cài đặt các tính năng Relationship trong class này luôn
Tạo file EFDdataContext.cs trong thư mục Models
using System;
using System.Collections.Generic;
using System.Linq;
using System.Threading.Tasks;
using Microsoft.EntityFrameworkCore;
namespace ShopAspCore.Models
{
    public class EFDataContext : DbContext
    {
        public EFDataContext(DbContextOptions<EFDataContext> options)
               : base(options)
        {

        }
        protected override void OnModelCreating(ModelBuilder modelBuilder)
        {
            //config primary key(Product & Category)
            modelBuilder.Entity<Product>().HasKey(s => s.idProduct);
            modelBuilder.Entity<Category>().HasKey(s => s.idCategory);

            //configuration relationship table(Product & Category)
            modelBuilder.Entity<Product>()
                .HasOne(s => s.Category)
                .WithMany(s => s.Products)
                .HasForeignKey(s => s.idCategory)
                .OnDelete(DeleteBehavior.Restrict);


        }
        public DbSet<Product> Products { get; set;}
        public DbSet<Category> Categories { get; set; }

    }
}
Đoạn code trên ta có cấu hình các khóa trong bảng table(Product,Category), để xử lý relationship cho hai thực thể mô hình này
Tiếp theo bạn hay mờ file Startup.cs trong project lên và thêm câu lệnh sau vào
services.AddDbContext<EFDataContext>(options =>
options.UseSqlServer(Configuration.GetConnectionString("EFDataContext")));
using System;
using System.Collections.Generic;
using System.Linq;
using System.Threading.Tasks;
using Microsoft.AspNetCore.Builder;
using Microsoft.AspNetCore.Hosting;
using Microsoft.AspNetCore.Http;
using Microsoft.AspNetCore.HttpsPolicy;
using Microsoft.AspNetCore.Mvc;
using Microsoft.Extensions.Configuration;
using Microsoft.Extensions.DependencyInjection;
using ShopAspCore.Models;
using Microsoft.EntityFrameworkCore;
namespace ShopAspCore
{
    public class Startup
    {
        public Startup(IConfiguration configuration)
        {
            Configuration = configuration;
        }

        public IConfiguration Configuration { get; }

        // This method gets called by the runtime. Use this method to add services to the container.
        public void ConfigureServices(IServiceCollection services)
        {
            services.Configure<CookiePolicyOptions>(options =>
            {
                // This lambda determines whether user consent for non-essential cookies is needed for a given request.
                options.CheckConsentNeeded = context => true;
                options.MinimumSameSitePolicy = SameSiteMode.None;
            });


            services.AddMvc().SetCompatibilityVersion(CompatibilityVersion.Version_2_1);
            services.AddDbContext<EFDataContext>(options =>
            options.UseSqlServer(Configuration.GetConnectionString("EFDataContext")));
        }

        // This method gets called by the runtime. Use this method to configure the HTTP request pipeline.
        public void Configure(IApplicationBuilder app, IHostingEnvironment env)
        {
            if (env.IsDevelopment())
            {
                app.UseDeveloperExceptionPage();
            }
            else
            {
                app.UseExceptionHandler("/Home/Error");
                app.UseHsts();
            }

            app.UseHttpsRedirection();
            app.UseStaticFiles();
            app.UseCookiePolicy();

            app.UseMvc(routes =>
            {
                routes.MapRoute(
                    name: "default",
                    template: "{controller=Home}/{action=Index}/{id?}");
            });
        }
    }
}
Ok thiết lập đã xong rồi, giờ ta hãy Nuget Package Manager->Package Manager Console lên để chạy câu lệnh Migration
# add-migration shopcore
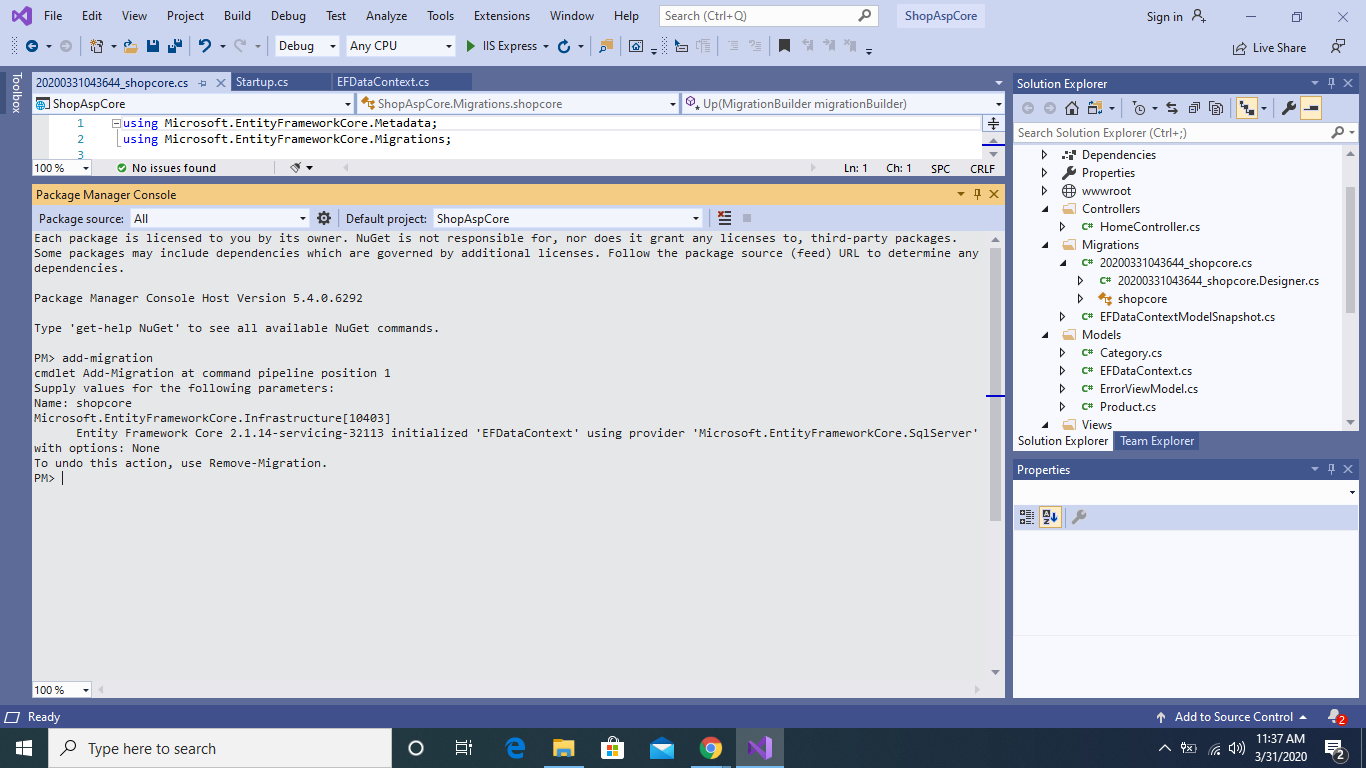
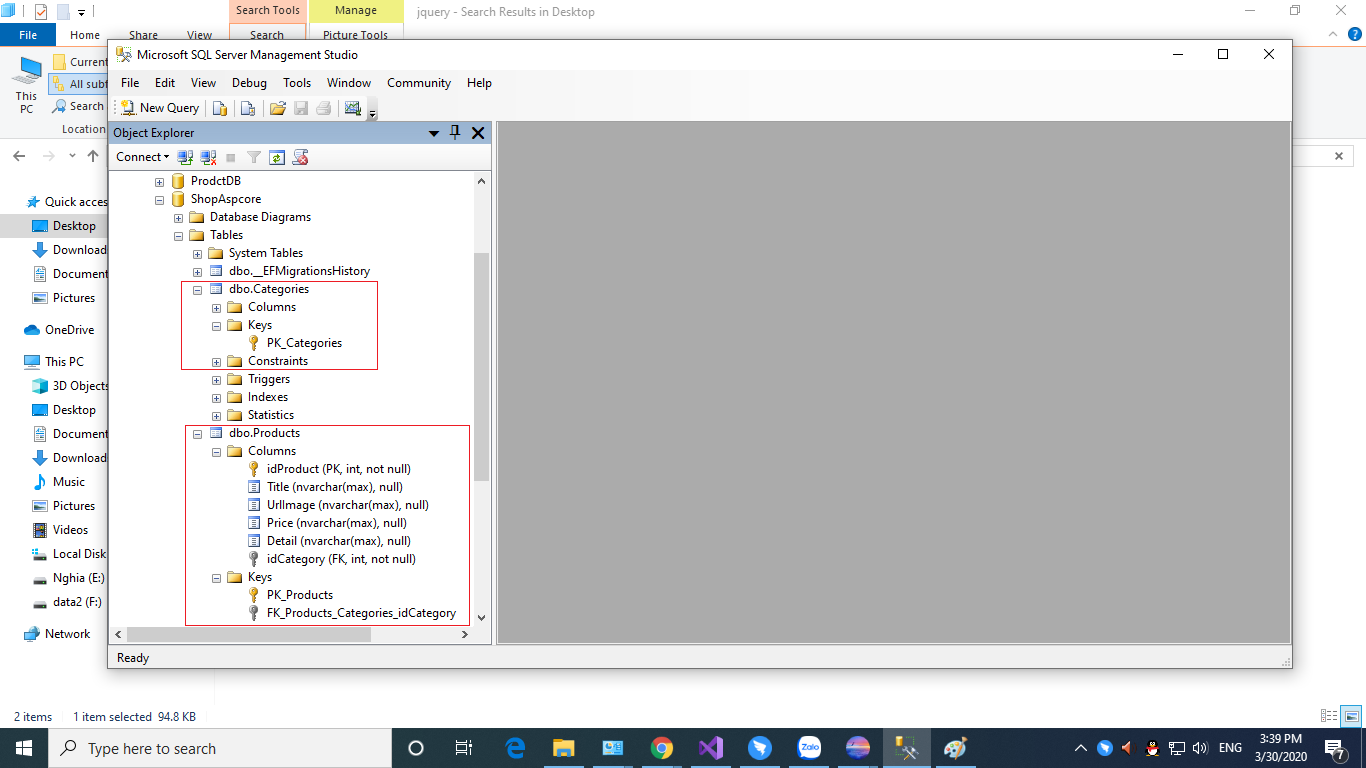
Sau khi chạy xong, bạn nhìn thấy một thư mục Migrations trong Project của bạn, tiếp theo để cho nó tự tạo ra datablase và table thì cần chạy câu lệnh sau
# update-database
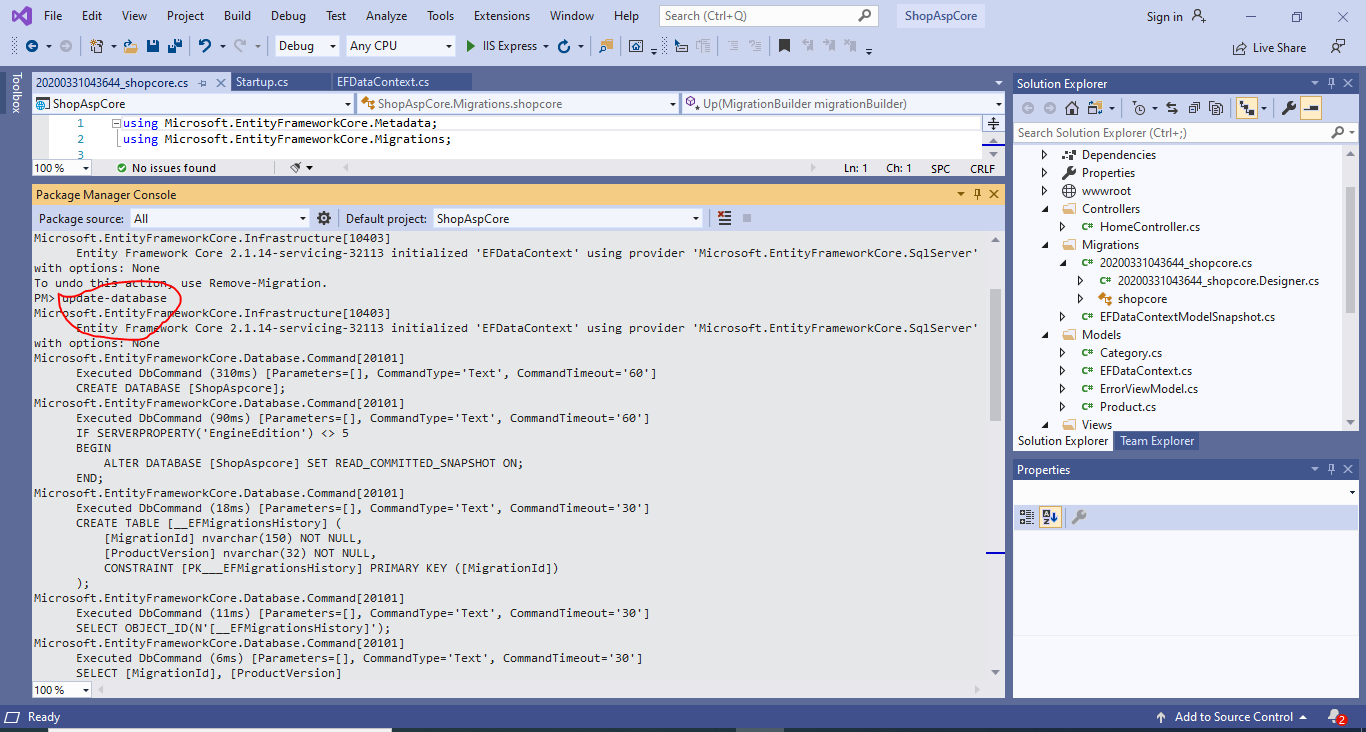
Chạy câu lệnh trên xong, bạn vào SQL SERVER của bạn sẽ thấy một database mới