
Đầu tiên chúng ta có thể cài đặt thông qua các câu lệnh dưới đây
# Redux + Plain JS template
npx create-react-app my-app --template redux

# Redux + TypeScript template
npx create-react-app my-app --template redux-typescript
Bộ công cụ Redux có sẵn dưới dạng gói trên NPM để sử dụng với gói mô-đun hoặc trong ứng dụng Node:
# NPM
npm install @reduxjs/toolkit

# Yarn
yarn add @reduxjs/toolkit
Bộ công cụ Redux bao gồm các API này: configureStore(), createReducer(), createAction(), createSlice(), createAsyncThunk, createEntityAdapter, createSelector , mọi người có thể tim hiều và các hàm này nhé!
+ configureStore() : cấu hình các store reducers trong đây nhé, đồng thời viết các middleware vào đây luôn
export const store = configureStore({
  reducer: {
    counter: counterReducer,
     users : usersReducer,
     posts : postsReducer,
     ......
  },
   // chổ concat ta có thể đưa vào [] mảng list middleware concat[...]
   middleware: (getDefaultMiddleware) => getDefaultMiddleware().concat(logger),
});
Bạn có thể tìm thêm tại đây: https://redux-toolkit.js.org/api/configureStore
+ createReducer() : Ta hiểu như thế này, ta cần viết các actions trong reducers, nó sẽ kiểm trả xem dispatch action vào có nằm trong case reducers hay không, nếu nó nằm trong đó sẽ tiến hành update state
createReducer(0, {
  increment: (state, action: PayloadAction<number>) => state + action.payload,
})
Ví dụ bạn nhìn dưới đây, dưới đây là cách đơn giản ta cấu hình các actions trong reducers
function todosReducer(state = [], action) {
  switch (action.type) {
    case 'ADD_TODO': {
      return state.concat(action.payload)
    }
    case 'TOGGLE_TODO': {
      const { index } = action.payload
      return state.map((todo, i) => {
        if (i !== index) return todo

        return {
          ...todo,
          completed: !todo.completed,
        }
      })
    }
    case 'REMOVE_TODO': {
      return state.filter((todo, i) => i !== action.payload.index)
    }
    default:
      return state
  }
}
Còn nếu bạn muốn viết theo kểu rút gọn thì ta có thể dùng cách sau:
const todosReducer = createReducer([], (builder) => {
  builder
    .addCase('ADD_TODO', (state, action) => {
      // "mutate" the array by calling push()
      state.push(action.payload)
    })
    .addCase('TOGGLE_TODO', (state, action) => {
      const todo = state[action.payload.index]
      // "mutate" the object by overwriting a field
      todo.completed = !todo.completed
    })
    .addCase('REMOVE_TODO', (state, action) => {
      // Can still return an immutably-updated value if we want to
      return state.filter((todo, i) => i !== action.payload.index)
    })
})
+ createAction() : Cách thông thường để xác định một hành động trong Redux là khai báo riêng một hằng số loại hành động và một hàm tạo hành động để xây dựng các hành động thuộc loại đó.
import { createAction } from '@reduxjs/toolkit'

const increment = createAction<number | undefined>('counter/increment')

let action = increment()
// { type: 'counter/increment' }

action = increment(3)
// returns { type: 'counter/increment', payload: 3 }

console.log(increment.toString())
// 'counter/increment'

console.log(`The action type is: ${increment}`)
// 'The action type is: counter/increment'
::) Các bạn tìm hiểu thêm về các API của Redux thêm nhé
Okay bây giờ mình sẽ tạo một project bằng template redux nhé :
# Redux + Plain JS template
npx create-react-app my-app --template redux
Sau khi thực hiện câu lệnh trên ta sẽ được project như thế này
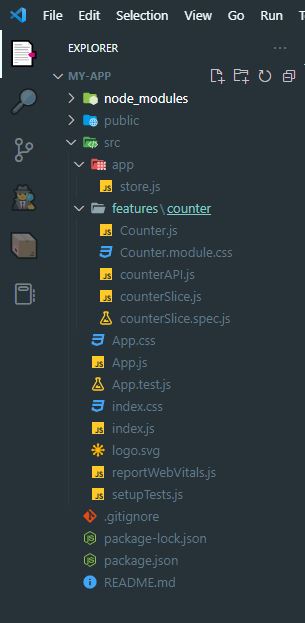
Giờ mình đi tìm hiểu sơ qua về các file trong thư mục project trên thử nhé.
+ app/store.js:
import { configureStore } from '@reduxjs/toolkit';
import counterReducer from '../features/counter/counterSlice';

export const store = configureStore({
  reducer: {
    counter: counterReducer,
  },
});
Ta thấy nó có gọi thư viện @reduxjs/toolkit , đồng thời gọi file counterSlice trong đường dẫn ../features/counters , xong rồi nó nó cấu hình store gọi hàm configureStore
configureStore: nó là một trong các bộ API của Redux, nó giúp ta cấu hình các store, đồng thời ta có thể thiết lập các middleware trong đây luôn
Middleware là gì? chúng ta cũng biết là middleware là một thằng đứng trung gian, nó có nhiệm vụ kiểm tra những thứ cần đúng theo yêu cầu mà ta cần đề ra, nếu mọi thứ đúng hết nó nó mới cho phép các phép toán tiếp theo. Hiểu đơn giản nhất là mọi yêu cầu của bạn cần gửi đi phải đi qua thằng này trước, nó thấy ok thì nó cho đi tiếp.
+ features/counter/counterSlice.js
import { createAsyncThunk, createSlice } from '@reduxjs/toolkit';
import { fetchCount } from './counterAPI';

const initialState = {
  value: 0,
  status: 'idle',
};

// The function below is called a thunk and allows us to perform async logic. It
// can be dispatched like a regular action: `dispatch(incrementAsync(10))`. This
// will call the thunk with the `dispatch` function as the first argument. Async
// code can then be executed and other actions can be dispatched. Thunks are
// typically used to make async requests.
export const incrementAsync = createAsyncThunk(
  'counter/fetchCount',
  async (amount) => {
    const response = await fetchCount(amount);
    // The value we return becomes the `fulfilled` action payload
    return response.data;
  }
);

export const counterSlice = createSlice({
  name: 'counter',
  initialState,
  // The `reducers` field lets us define reducers and generate associated actions
  reducers: {
    increment: (state) => {
      // Redux Toolkit allows us to write "mutating" logic in reducers. It
      // doesn't actually mutate the state because it uses the Immer library,
      // which detects changes to a "draft state" and produces a brand new
      // immutable state based off those changes
      state.value += 1;
    },
    decrement: (state) => {
      state.value -= 1;
    },
    // Use the PayloadAction type to declare the contents of `action.payload`
    incrementByAmount: (state, action) => {
      state.value += action.payload;
    },
  },
  // The `extraReducers` field lets the slice handle actions defined elsewhere,
  // including actions generated by createAsyncThunk or in other slices.
  extraReducers: (builder) => {
    builder
      .addCase(incrementAsync.pending, (state) => {
        state.status = 'loading';
      })
      .addCase(incrementAsync.fulfilled, (state, action) => {
        state.status = 'idle';
        state.value += action.payload;
      });
  },
});

export const { increment, decrement, incrementByAmount } = counterSlice.actions;

// The function below is called a selector and allows us to select a value from
// the state. Selectors can also be defined inline where they're used instead of
// in the slice file. For example: `useSelector((state: RootState) => state.counter.value)`
export const selectCount = (state) => state.counter.value;

// We can also write thunks by hand, which may contain both sync and async logic.
// Here's an example of conditionally dispatching actions based on current state.
export const incrementIfOdd = (amount) => (dispatch, getState) => {
  const currentValue = selectCount(getState());
  if (currentValue % 2 === 1) {
    dispatch(incrementByAmount(amount));
  }
};

export default counterSlice.reducer;
Ta nhìn cái 1 đóng code trên ta thấy nó có import createAsyncThunk, createSlice từ @reduxjs/toolkit'
createAsyncThunk để tạo ra các async action. ta có thể viết fetch ở trong đây nhé
export const incrementAsync = createAsyncThunk(
  'counter/fetchCount',
  async (amount) => {
    const response = await fetchCount(amount);
    // The value we return becomes the `fulfilled` action payload
    return response.data;
  }
);
hoặc bạn có thể viết fetch api trực tiếp như sau:
export const login = createAsyncThunk(
  // Tên action
  'user/login',

  // Code async logic, tham số đầu tiên data là dữ liệu truyền vào khi gọi action
  async (data, { rejectWithValue }) => {
    // Gọi lên API backend
    const response = await fetch(
      'https://api.test/login',
      {
        method: 'POST',
        headers: {
          'Content-Type': 'application/json',
        },
        body: JSON.stringify(data),
      }
    );

    // Convert dữ liệu ra json
    const jsonData = await response.json();

    // Nếu bị lỗi thì reject
    if (response.status < 200 || response.status >= 300) {
      return rejectWithValue(jsonData);
    }

    // Còn không thì trả về dữ liệu
    return jsonData;
  }
);
+ features/counter/counterAPI.js: nó cũng là một file viết fetch api thôi, giống như mình mới nói bên trên, tại tách riêng ra cho nhìn gọn ràng hơn
// A mock function to mimic making an async request for data
export function fetchCount(amount = 1) {
  return new Promise((resolve) =>
    setTimeout(() => resolve({ data: amount }), 500)
  );
}
Tiếp theo bạn thấy hàm createSlice : Trong Redux Toolkit được sử dụng nhằm để kết hợp giữa actions và reducers lại với nhau và đó chính là nhiệm vụ của slice và được thực thi bằng hàm createSlice
Giờ là cần tạo một số state để cho chức năng counter
const initialState = {
  value: 0,
  status: 'idle',
};
Ta chú ý chổ reducers, ta cần cài đặt các actions trong đây, nói chung nhìn đơn giản cũng dễ hiểu, nếu bạn nào có tìm hiểu qua Redux rồi, thì nhìn vào đoạn mã trên chắc sẽ hiểu thôi, nó kiểm tra các dispatch actions đến có nằm trong reducers không, có thì nó tiến hành update state
 reducers: {
    increment: (state) => {
     // cập nhật state khi ta actions dispatch(increment())
      state.value += 1;
    },
    decrement: (state) => {
     // khi dispatch(decrement())
      state.value -= 1;
    },
    incrementByAmount: (state, action) => {
    // khi dispatch(incrementByAmount(number))
      state.value += action.payload;
    },
  },
Tiếp theo ta hãy xem đoạn code dưới đây nó xử lý rất hay đấy
///Code logic xử lý async action
 extraReducers: (builder) => {
   //Bắt đầu thực hiện action incrementAsync (Promise pending)
    builder
      .addCase(incrementAsync.pending, (state) => {
       // nó đang chạy loading
        state.status = 'loading';
      })
      .addCase(incrementAsync.fulfilled, (state, action) => {
        // Khi thực hiện action  incrementAsync  thành công (Promise fulfilled)
        state.status = 'idle';
        state.value += action.payload;
      });
  },
Nhìn thấy nó hay nhĩ đúng không nào, tôi thấy code xử lý logic trên tuyệt vời, để nửa làm một ví dụ về cái này cho dễ hiểu hơn mới được
Để có thể gọi được các actions trong reducers ta cần exports nó ra như sau:
//export các actions để ta có thể gọi trong component
export const { increment, decrement, incrementByAmount } = counterSlice.actions;

// ta chỉ cần lấy giá trị value của nó
export const selectCount = (state) => state.counter.value;
Bây giờ ta sẽ sử dụng nó trong component như thế nào đây, ta hãy xem Counter.js trong đường dẫn features/counters/
Khai báo câu lệnh sau để có thể select state ra sử dụng và dispatch actions
import { useSelector, useDispatch } from 'react-redux';
.....
function App(){
 // getState selectCount được khái báo trong file counterSlice.js
 const count = useSelector(selectCount);

 // using dispatch actions
  const dispatch = useDispatch();
}
Gọi các ra actions ta đã cấu hình trong counterSlide.js
//counterSlice.js
export const { increment, decrement, incrementByAmount } = counterSlice.actions;

// component Counter.js
import {
  decrement,
  increment,
  incrementByAmount,
  incrementAsync,
  incrementIfOdd,
  selectCount,
} from './counterSlice';
Còn lại là dispatch các actions để xử lý thôi
const [incrementAmount, setIncrementAmount] = useState('2');
const incrementValue = Number(incrementAmount) || 0;

///dispatch
dispatch(decrement())
dispatch(increment())
dispatch(incrementByAmount(incrementValue))
dispatch(incrementAsync(incrementValue))
dispatch(incrementIfOdd(incrementValue))
Okay tìm hiểu sơ qua đây thử, giờ ta thử chạy cái source lên xem có gì thú vị không nào
npm startBạn nào chưa cài plugin Redux thì vào đường link này cài nhé : Redux Devtools Cài đặt xong, bạn thử xem các lần dispatch action xem, nó như thế nào nhé, để bạn dễ hiểu hơn về nó